
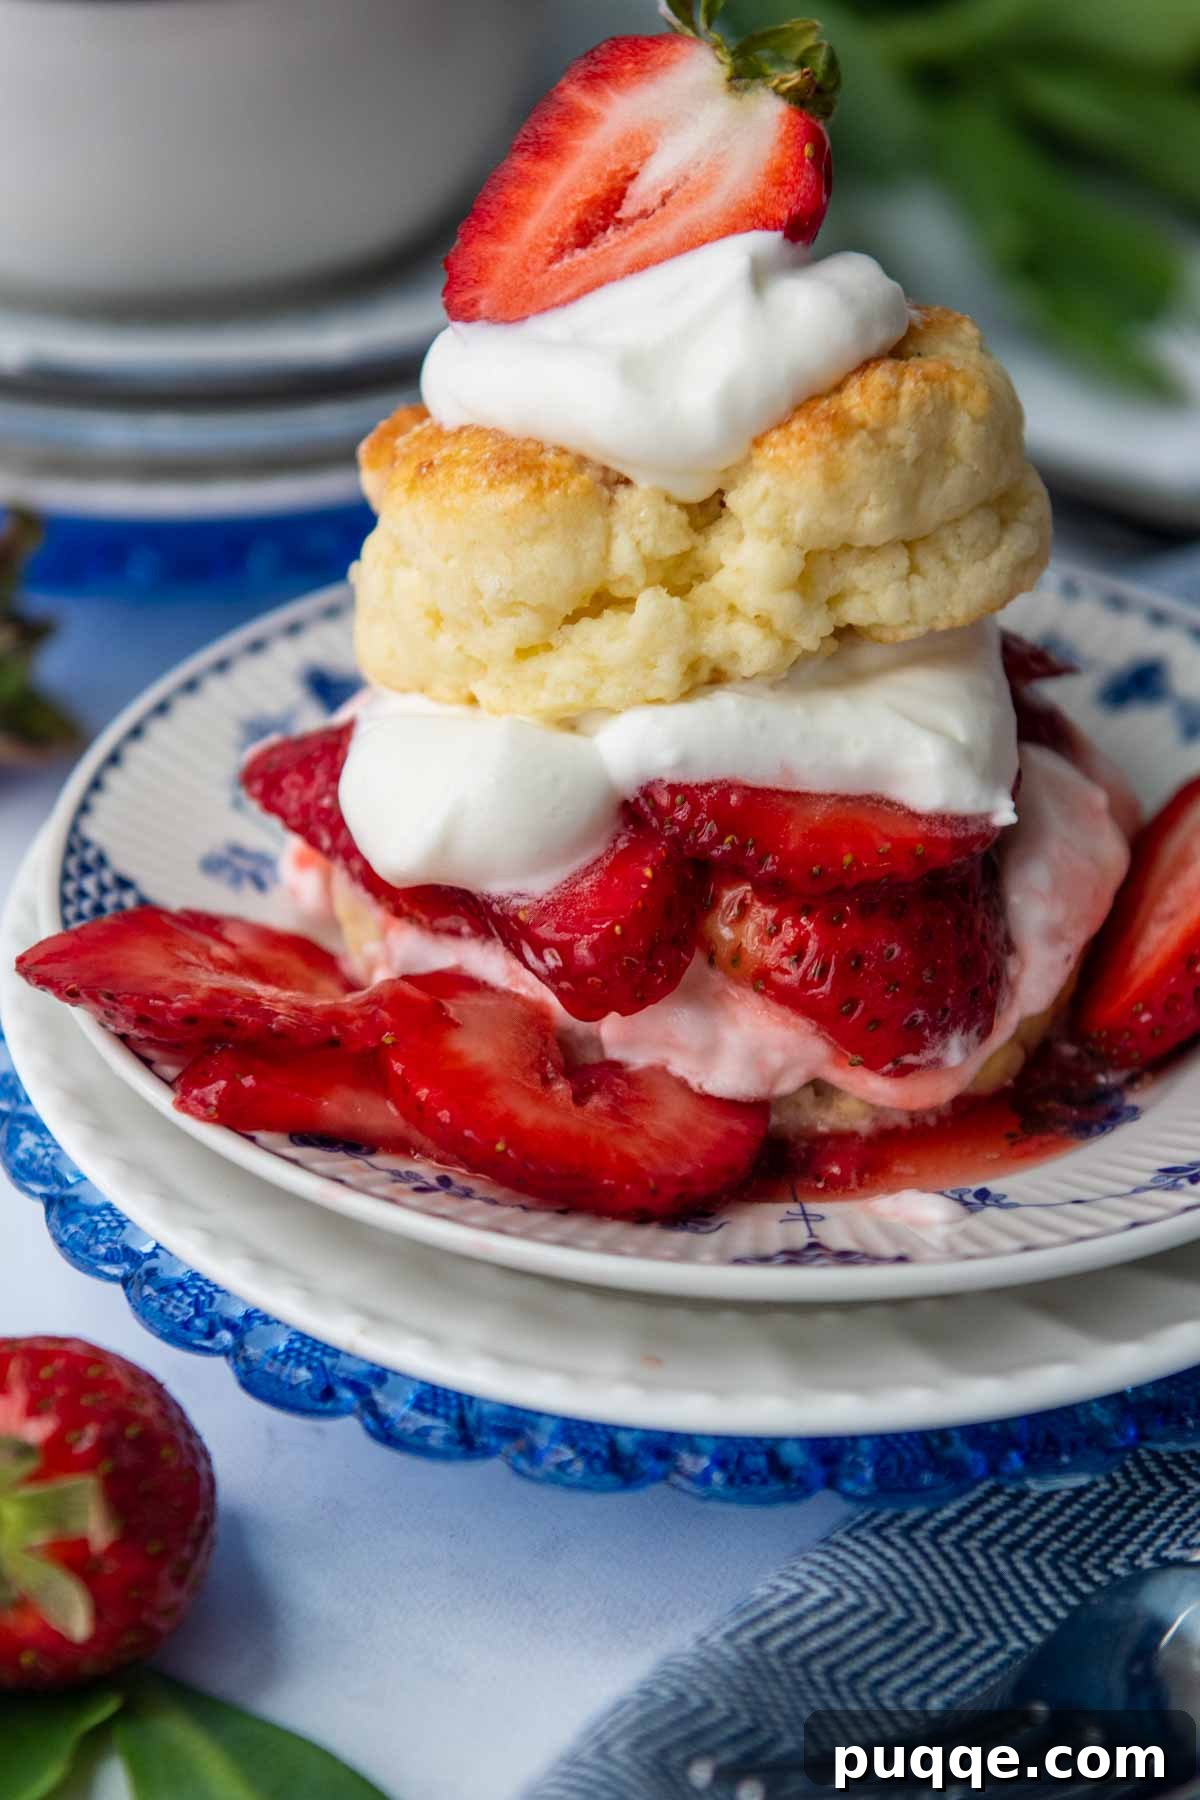
Unlock the secret to the ultimate **homemade gluten-free strawberry shortcake**, a summer dessert masterpiece featuring incredibly fluffy biscuits, a luscious fresh strawberry sauce, and ethereal whipped cream. This isn’t just a recipe; it’s a celebration of seasonal flavors and a testament to delicious gluten-free baking that rivals any traditional version. Prepare to delight your taste buds with every tender, fruit-filled bite.
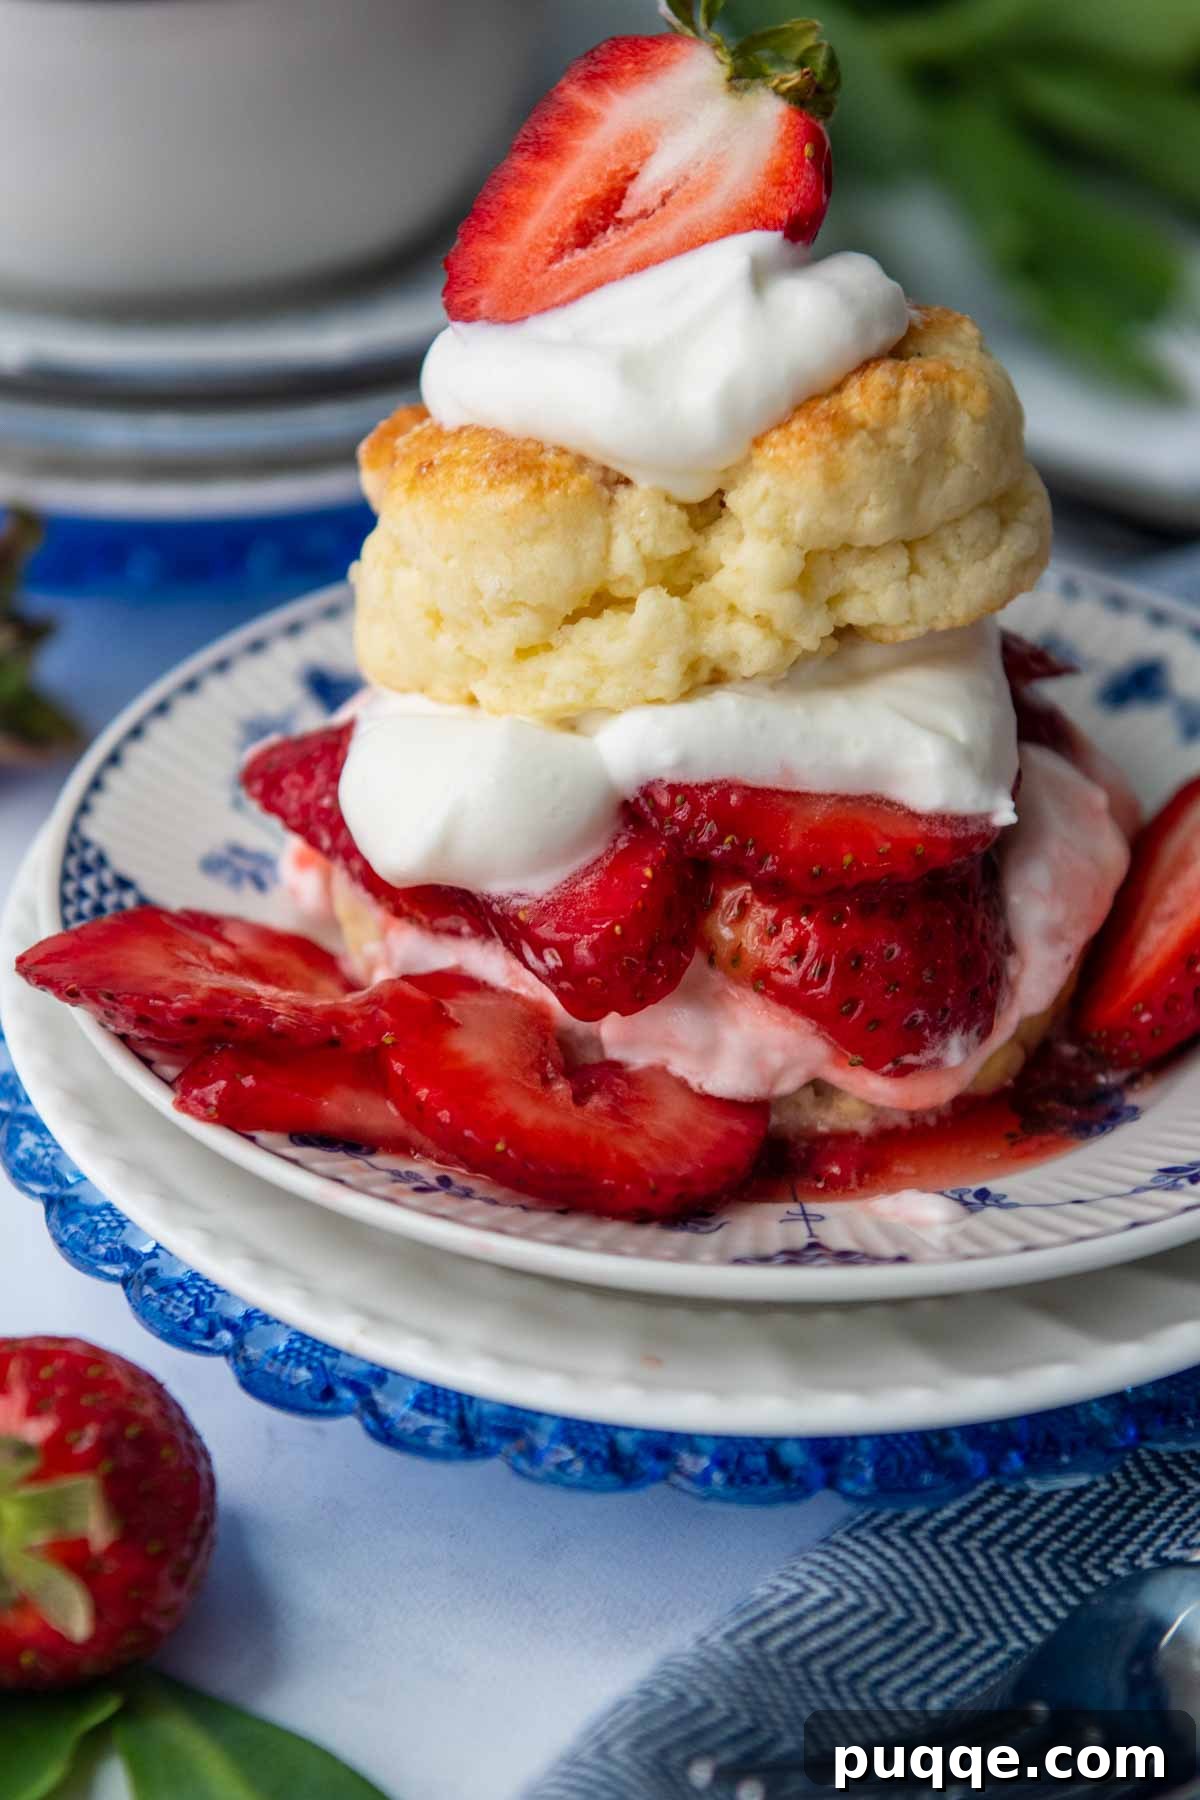
Crafting the Perfect Gluten-Free Strawberry Shortcake
There’s a certain magic to strawberry shortcake, a nostalgic embrace of summer days and sweet indulgence. Growing up, our backyard strawberry patch was a treasure trove, and the moment those ruby-red berries ripened, my mom would transform them into an effortless, divine dessert. Bisquick-based shortcakes and freshly whipped cream were staples, a simple pleasure that marked the season.
For those navigating a gluten-free lifestyle, finding a shortcake recipe that delivers on that nostalgic promise – light, fluffy, and tender – can be a challenge. Many gluten-free baked goods can turn out dense or crumbly. But fear not! This recipe has been meticulously developed to ensure your gluten-free shortcake biscuits are as airy and delightful as any traditional shortcake, providing the perfect canvas for juicy strawberries and creamy topping.
If you’re a fan of gluten-free strawberry delights, consider exploring other tempting recipes like our gluten-free strawberry muffins, perfect for breakfast or a snack. For a more rustic treat, our gluten-free strawberry rhubarb crisp offers a wonderful blend of sweet and tart flavors. Both recipes are versatile, working beautifully with either fresh or frozen berries. And if you find yourself with an abundance of fresh strawberries, a classic homemade strawberry pie with a flaky gluten-free crust is always an irresistible option.
The Three Pillars of an Exceptional Shortcake
Creating the best strawberry shortcake, especially a gluten-free version, hinges on three harmonious components:
- Fluffy Gluten-Free Shortcake Biscuits: The foundation of this dessert is a truly remarkable biscuit. We’ve adapted our favorite light and fluffy gluten-free biscuit recipe, enhancing it with a touch more sweetness to perfectly complement the fruit. The result is a tender crumb that eagerly soaks up all the strawberry goodness.
- Fresh Macerated Strawberry Sauce: The magic of this sauce lies in its simplicity and deep flavor. By macerating the strawberries with sugar, they naturally release their sweet, vibrant juices, creating a rich syrup without any cooking. This no-cook method is easy and ensures a fresh, bright taste that truly elevates the shortcake.
- Decadent Whipped Cream: A cloud of homemade whipped cream is the crown jewel. Our recipe includes instructions for a perfectly sweetened, stable whipped cream. For convenience, you can opt for store-bought whipped topping like Cool Whip or choose a dairy-free alternative to suit dietary needs.
Your Step-by-Step Guide to Gluten-Free Shortcake Perfection
Let’s embark on this culinary journey together! Below, you’ll find detailed steps and helpful photos. For precise ingredient measurements and a printable recipe card, please scroll down to the bottom of the page.
Creating the Irresistible Strawberry Sauce Filling
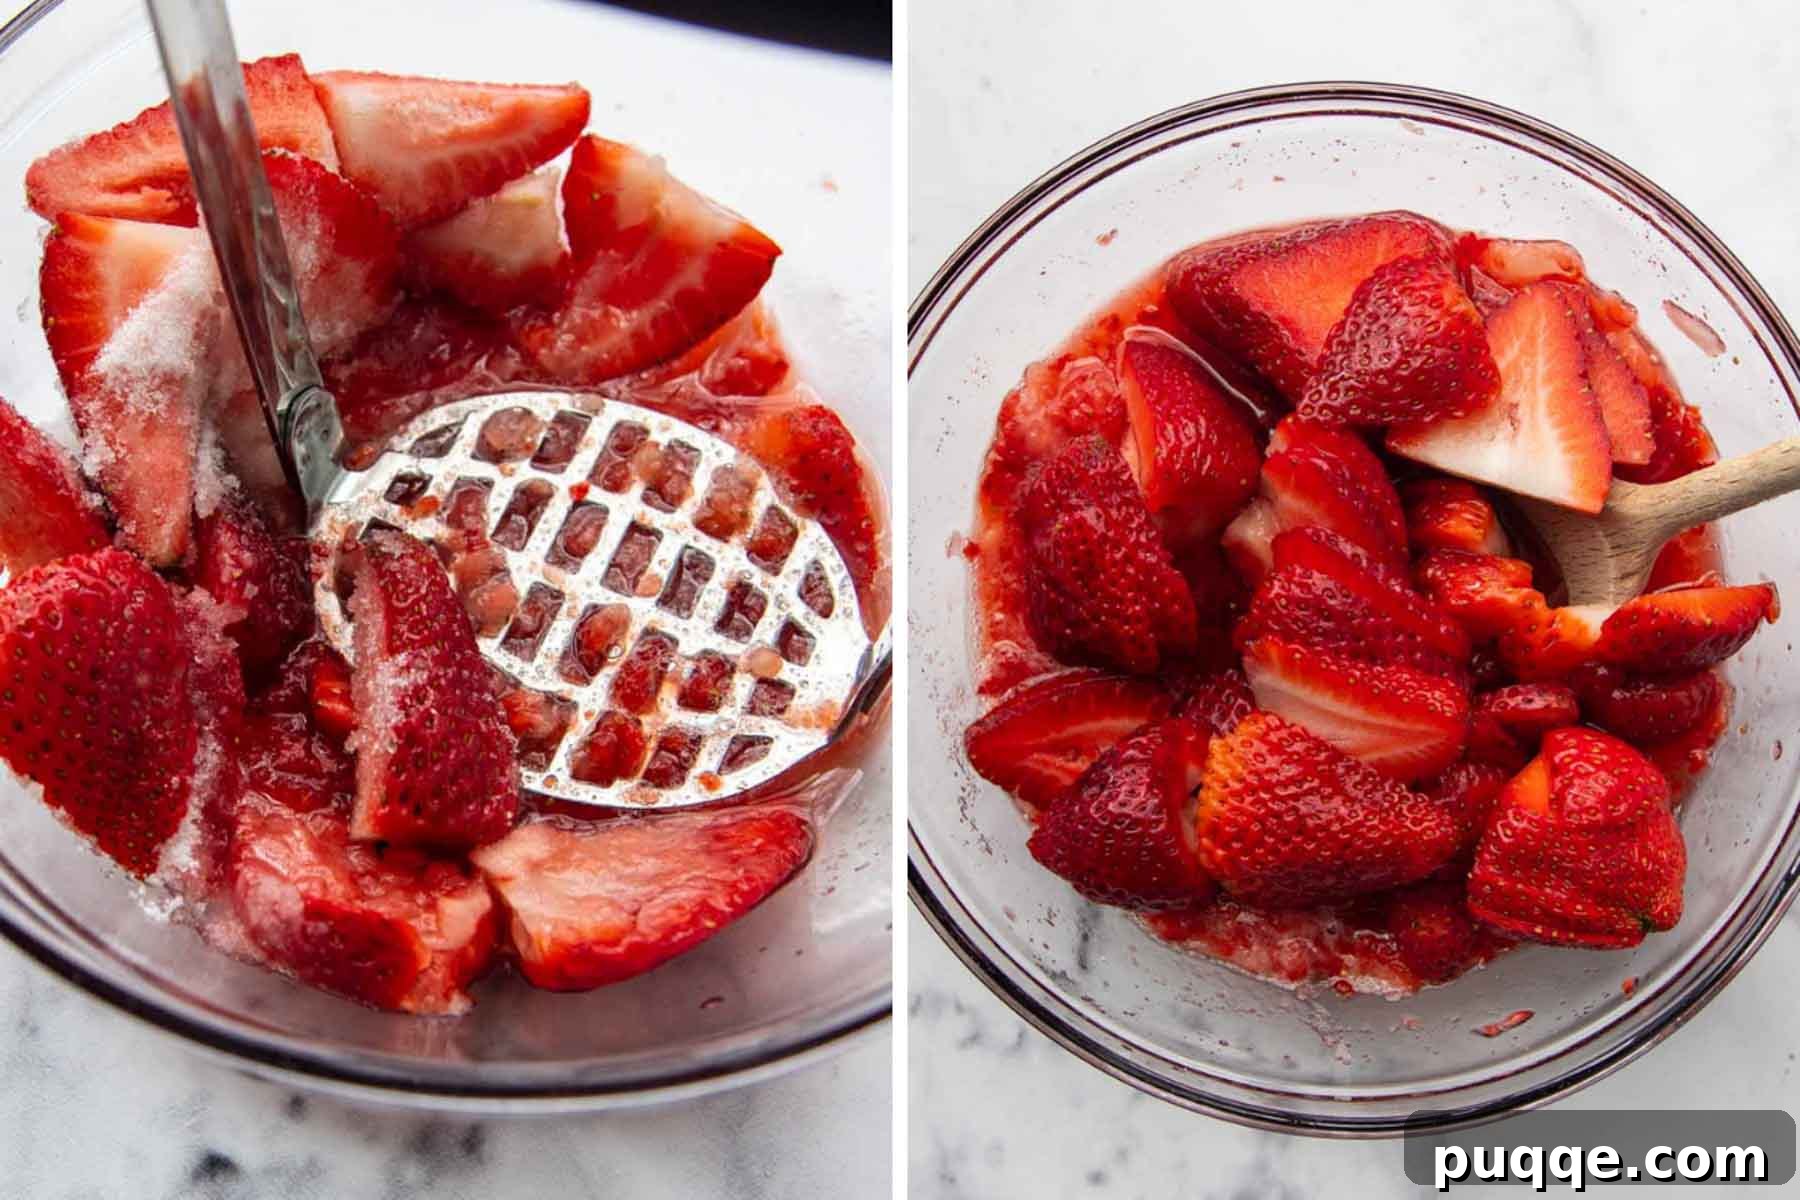
The secret to a profoundly juicy and flavorful strawberry sauce is to start it well in advance of the shortcake. Maceration is a simple yet transformative process where fruit is gently crushed with sugar and allowed to rest, prompting it to release its natural juices. This crucial step takes at least 1-2 hours, so plan accordingly to achieve the best results.
- Begin by slicing about one-third of your fresh strawberries. Place them in a bowl and gently crush them with the granulated sugar using a potato masher or a fork. This initial crushing helps to jumpstart the juice-releasing process.
- Allow the crushed strawberries and sugar mixture to sit at room temperature for a minimum of one hour, and ideally up to two hours. During this time, the sugar will draw out the moisture from the berries, creating a naturally sweet and thick syrup.
- Once the maceration process is complete, slice the remaining fresh strawberries and gently stir them into the crushed berry mixture. The result is a beautiful, semi-pulpy, fresh, no-cook strawberry syrup that’s bursting with natural flavor.
Baking the Fluffy Gluten-Free Shortcake Biscuits
Once your strawberry sauce is macerating beautifully, it’s time to turn our attention to the star of the show: the gluten-free shortcake biscuits. This incredibly easy recipe bypasses the need for rolling and cutting, making it perfect for bakers of all skill levels. Simply mix the dough, drop it onto a baking sheet, and let your oven do the rest!
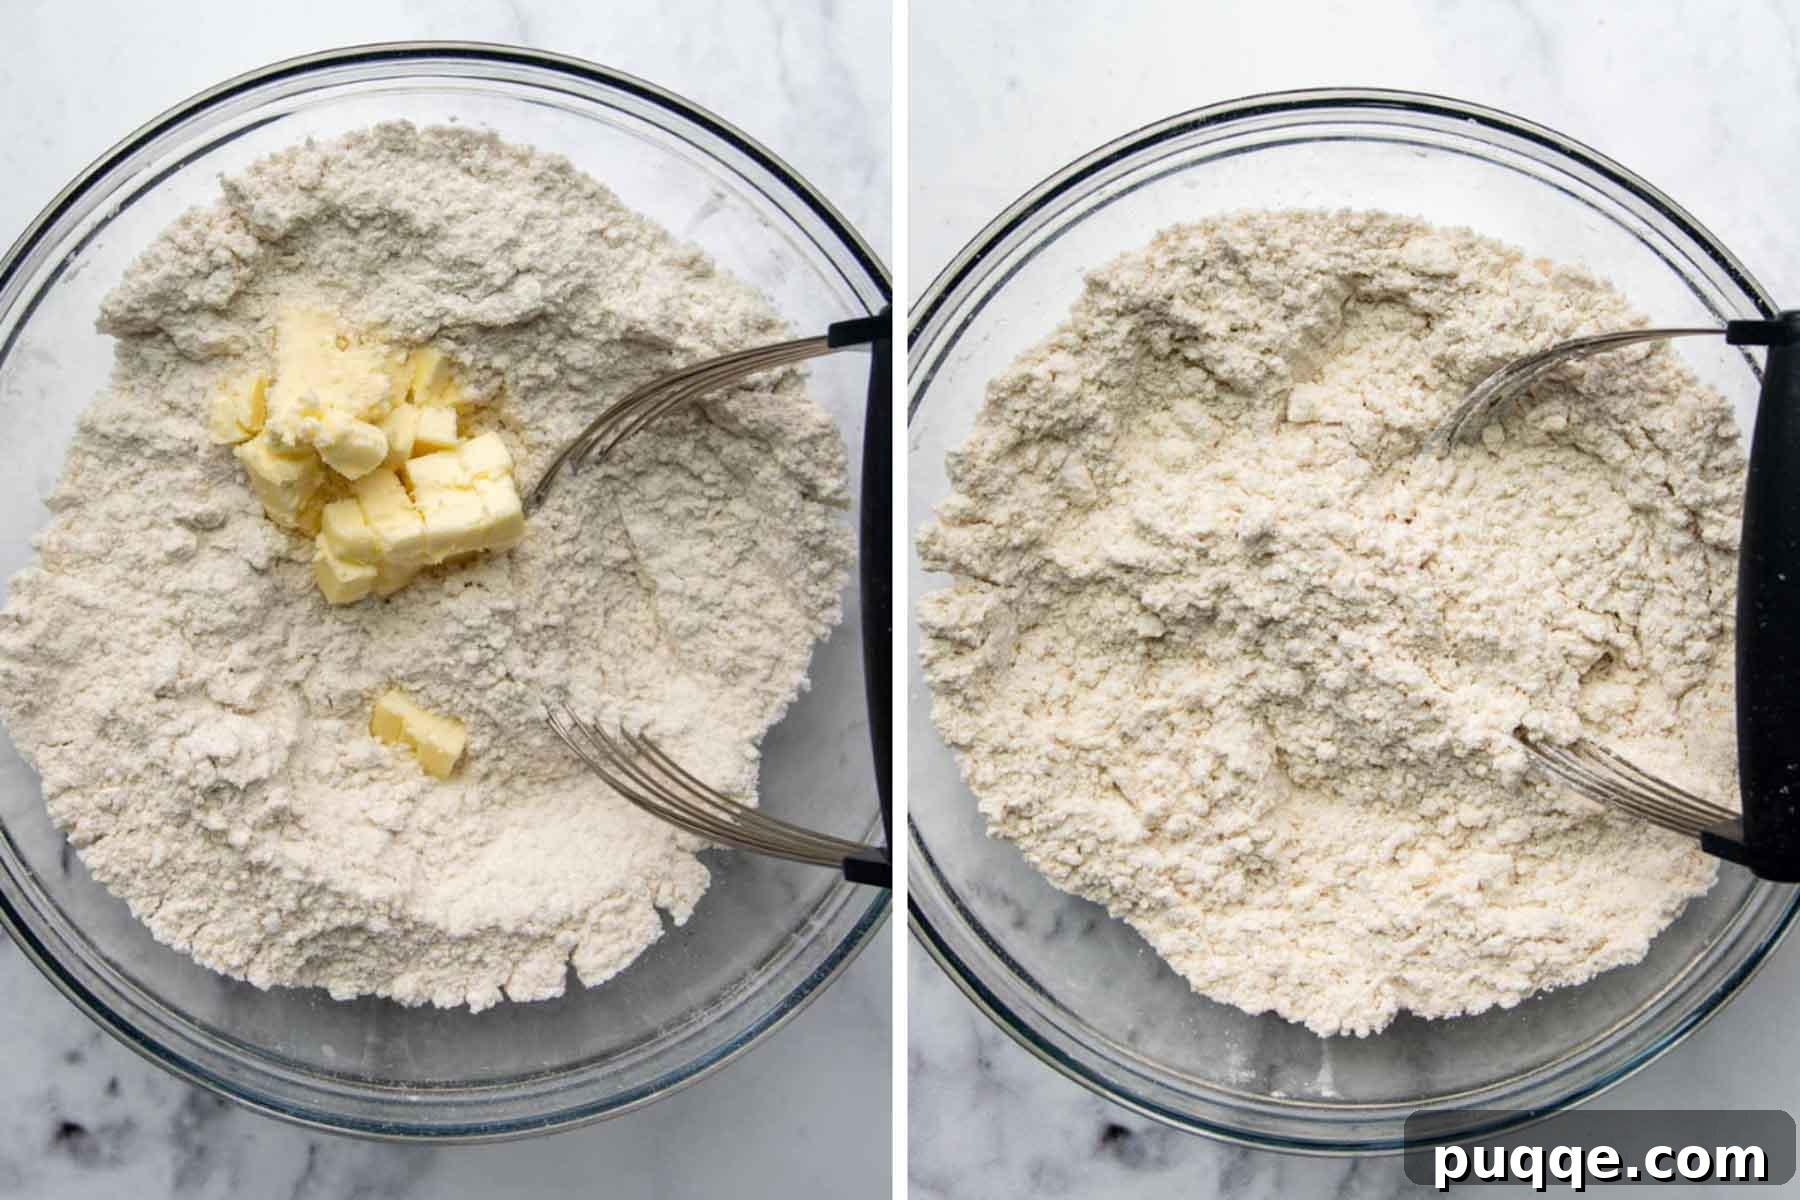
First, in a large mixing bowl, whisk together your dry ingredients: the gluten-free all-purpose flour blend (we highly recommend Cup4Cup for its excellent texture), granulated sugar, baking powder, salt, and a pinch of baking soda. Next, add the cold, small pieces of unsalted butter to the flour mixture. Using a fork, a pastry blender, or even your fingertips, cut the butter into the flour until the mixture resembles coarse meal with some pea-sized butter pieces remaining. This ensures a flaky texture in your baked shortcakes.
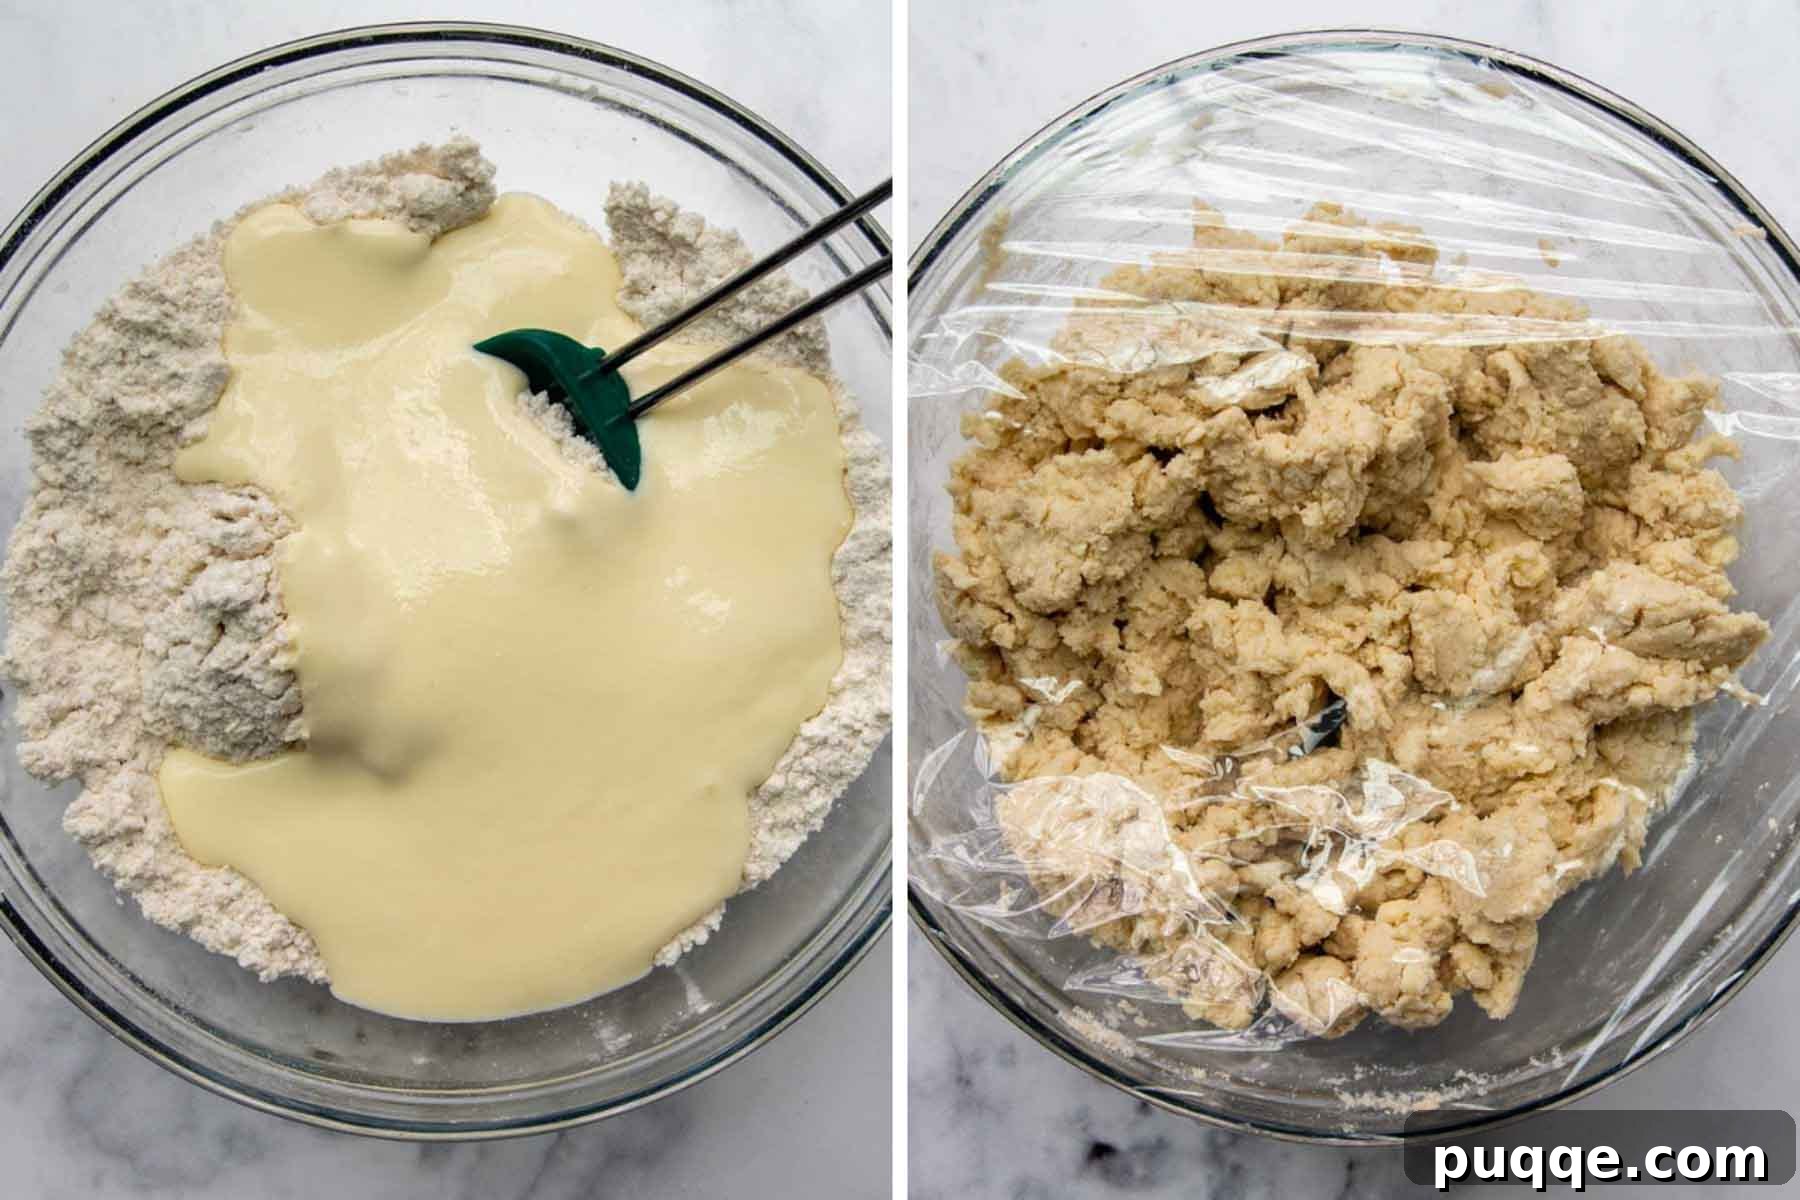
In a separate bowl, whisk together the liquid ingredients: plain yogurt, vegetable or canola oil, a large egg, and fresh lemon juice. The combination of yogurt and lemon juice brilliantly mimics the tangy flavor and tenderizing qualities of buttermilk, while also helping to soften the gluten-free flour blend and prevent any undesirable gritty texture. Gently stir this liquid mixture into the dry ingredients until just combined, being careful not to overmix. A few flour streaks are fine.
Cover the bowl of dough with plastic wrap and let it rest at room temperature for at least 30 minutes. This resting period is a crucial step for gluten-free baking. It allows the gluten-free flour to fully hydrate and the starches to relax, resulting in exceptionally tender, moist, and fluffy shortcake biscuits. While the dough rests, preheat your oven to 425°F (220°C).
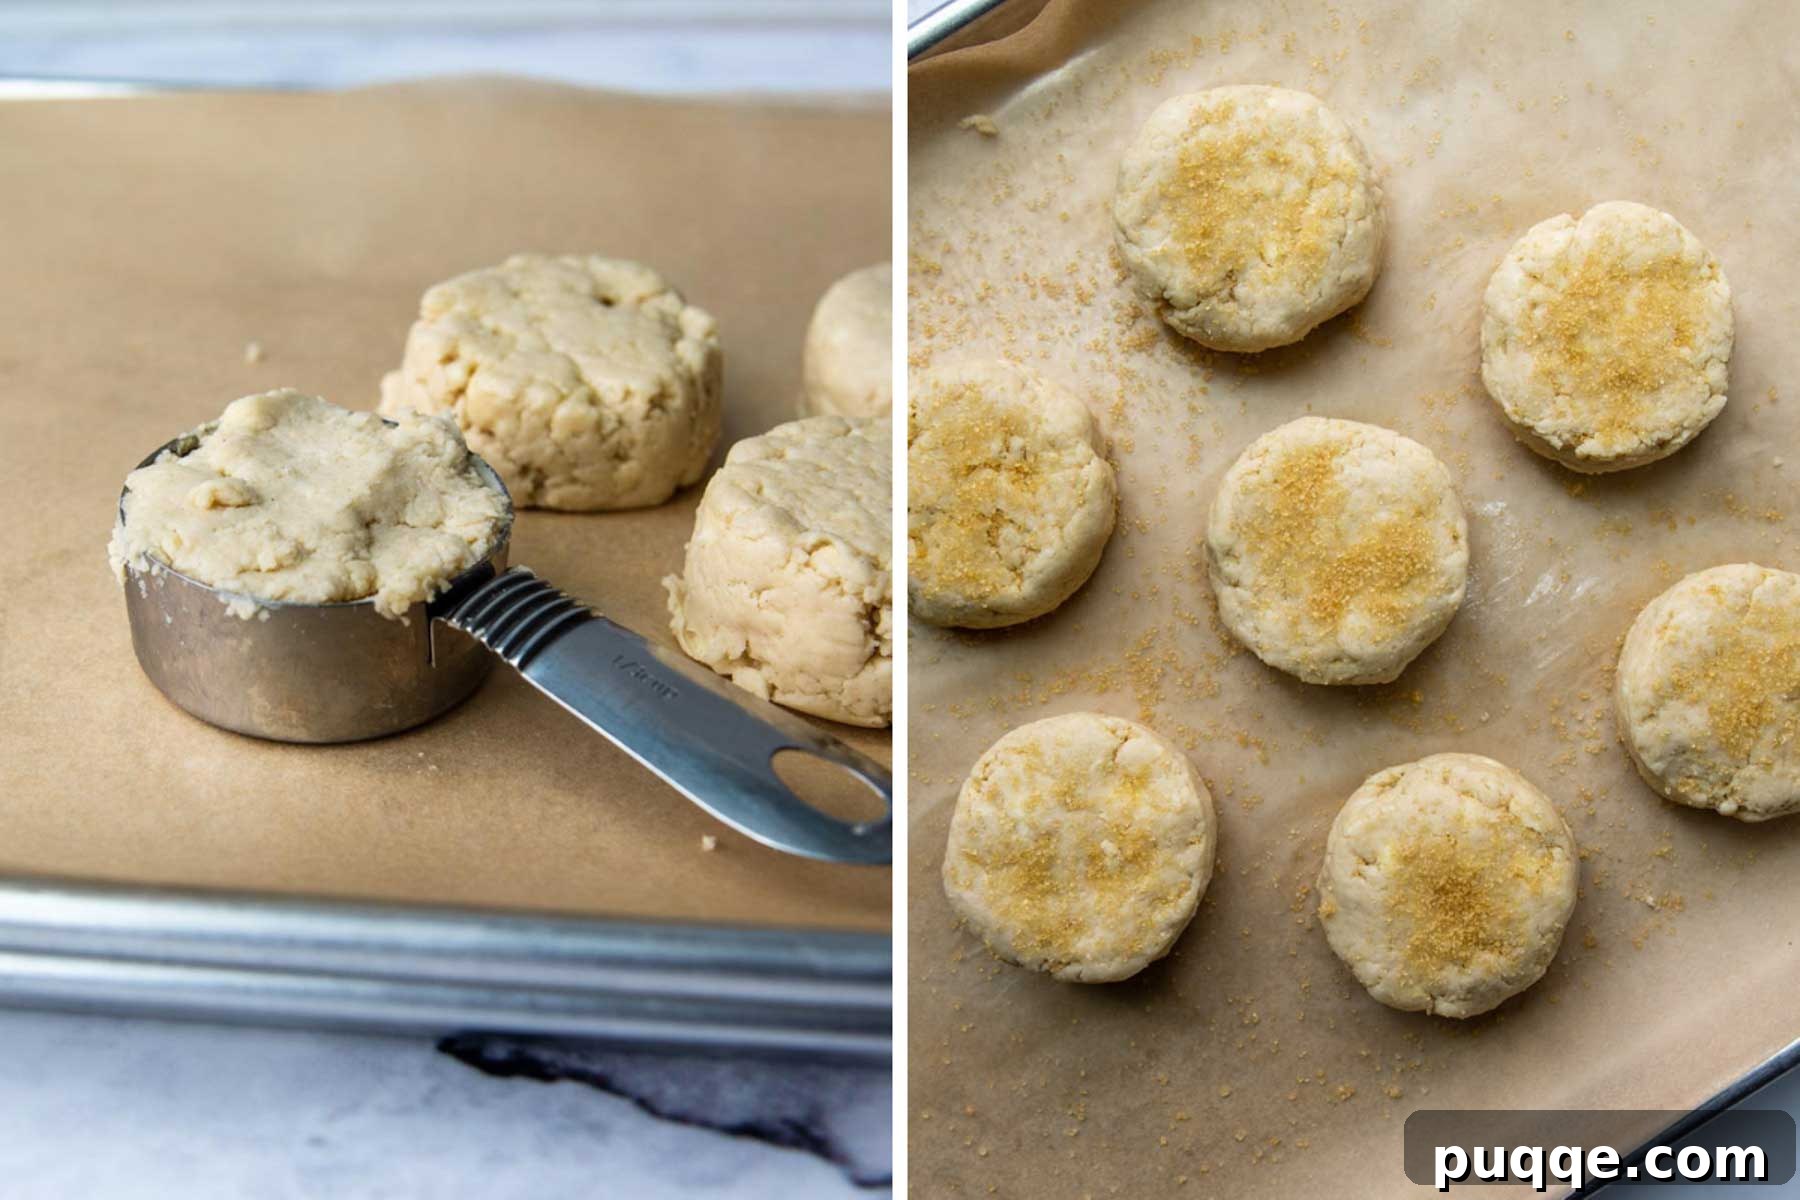
To prepare for baking, take two baking sheets and stack one inside the other. Line the top baking sheet with parchment paper. This clever double-layer technique is essential: it creates an insulating layer that prevents the bottoms of your shortcakes from becoming overly browned or burnt in the high oven temperature, ensuring an evenly baked, golden biscuit.
Lightly grease a 1/3 measuring cup with cooking spray. Scoop a generous amount of the rested shortcake dough into the cup, pressing down slightly to compact it. Carefully turn the dough out onto the prepared double-layered baking sheet, spacing the biscuits about 1 inch apart towards the center of the sheet. This proximity allows for some steam to be trapped between them, contributing to a softer, more tender crumb. Remember to spray your measuring cup lightly between each scoop to prevent sticking.
For a beautiful golden finish and a delightful crunch, brush the tops of the unbaked biscuits with a little milk or cream, if desired, and then sprinkle them generously with turbinado sugar. Bake for approximately 15 minutes, rotating the pan halfway through the baking time to ensure even cooking. Your shortcakes are ready when they are beautifully golden brown and smell wonderfully fragrant. Transfer them to a wire rack to cool slightly before assembling.
Whipping Up Dreamy Homemade Whipped Cream
As your delectable shortcakes cool, it’s the perfect time to prepare the light and airy homemade whipped cream. This simple yet luxurious topping comes together quickly and adds a perfect balance to the sweet strawberries and tender biscuits.
In a large mixing bowl (ideally chilled beforehand for best results), combine very cold heavy cream, granulated sugar, and pure vanilla extract. Using either a handheld mixer or a stand mixer fitted with a whisk attachment, begin beating the mixture on medium-low speed. Continue to beat until the cream starts to thicken and soft peaks begin to form.
Once you reach this stage, increase the mixer speed to high and whip for another 1-2 minutes, or until stable, medium-sturdy peaks form. Be careful not to over-whip, as heavy cream can quickly turn into creamy butter if beaten too long. However, if you accidentally over-whip, don’t despair! You can often bring it back to life by slowly mixing in a small amount of additional cold cream or milk until it reaches the desired consistency.
Beyond Strawberries: Exploring Other Fruit Variations
While strawberry shortcake is a cherished classic, the beauty of this dessert lies in its adaptability. You can easily substitute other seasonal fruits, or even a delightful mixture, for the strawberries. The process for macerating the fruit – combining it with sugar to draw out its natural juices – remains largely the same, ensuring a flavorful topping no matter your choice.
This means shortcake can be a year-round indulgence! Imagine enjoying a burst of summer flavor even in the depths of winter by using fruits like:
- Blueberries: Offer a subtle sweetness and beautiful color.
- Raspberries or Blackberries: Provide a lovely tart contrast.
- Peaches: Fresh, ripe peaches are incredible, and grilling them beforehand adds a smoky sweetness.
- Mango: For a tropical twist, perfectly ripe mango chunks are delightful.
- Guava: A unique, aromatic option for adventurous palates.
- Pears: Especially good in the cooler months, perhaps with a hint of cinnamon.
- Cranberries: A wonderful tart option for holiday-themed shortcakes, possibly with a touch more sugar.
- Pineapple: Fresh or lightly grilled pineapple brings a vibrant, tangy sweetness.
- Cherries: Sweet or tart, pitted cherries make a beautiful and delicious topping.
Tips for Shortcake Success
Achieving the perfect gluten-free strawberry shortcake is easier with a few key insights. Here are our top tips to ensure your dessert turns out flawless every time:
- Prioritize Maceration: Always make your fruit sauce first and allow ample time (1-2 hours) for the strawberries to macerate. This ensures the juiciest, most flavorful sauce that truly penetrates the biscuits.
- Cold Butter is Key: For flaky biscuits, ensure your butter is very cold and cut into small pieces before incorporating it into the flour. This creates pockets of steam during baking, leading to light layers.
- Don’t Overmix the Dough: Overmixing gluten-free dough can lead to a tougher texture. Mix only until the ingredients are just combined and no dry flour streaks remain.
- The Power of the Rest: The 30-minute resting period for the biscuit dough is non-negotiable. It allows the gluten-free flour to hydrate fully, resulting in a tender, moist, and less crumbly shortcake.
- Double Baking Sheets: This simple trick is a game-changer for preventing burnt biscuit bottoms, ensuring an even golden hue and perfect texture.
- Sugar Topping: Brushing the tops of the unbaked shortcakes with milk or cream before sprinkling with turbinado sugar provides a beautiful golden crust and a delightful sugary crunch. Regular granulated sugar or sanding sugar can also be used.
- Enhance the Sauce: For an adult twist, a tablespoon of Grand Marnier or Chambord liqueur can add a sophisticated depth of flavor to your fruit sauce.
- Frozen Fruit Option: Don’t limit shortcake to fresh berry season! Frozen strawberries or other fruits can be used effectively. Thaw them first and proceed with the maceration as usual.
- Whipping Cream Rescue: If you accidentally over-whip your cream into a slightly grainy, solidified state, you can often save it by gently beating in a small amount of additional cold cream or milk until it smooths out.
- Reviving Refrigerated Whipped Cream: If leftover whipped cream becomes runny in the refrigerator, re-whip it with a small amount of powdered sugar. Ensure it’s very cold before re-whipping for the best results.
Serving and Assembly
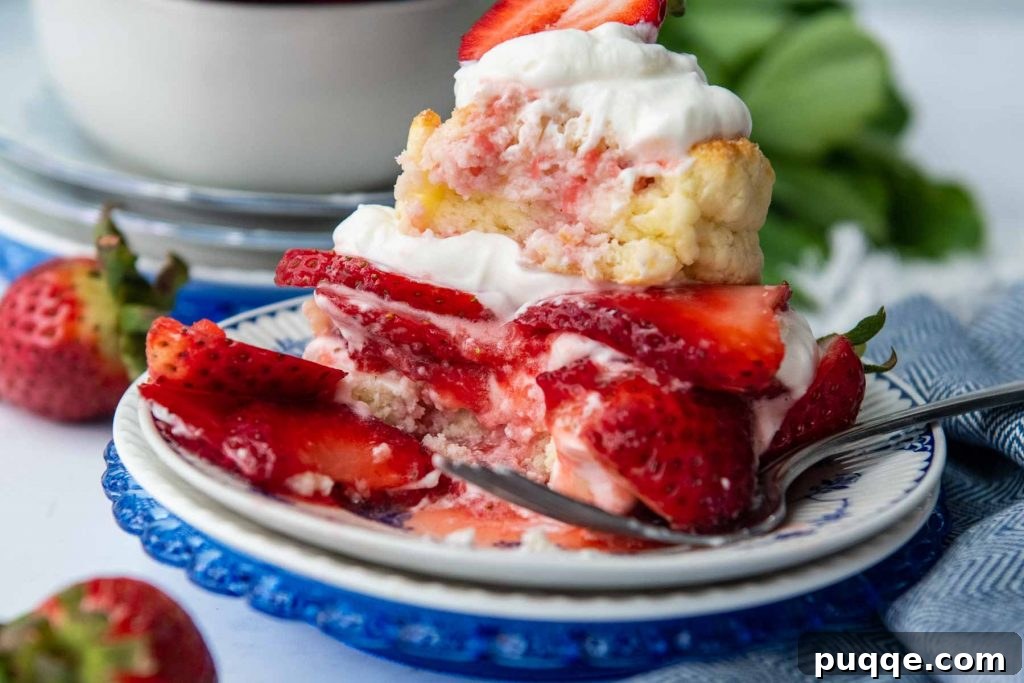
Assembling your gluten-free strawberry shortcake is the most satisfying part! Once your biscuits are slightly cooled, and your strawberry sauce and whipped cream are ready, it’s time to bring it all together. Carefully split each biscuit horizontally through the middle using a serrated knife. Spoon a generous amount of the macerated strawberries and their juicy sauce onto the bottom half of the biscuit. Then, crown the strawberries with a dollop (or two!) of homemade whipped cream. Finally, gently place the top half of the biscuit on top. For an extra touch of indulgence, serve with additional whipped cream and sauce on the side. A sprig of fresh mint can add a beautiful color contrast and aromatic finish.
Storage and Make-Ahead Instructions
To enjoy this delightful dessert at its peak freshness, proper storage is key. Ideally, assemble shortcakes just before serving. However, individual components can be prepared in advance:
- Shortcake Biscuits: Once completely cooled, store the baked gluten-free shortcake biscuits at room temperature in an airtight container for up to two days. To freeze, wrap each biscuit individually in plastic wrap, then transfer them to a freezer-safe ziplock bag. They can be frozen for up to three months. Thaw at room temperature or gently reheat in a low oven for a few minutes.
- Strawberry Sauce: The macerated strawberry sauce can be stored in the refrigerator, covered securely, for up to two days. For the freshest taste and texture, it’s best to add the freshly sliced (un-macerated) strawberries just before serving. Leftover sauce can also be frozen for up to two months. Note that upon thawing, the texture may be softer and slightly more pulpy.
- Whipped Cream: Refrigerate any leftover homemade whipped cream in an airtight container for up to two days. Ensure it’s very cold before serving, and give it a quick whisk if it needs a little refreshing. Whipped cream can also be piped into individual serving-sized mounds on a parchment-lined tray and frozen. Once solid, transfer to a freezer bag and store for future use as a quick topping.
Frequently Asked Questions (FAQ)
We’ve gathered some common questions to help you perfect your gluten-free strawberry shortcake!
Q: Can I use any gluten-free flour blend for the shortcakes?
A: While many all-purpose gluten-free flour blends are available, results can vary significantly due to different starch and gum content. We highly recommend using a cup-for-cup or “measure for measure” gluten-free flour blend, such as Cup4Cup, for the best results, as it’s formulated to closely mimic wheat flour in recipes. If using another brand, you might need to slightly adjust liquid amounts.
Q: Can I use frozen strawberries instead of fresh ones?
A: Absolutely! Frozen strawberries work perfectly, especially if fresh ones are out of season. Thaw them completely before beginning the maceration process. Keep in mind that thawed frozen berries may release more liquid, so you might want to drain a small amount before macerating if the berries seem excessively watery.
Q: How can I prevent my shortcakes from getting soggy?
A: The key to preventing soggy shortcakes is to assemble them just before serving. The biscuits absorb the strawberry juices quickly, so for the best texture, keep the components separate until you’re ready to enjoy. If you’re serving a crowd, you can prep everything ahead and let guests assemble their own!
Q: Can I make this recipe dairy-free?
A: Yes, you can! For the shortcakes, substitute the plain yogurt with a plain, unsweetened dairy-free yogurt (such as almond or coconut-based). For the whipped cream, use a full-fat canned coconut cream (chilled overnight, use the thick cream from the top of the can) or a store-bought dairy-free whipped topping. Ensure any butter used is also dairy-free.
Q: How long do homemade gluten-free strawberry shortcakes last?
A: Assembled shortcakes are best enjoyed immediately. If stored, they will start to soften as the biscuits absorb moisture. The individual components, stored separately, last longer: biscuits for 2 days at room temperature (or 3 months frozen), strawberry sauce for 2 days in the fridge (or 2 months frozen), and whipped cream for 2 days in the fridge.
Save this recipe to your Pinterest board!
Let’s be friends on Pinterest! I’m always sharing great recipes!
Did you make this recipe? I love hearing from you! Leave a star rating and comment below the recipe card. It helps others when searching for recipes and I appreciate feedback from our community. You will always hear back from me! -Melissa
Fluffy, Tender Gluten Free Strawberry Shortcake

Melissa Erdelac
Make the best homemade gluten-free strawberry shortcake recipe with fluffy biscuits, a fruity fresh strawberry sauce, and heavenly whipped cream for summer dessert perfection.
Pin Recipe
Rate This Recipe
Ingredients
Strawberry Sauce
- 2 pounds strawberries, hulled and sliced
- 6 tablespoons granulated sugar
Gluten-Free Shortcake
- 2 cups all-purpose gluten-free flour blend (I highly recommend Cup4Cup gluten-free flour)
- 2 tablespoons granulated sugar
- 4 teaspoons baking powder
- ¼ teaspoon baking soda
- ½ teaspoon salt
- 3 tablespoons unsalted butter, chilled and cut into small pieces
- ¾ cup plain yogurt
- 1 large egg
- 2 tablespoons vegetable or canola oil
- 2 teaspoons lemon juice, or substitute vinegar
- 1 tablespoon turbinado sugar (for topping)
Whipped Cream
- 1 cup heavy cream, well chilled
- 3 tablespoons granulated sugar
- 1 teaspoon vanilla extract
Equipment
- Baking Sheets
- Pastry Cutter
- Potato Masher
Instructions
Strawberry Sauce
- Place one-third of the sliced strawberries in a bowl and sprinkle sugar on top. Use a potato masher or fork to crush strawberries with sugar.
- Stir in the remaining sliced strawberries. Cover the bowl and let it sit at room temperature for up to 2 hours. This crucial maceration process helps the strawberries soften and release their delicious, juicy syrup.
Gluten-Free Shortcakes
- In a large bowl, whisk together the gluten-free flour, 2 tablespoons granulated sugar, baking powder, baking soda, and salt. Add the chilled butter pieces to the flour mixture. Using a pastry blender, fork, or your fingers, cut the butter into the flour until small, pea-sized pieces remain.
- In a separate bowl, whisk together the yogurt, egg, oil, and lemon juice. Stir the yogurt mixture into the flour mixture until no flour pockets remain and the ingredients are thoroughly combined. Cover the bowl with plastic wrap and let the dough sit for 30 minutes at room temperature. This resting period hydrates the flour and relaxes the starches, resulting in tender biscuits. Preheat your oven to 425ºF (220°C).
- Place one baking sheet inside a second baking sheet (creating a double layer) and line the top baking sheet with parchment paper. Grease a 1/3 cup measuring cup with cooking spray. Scoop a heaping amount of biscuit dough into the greased measuring cup, pressing down slightly. Drop the dough onto the prepared baking sheet, spacing biscuits about 1 inch apart in the center of the sheet. Spray the measuring cup between each scoop of dough to prevent sticking.
- Sprinkle turbinado sugar on top of each biscuit. If desired, brush a little milk or cream on the biscuit tops before sprinkling the sugar. Bake on the LOWER RACK until golden brown, about 15 minutes, rotating the pan halfway through for even baking. Transfer the baking sheet to a wire rack and cool the shortcakes for at least 10 minutes before serving with strawberries and whipped cream.
Whipped Cream
- Using a large mixing bowl and either a handheld mixer or a stand mixer fitted with a whisk attachment, beat together the cold heavy cream, 3 tablespoons granulated sugar, and vanilla extract on medium-low speed until the mixture starts to thicken.
- Increase the speed to high and continue to whip until stable, soft-to-medium peaks form, typically about 1-2 minutes longer. Be careful not to over-whip.
Assembly
- Carefully split each cooled shortcake biscuit through the middle horizontally. Spoon a generous amount of strawberries with their sauce onto the bottom half of the biscuit. Top the strawberries with a dollop of whipped cream and place the second half of the biscuit on top. Serve immediately with additional whipped cream and sauce, if desired.
Notes
Best Tips
- Make the fruit sauce first to allow the strawberries to macerate. Sitting for 1-2 hours makes the juiciest sauce.
- Brush milk or cream on the unbaked shortcake before sprinkling with turbinado sugar (alternatively use regular granulated sugar, Sugar in the Raw, or sanding sugar) for a golden, crunchy topping.
- Add a tablespoon of Grand Marnier or Chambord liqueur to flavor the fruit sauce for an extra touch of sophistication.
- Frozen strawberries or other fruits may be used in place of fresh; ensure they are thawed first.
- If you accidentally over-whip the cream, you can often bring it back to life by beating in additional cold cream or milk.
- If refrigerated whipped cream becomes runny, re-whip it with a little powdered sugar to make it sturdy and stabilized again. Ensure the whipped cream is very cold before re-whipping.
Make Ahead / Storing / Freezing
- Shortcake: Cool completely and store at room temperature in an airtight container for up to two days. To freeze, wrap each biscuit individually in plastic wrap and transfer to a freezer-safe ziplock bag. Freeze for up to 3 months.
- Strawberry Sauce: Store the sauce in the refrigerator, covered securely, for up to 2 days. For best results, don’t add the freshly sliced strawberries until just before serving. Freeze leftover sauce for up to 2 months; upon thawing, the texture may become softer and more pulpy.
- Whipped Cream: Refrigerate any leftover whipped cream in an airtight container for up to two days. Whipped cream may also be piped into serving-sized mounds and frozen on a parchment-lined tray; once solid, transfer to a freezer bag.
Nutrition Information (per serving)
Calories: 453kcal,
Carbohydrates: 57g,
Protein: 7g,
Fat: 24g,
Saturated Fat: 15g,
Cholesterol: 86mg,
Sodium: 286mg,
Potassium: 504mg,
Fiber: 6g,
Sugar: 28g,
Vitamin A: 725IU,
Vitamin C: 77mg,
Calcium: 201mg,
Iron: 2mg
⭐ Did you make this recipe? Please leave a star rating and review below. It helps others when searching for recipes, and I LOVE your feedback!