
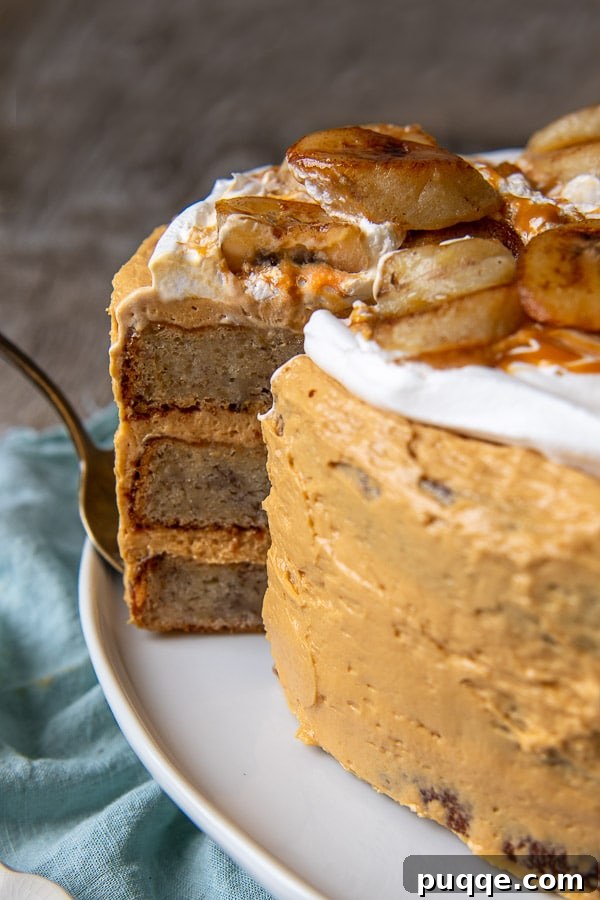
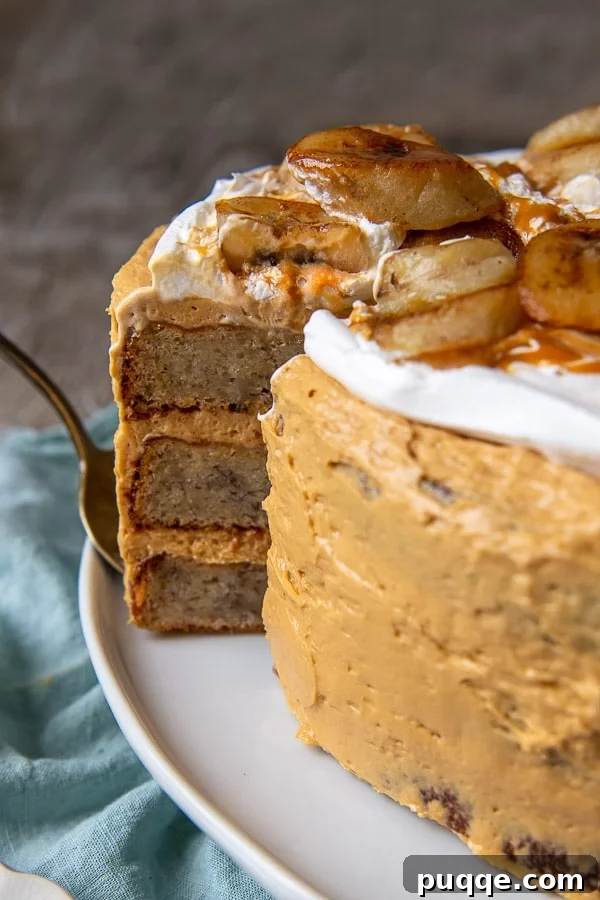
Indulge in a truly spectacular dessert experience with this exquisite **Banoffee Cake recipe**. This remarkable creation brilliantly transforms the beloved **banana and toffee** flavors of the classic Banoffee Pie into a show-stopping, multi-layered cake. Each slice promises a symphony of textures and tastes: a base of wonderfully **fluffy banana cake**, generously enveloped in a luscious **dulce de leche caramel frosting**, and crowned with golden, delicately buttery **pan-fried bananas**. Perfect for any celebration, or simply as a luxurious treat, this Banoffee Cake is destined to become a cherished addition to your baking repertoire, offering an impressive homemade dessert that’s surprisingly accessible to create.
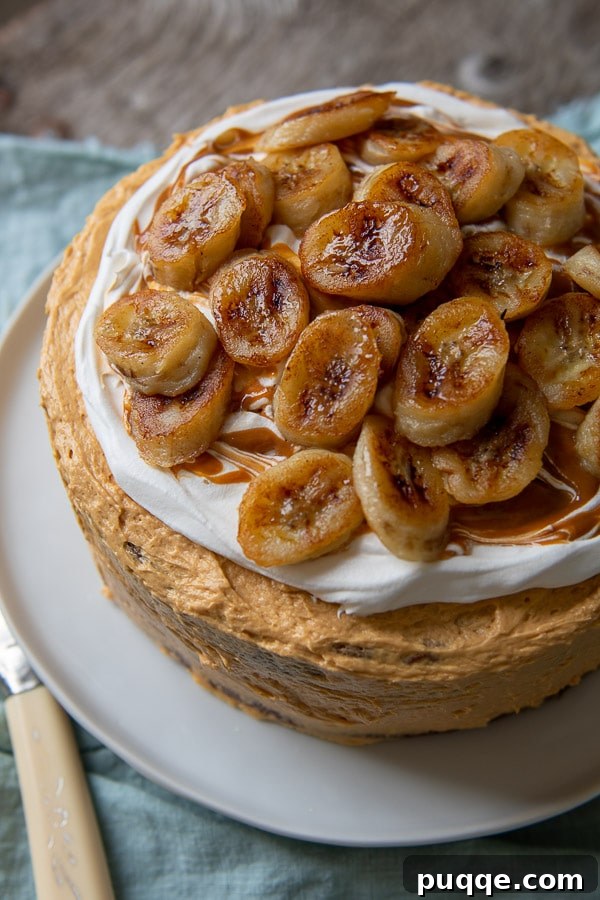
What is Banoffee and Why This Cake?
The term “Banoffee” is a delightful portmanteau, a clever combination of “banana” and “toffee.” It gained widespread popularity in the United Kingdom as a staple dessert: the Banoffee Pie. Traditionally, this iconic pie is crafted with a crumbly biscuit base, topped with a generous layer of sweet toffee or rich caramel (often dulce de leche), sliced fresh bananas, and finished with a cloud of whipped cream. It’s a dessert celebrated for its irresistible blend of sweet, fruity, and creamy elements.
Our Banoffee Cake takes this classic British comfort dessert to new heights, reimagining it as an elegant and robust layer cake. Instead of a simple biscuit base, we build upon tender, moist banana cake layers. The traditional toffee and caramel notes are captured in a silky smooth dulce de leche caramel buttercream, providing a decadent filling and frosting. Finally, the cake is adorned with fresh, yet perfectly prepared, bananas, ensuring every bite delivers that authentic banoffee experience in a sophisticated cake format. This innovative adaptation offers a more substantial and celebratory dessert, making it an ideal centerpiece for any special occasion.
Mastering the Easy Banoffee Cake: A Step-by-Step Guide
Creating an easy yet undeniably impressive layer cake might seem like a daunting task, but this Banoffee Cake recipe is designed for feasibility and success. Whether you’re aiming to wow guests, celebrate a milestone birthday, or even scale up for a grander event like a wedding, this cake, despite its luxurious appearance, is remarkably straightforward to assemble. With our clear, **easy step-by-step directions and accompanying photos**, you’ll find the process enjoyable and the results stunning.
The journey to your perfect Banoffee Cake begins with baking the light and airy banana cake layers. Allowing these to cool completely is a crucial step for optimal frosting. Once your cake layers are ready, you’ll whip up the incredibly smooth and flavorful dulce de leche caramel frosting, which serves as both the filling between the layers and the exterior coating. The grand finale involves quickly pan-frying bananas to achieve a golden, buttery texture that not only tastes incredible but also enhances the cake’s presentation and shelf life. These caramelized banana slices are then artfully arranged atop a billowy cloud of whipped topping, completing this magnificent dessert.
Each essential component of this Banoffee Cake recipe is meticulously broken down below with helpful imagery to guide you. For precise ingredient measurements and comprehensive instructions, please **scroll down to the bottom of the post for the printable recipe card**. We’ve ensured every detail is covered to help you achieve banoffee perfection in your own kitchen!
Crafting the Fluffy Banana Cake Layers
The secret to achieving a truly fluffy and moist banana cake lies in a few key baking principles. First and foremost, always ensure that **all your ingredients, especially butter and eggs, are at room temperature**. This seemingly minor detail makes a significant difference. Room temperature ingredients emulsify more effectively, binding together uniformly to create a smoother, lighter, and more thoroughly incorporated batter. This results in a cake with a finer crumb and a more tender texture.
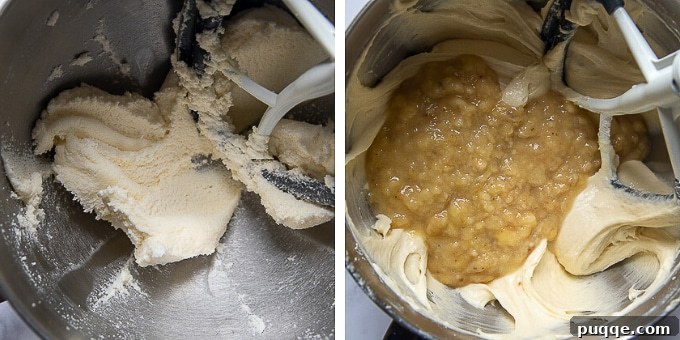
Another critical technique is the creaming of butter and sugar. Don’t rush this step! Blend the butter with the sugar **thoroughly and patiently**. It’s not enough for them to just be combined; continue beating for several minutes longer than you might think necessary. This process incorporates air into the mixture, transforming it into a visibly pale, light, and fluffy consistency. This aeration is what contributes to the cake’s incredible lift and airy texture, making each layer exceptionally tender and delightful.
- Begin by mashing ripe bananas, then mix them with a touch of fresh lemon juice. The lemon juice helps prevent browning and adds a subtle brightness that complements the banana flavor. Set this mixture aside.
- In a separate bowl, whisk together all the dry ingredients – flour, baking soda, baking powder, and salt. This ensures even distribution throughout the batter. Prepare your cake pans by greasing and flouring them, or lining the bottoms with parchment paper, and set them aside.
- In a large mixing bowl, using an electric mixer, beat the room temperature butter and sugar together until the mixture is very pale, light, and fluffy. This typically takes 3-5 minutes. Then, incorporate the egg yolks one at a time, ensuring each is fully blended before adding the next. Stir in the vanilla extract and, if desired, a touch of banana extract to amplify the fruity notes.
- Gradually add the whisked flour mixture to the creamed butter and sugar, alternating with the buttermilk. Start and end with the flour mixture, mixing just until combined after each addition to avoid overmixing. Once the flour and milk are fully incorporated, gently fold in the mashed banana mixture.
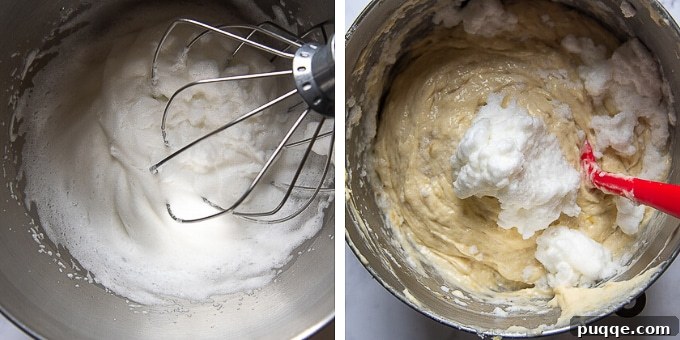
- In a separate, impeccably clean and dry bowl, beat the reserved egg whites until they form stiff peaks. These whipped egg whites are crucial for adding extra air and lightness to the cake batter. Carefully fold the stiff egg whites into the banana cake batter in two or three additions, being gentle to maintain their volume. Mix until no streaks of egg white remain. Divide the batter evenly among your prepared cake pans and bake until a toothpick inserted into the center comes out clean. Once baked, allow the banana layer cakes to cool completely on wire racks before frosting.
Preparing the Irresistible Dulce de Leche Frosting
The luscious dulce de leche frosting is the heart of this Banoffee Cake, delivering rich, creamy caramel notes that perfectly complement the banana layers. It’s essential that your cake layers have **completely cooled** before you even begin preparing the frosting. Attempting to frost warm cakes will lead to a melted, runny mess. For the best consistency and to prevent any separation of ingredients, you’ll want to **prepare the frosting right before you intend to use it** for assembly.
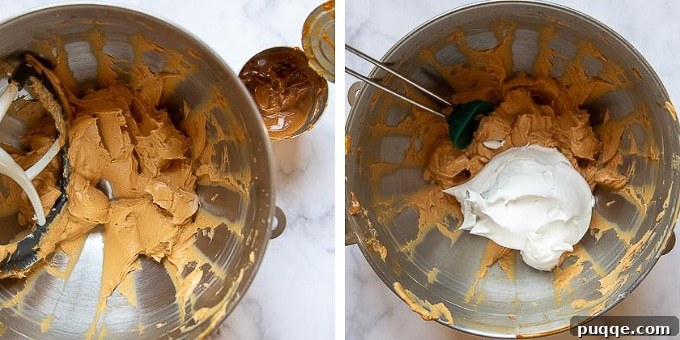
- To create the base of this decadent frosting, first, whip your room-temperature butter until it’s incredibly smooth, light, and creamy. This aeration ensures a fluffy buttercream. Next, incorporate **half of the can of dulce de leche** into the whipped butter, mixing until it’s perfectly smooth and well combined. Be sure to reserve the remaining dulce de leche for a stunning topping later.
- Gently fold in 2 cups of your preferred whipped topping, often known as Cool Whip, into the dulce de leche buttercream. The addition of whipped topping gives the frosting an incredibly light, airy, and billowy texture, making it less dense and wonderfully easy to spread. If you prefer a homemade option, freshly whipped cream (made from heavy cream) can also be used for an even richer taste.
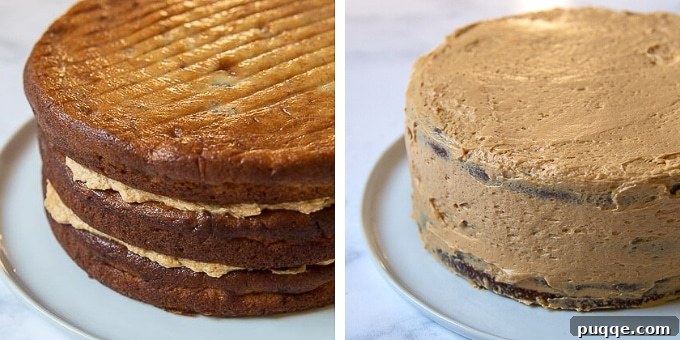
- Once your frosting is ready, begin assembling your cake. Place the first cooled banana cake layer onto your serving platter. Spread approximately one-third of the dulce de leche frosting evenly over this layer using an offset spatula. Carefully place the second cake layer on top and repeat with another third of the frosting. Finally, top with the third and last cake layer.
- Use the remaining frosting to generously cover the entire top of the cake, creating a smooth, elegant surface. Then, thinly cover the sides of the cake. This initial layer, often called a crumb coat, helps to seal in any loose crumbs. Immediately refrigerate the cake to allow the frosting to firm up and set. This crucial step prevents the frosting from sliding or becoming messy while you prepare the beautiful pan-fried bananas for the topping.
The Magic of Pan-Fried Bananas: Flavor and Freshness
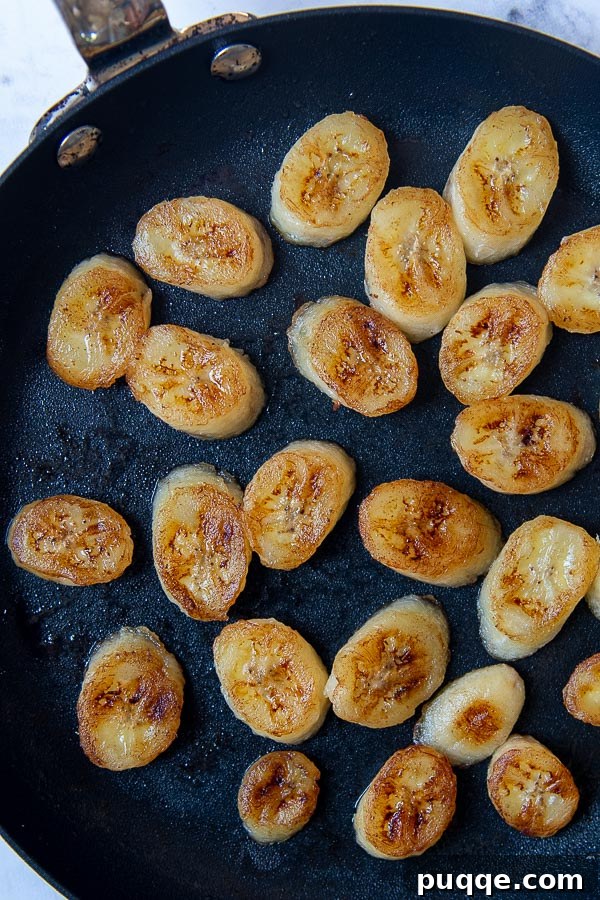
The decision to use pan-fried bananas instead of simply fresh slices for this Banoffee Cake is a strategic one, offering **two significant benefits** that elevate both taste and practicality. First and foremost, the flavor profile is simply unparalleled. Pan-frying transforms ordinary banana slices into something truly extraordinary: slightly crispy on the exterior, with a gorgeously golden-brown hue, and an interior that remains wonderfully soft and intensely sweet. The caramelization achieved through pan-frying in butter deepens the banana’s natural sugars, creating a rich, almost candy-like flavor that perfectly complements the dulce de leche and fluffy cake. What’s not to love about that irresistible combination?
Secondly, and just as importantly for a layer cake, **pan-frying the bananas significantly extends their shelf life**. Fresh banana slices, while delicious initially, have a notorious tendency to oxidize and turn brown very quickly, often within hours. This not only makes the cake look less appealing but also affects the texture, turning mushy. By gently pan-frying the bananas, you create a protective, slightly caramelized exterior that helps them maintain their vibrant color and firm texture for much longer. These prepared bananas will hold up beautifully for up to 3 days when stored in the refrigerator, without succumbing to the dreaded brown mush that fresh bananas inevitably become. This means you can prepare your cake in advance, or enjoy leftovers, without compromising on quality or appearance. They add a delectable, buttery warmth that contrasts beautifully with the cool, creamy frosting.
Can I Make This Banoffee Cake Gluten-Free?
Absolutely! This Banoffee Cake recipe is wonderfully adaptable for gluten-free diets. I have personally tested and successfully created this cake by substituting regular all-purpose flour with a high-quality gluten-free all-purpose flour blend. For the best results and a texture that closely mimics traditional cake, my preferred and highly recommended brand to use is Cup4Cup gluten-free flour. Its blend of gluten-free grains and starches provides an excellent structure and moisture, ensuring your gluten-free Banoffee Cake is just as delicious and fluffy as the original. Always ensure all other ingredients used are certified gluten-free if you are catering to strict dietary needs.
Utilizing Homemade or Store-Bought Dulce de Leche
Dulce de leche is a key flavor in our Banoffee Cake, delivering that rich, caramelized sweetness. While often associated with South American cuisine, it’s becoming increasingly accessible. Canned dulce de leche can typically be found in the ethnic foods aisle of most larger supermarkets, or readily available at Hispanic grocery stores. This convenient option saves significant time and effort without compromising on flavor, making it perfect for busy bakers. It’s also a versatile ingredient that can be used in other delectable desserts, such as a rich Carmelita Cake.
For those who enjoy a more hands-on approach or simply can’t find it locally, dulce de leche can also be easily made at home. The most common method involves slowly simmering canned sweetened condensed milk until it transforms into a thick, golden, and deeply caramelized spread. This homemade version offers a truly authentic and rewarding experience.
Substituting Heavy Cream for Whipped Topping
Our Banoffee Layer Cake recipe utilizes a pre-made whipped topping, like Cool Whip, to achieve an incredibly light and airy texture in the frosting. This offers convenience and consistent results. However, if you prefer to use fresh ingredients or simply enjoy the richer taste of homemade whipped cream, this recipe is easily adaptable. You can absolutely substitute the commercial whipped topping with a homemade version.
To do so, you will need to beat together 1 1/2 cups of cold heavy cream with 3 tablespoons of granulated sugar until stiff peaks begin to form. This process typically yields approximately 3 cups of whipped cream, which is the exact amount needed for this Banoffee Cake recipe. The homemade whipped cream will provide a luxurious, delicate creaminess that beautifully complements the robust flavors of banana and dulce de leche, making your cake even more decadent.
Save This Decadent Recipe to Your Pinterest Board!
Let’s be friends on Pinterest! I’m always sharing fantastic recipes and baking inspiration!
Did you create this amazing Banoffee Cake? I absolutely love hearing from you and seeing your delicious creations! Please leave a star rating and comment below the recipe card. Your feedback is invaluable, helping other home bakers discover and enjoy these recipes. I truly appreciate hearing from our community, and I promise you’ll always hear back from me! -Melissa
Banoffee Cake
 Melissa Erdelac
Pin Recipe
Rate This Recipe
Remove Ads
Ingredients
Banana Cake
- ▢ 1 ½ cups (450g) mashed bananas, (about 3-4 bananas)
- ▢ 2 teaspoons (10mL) fresh lemon juice
- ▢ 3 cups (360g) all purpose flour or gluten free all purpose flour, (I recommend Cup4Cup gluten free flour)
- ▢ 1 teaspoon baking soda
- ▢ ½ teaspoon baking powder
- ▢ ½ teaspoon salt
- ▢ ¾ cup (170g) unsalted butter, room temperature
- ▢ 2 cups (400g) sugar
- ▢ 3 large eggs, separated and room temperature
- ▢ 2 teaspoons (10mL) vanilla extract
- ▢ 1 teaspoon (5mL) (optional) banana extract
- ▢ 1 ½ cups (360mL) buttermilk, room temperature
Dulce de Leche Buttercream
- ▢ 1 cup (226g, 2 sticks) unsalted butter,, room temperature
- ▢ 13.4 ounce can dulce de leche
- ▢ ⅛ teaspoon salt, (omit if butter is salted)
- ▢ 8 ounce Cool Whip whipped topping, (see recipe notes for substituting heavy cream)
Pan Fried Bananas
- ▢ 2 large bananas, sliced thickly at an angle
- ▢ 1 ½ tablespoon (21g) butter
Equipment
- ▢
9 inch Cake Pans
- ▢
Offset Spatula
- ▢
Stand Mixer
Instructions
-
Preheat your oven to 350ºF (175°C). Prepare three 9″ (23cm round) cake pans by spraying them generously with cooking spray. Line the bottom of each pan with a parchment or wax paper circle cut to size. Spray the tops of the paper as well, then set the prepared pans aside.
Tip: If you only have two 9″ cake pans, bake two layers first. Keep the remaining batter covered on the counter. Once the first two pans are cool, clean and prepare one, then bake the third layer.
-
In a small bowl, combine the mashed bananas with fresh lemon juice and mix well. Set this mixture aside. In a separate medium bowl, whisk together the flour, baking soda, baking powder, and salt until thoroughly combined. Set this dry mixture aside.1 ½ cups (450g) mashed bananas, 2 teaspoons (10mL) fresh lemon juice, 3 cups (360g) all purpose flour or gluten free all purpose flour, 1 teaspoon baking soda, ½ teaspoon baking powder, ½ teaspoon salt
-
In a large mixing bowl, using an electric mixer, cream the ¾ cup (170g) room temperature unsalted butter with the sugar until the mixture is very light, pale, and fluffy. This should take at least 3 minutes of beating. Incorporate the egg yolks one at a time, mixing well after each addition. Stir in the vanilla extract and the optional banana extract for an enhanced flavor.¾ cup (170g) unsalted butter, 2 cups (400g) sugar, 3 large eggs, 2 teaspoons (10mL) vanilla extract, 1 teaspoon (5mL) (optional) banana extract
-
Add approximately one-third of the flour mixture to the creamed butter and sugar mixture, mixing just until combined. Alternate by adding one-third of the buttermilk and mixing well. Continue this process until all the flour and buttermilk have been fully incorporated, being careful not to overmix the batter. Finally, gently fold in the mashed banana mixture.1 ½ cups (360mL) buttermilk
-
In a separate, very clean and dry bowl, beat the reserved egg whites until they form stiff, glossy peaks. This will add significant lightness to your cake. Gently fold about one-third of the beaten egg whites into the banana cake batter to lighten it, then carefully fold in the remaining two-thirds until no streaks of egg white are visible. Divide the batter evenly among your three prepared cake pans.
-
Bake the cake layers for 30-33 minutes. If you are using gluten-free flour, they may require a couple of minutes longer. The cakes are done when a toothpick inserted into the center comes out clean. Once baked, turn the cakes out onto wire racks and allow them to cool completely before proceeding with the frosting.
Dulce de Leche Buttercream
-
In a large mixing bowl, beat the softened, room-temperature butter until it is smooth and wonderfully creamy. Next, incorporate **half of the can of dulce de leche** (remember to set aside the remaining portion for the cake topping) and the salt. Continue mixing until all ingredients are perfectly combined and the frosting is smooth.1 cup (226g, 2 sticks) unsalted butter,, 13.4 ounce can dulce de leche, ⅛ teaspoon salt
-
Gently fold in 2 cups (or approximately two-thirds of an 8-ounce container) of your preferred whipped topping into the dulce de leche buttercream. Mix until the frosting is light, airy, and uniformly smooth. Reserve the remaining cup of whipped topping in the refrigerator, as it will be used later for the final cake assembly.8 ounce Cool Whip whipped topping
-
Place the first cooled cake layer onto your desired serving platter. Evenly spread about one-third of the prepared dulce de leche frosting over this layer using an offset spatula. Carefully position the second cake layer on top and repeat the frosting process with another one-third of the buttercream. Finally, place the remaining cake layer on top.
-
Use the remaining frosting to completely cover the top of the cake, creating a smooth, inviting surface. Then, thinly cover the sides of the cake with frosting. This initial layer helps to lock in crumbs and create a clean base. Immediately refrigerate the cake to allow the frosting to set firmly while you prepare the pan-fried bananas.
Pan Fried Bananas
-
In a large, nonstick sauté pan, melt 1 ½ tablespoons (21g) of butter over medium heat until it’s glistening. Arrange the thickly sliced bananas in a single layer in the pan, ensuring each slice makes full contact with the bottom for even caramelization.2 large bananas, 1 ½ tablespoon (21g) butter
-
Cook the banana slices undisturbed for approximately 2 minutes, or until their bottoms turn a beautiful golden brown. Carefully flip each banana slice and cook on the other side for another 2 minutes, or until they are also golden brown and slightly tender. Remove the pan-fried bananas from the heat and allow them to cool completely before using them to top the cake.
Cake Assembly
-
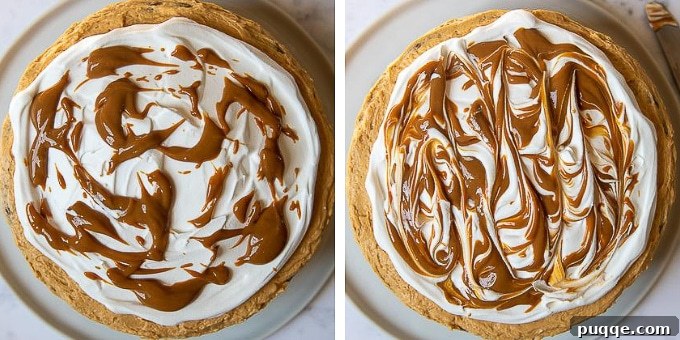
Once the cake and its frosting have set in the refrigerator, remove it. Carefully spread the remaining reserved Cool Whip whipped topping over the top of the cake, creating a light, fluffy cloud.
-
To the remaining dulce de leche that you set aside earlier, stir in 2 tablespoons of water until it becomes a smooth, slightly thinned sauce. Drizzle about 2 tablespoons of this thinned dulce de leche over the whipped topping. Using a butter knife or a skewer, gently swirl the dulce de leche into the whipped topping to create an elegant pattern.
-
Finally, arrange the cooled pan-fried bananas artfully over the top of the cake. Your magnificent Banoffee Cake is now ready to serve! For an extra special treat, serve individual slices with any remaining dulce de leche drizzle and a scoop of vanilla ice cream, if desired. Enjoy this truly unforgettable dessert!
Notes
How To Freeze / Store This Delicious Banoffee Cake
If you do not plan on serving your magnificent Banoffee Cake immediately, it can be safely stored in the refrigerator for up to 3 days. Ensure the cake is well covered to maintain its freshness and prevent it from drying out or absorbing other flavors. For the best flavor and texture, both the cake, the frosting, and the pan-fried bananas taste best when allowed to come to room temperature. Therefore, **be sure to take the cake out of the refrigerator several hours before you intend to serve it.** This allows the cake layers to soften and the flavors to fully develop, ensuring a truly delightful experience.
For longer storage, individual leftover cake slices can be wrapped tightly in plastic wrap, then placed in an airtight container and frozen for up to 3 months. When ready to enjoy, simply thaw in the refrigerator overnight and then bring to room temperature before serving.