
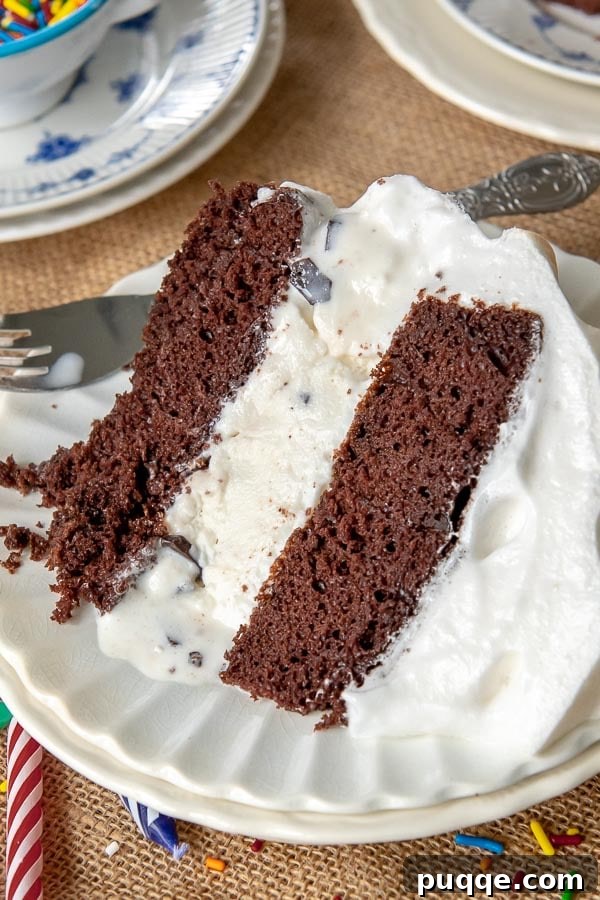
Prepare to amaze your guests with the incredible Baked Alaska! This iconic dessert, renowned for its dramatic presentation and delightful contrast of hot and cold, is surprisingly accessible for home bakers. Follow our easy, step-by-step guide to create a truly show-stopping dessert featuring layers of moist cake, creamy ice cream, and a perfectly toasted meringue. Whether you opt for the classic oven-baked finish or the more theatrical flambé style served table-side, this recipe promises an unforgettable culinary experience.
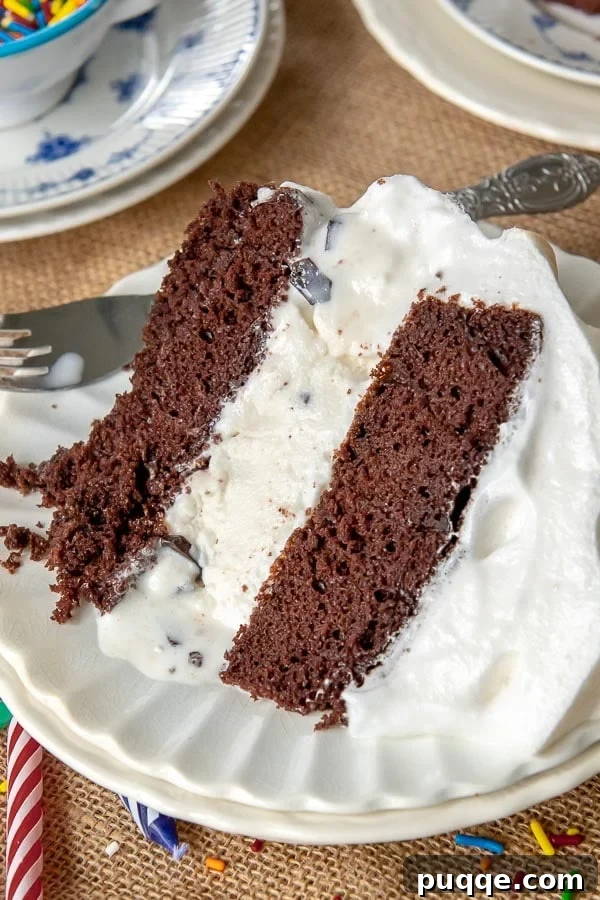
What Exactly is Baked Alaska? A Dessert with a Rich History
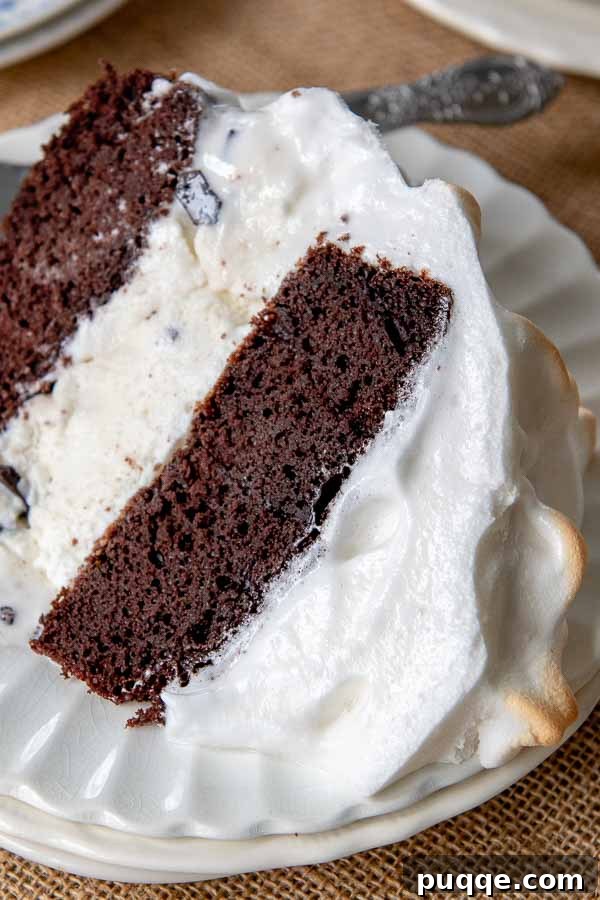
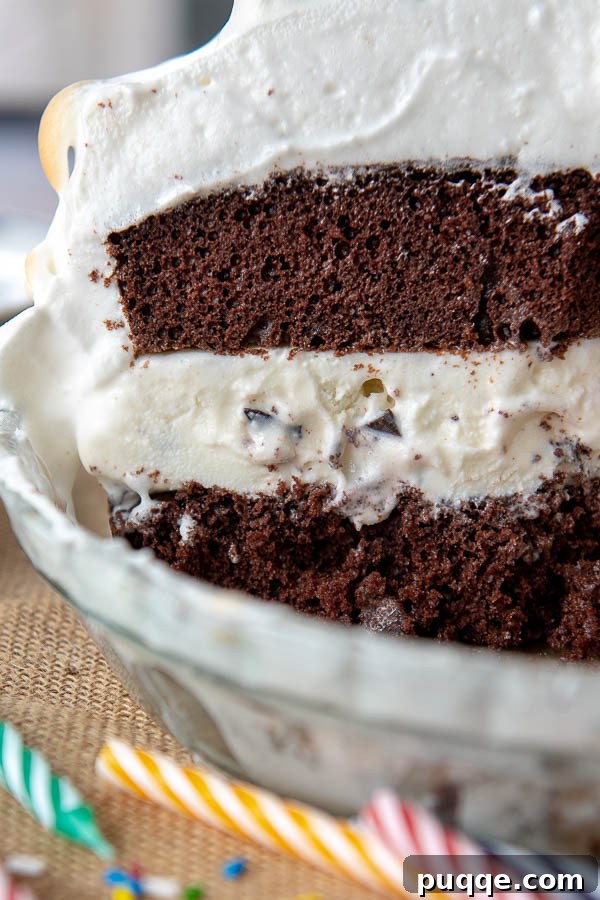
At its heart, Baked Alaska is a delightful trifecta of textures and temperatures: a moist cake base, a frozen layer of ice cream, all encased in a fluffy, caramelized meringue. The meringue, a cloud-like topping whipped from egg whites and sugar until it forms stiff, glossy peaks, acts as a remarkable protective shield for the ice cream within. This magnificent dessert is then briefly exposed to intense heat, either by baking it in a very hot oven until golden brown or by drizzling it with a high-proof spirit and igniting it for a dramatic flambé effect, bringing flames to the table.
The intriguing name “Baked Alaska” naturally sparks curiosity about its origins. This culinary marvel is widely credited to Charles Ranhofer, the esteemed chef at Delmonico’s Restaurant in New York City. Ranhofer reportedly created the dessert in 1867 to celebrate the United States’ acquisition of the vast Alaska territory from Russia that year. Initially, it was known as the “Alaska-Florida Cake,” a clever and evocative name that highlighted the stark temperature contrast inherent in the dessert: the icy cold of the frozen ice cream (representing Alaska’s chilly climate) juxtaposed with the flaming meringue (symbolizing Florida’s tropical heat). Its increasing popularity and unique appeal soon led to the simplified, memorable name we use today: Baked Alaska.
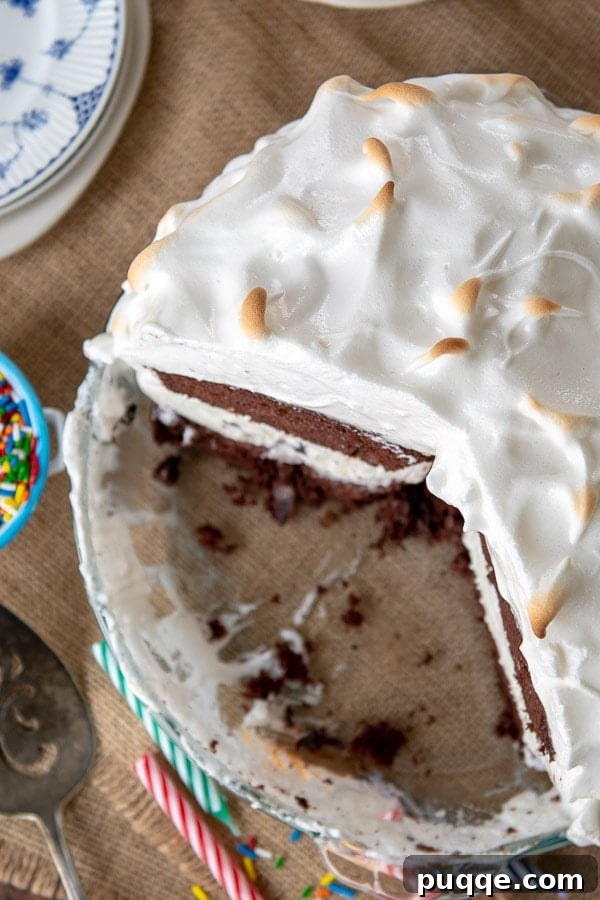
The Science Behind the Magic: Why Doesn’t Baked Alaska Melt?
The astonishing secret to Baked Alaska’s ability to withstand high heat without melting its icy core lies entirely within the meringue, making it a true culinary paradox. This remarkable insulating property was first observed around the turn of the 18th century by the brilliant scientist Sir Benjamin Thompson, also known as Count Rumford. He discovered that the myriad of tiny air bubbles trapped within whipped egg whites make meringue an exceptional thermal insulator.
When you vigorously whip egg whites, you incorporate a vast amount of air into the protein structure. This trapped air creates a formidable barrier that significantly slows down the transfer of heat. Consequently, the thick, airy layer of meringue acts much like a protective blanket, effectively shielding the deeply frozen ice cream and cake layers from the intense heat of a scorching oven or the direct flames of a flambé. The rapid application of heat – typically only for a few minutes – is just enough to caramelize and lightly toast the exterior of the meringue, creating a beautiful golden-brown crust with delicate peaks, while the interior remains cool and the ice cream perfectly frozen. Furthermore, starting with very firm, deeply frozen ice cream and thoroughly chilled cake layers provides an additional thermal buffer, ensuring the dessert maintains its integrity and spectacular appearance until it’s perfectly sliced and served.
Essential Ingredients for Your Homemade Baked Alaska
Crafting the perfect Baked Alaska begins with selecting high-quality ingredients and understanding their role. Here’s a breakdown of what you’ll need for this impressive dessert, along with some key tips for each component to ensure your success:
- Cake Layers: You will need two 9-inch cake layers, fully baked and completely cooled. A light and airy sponge cake, such as a genoise, vanilla sponge, or chocolate sponge, is ideal. Its delicate texture pairs wonderfully with the rich ice cream and meringue. Ensure your cake layers are thoroughly cooled, or even slightly chilled in the freezer, before beginning the assembly process to prevent premature melting of the ice cream.
- Ice Cream: Approximately 1.5 quarts (about 1.4 liters) of your favorite ice cream. It should be softened just enough to be easily spreadable – typically by letting it sit out at room temperature for about 20-30 minutes. While vanilla and chocolate are classic and universally loved choices, feel free to get creative with flavors like strawberry, coffee, mint chocolate chip, or even a sorbet for a lighter twist.
- Egg Whites: Six large egg whites, brought to room temperature. Room temperature egg whites are crucial for achieving maximum volume and stability when whipped, which is essential for a robust and fluffy meringue. Take extreme care when separating them to ensure there is absolutely no trace of egg yolk, as any fat can prevent the whites from whipping properly.
- Water: Half a cup of water, which will be combined with cornstarch to create a stabilizing slurry for the meringue.
- Cornstarch: Two teaspoons of cornstarch. This often-overlooked ingredient is a secret weapon for meringue, as it helps to stabilize the egg whites, making the meringue more resilient, less prone to weeping, and more forgiving under heat.
- Cream of Tartar: Half a teaspoon of cream of tartar. This acidic component acts as an additional stabilizer for the egg whites. It helps them reach their fullest volume and creates a firmer, more reliable meringue structure that holds its shape beautifully.
- Granulated Sugar: Three-quarters of a cup of granulated sugar. Sugar not only provides the necessary sweetness to the meringue but also plays a vital role in its structure, contributing to its glossy finish and helping it to hold stiff peaks. It must be added gradually to allow for proper dissolution and incorporation.
Let’s Make This Together! Your Step-by-Step Baked Alaska Recipe
Phase 1: Preparing the Ice Cream Core and Assembling the Layers
The foundation of your show-stopping Baked Alaska is a perfectly frozen ice cream layer, nestled between two soft cake layers. This phase requires meticulous preparation and patience to ensure everything is deeply chilled, which is paramount for preventing melting during the final stages.
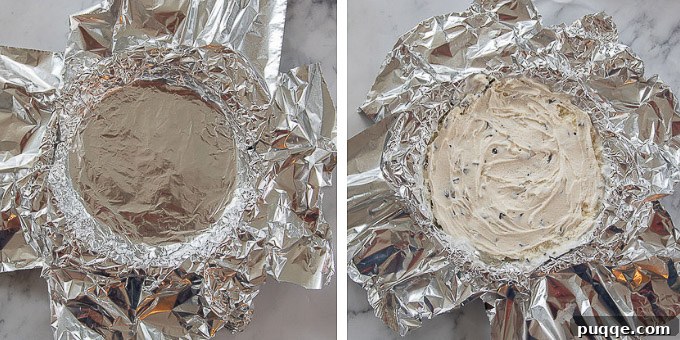
- Prepare the Ice Cream Pan: Begin by lining a 9-inch round cake pan with two long sheets of heavy-duty aluminum foil. Criss-cross the sheets to ensure full coverage of the bottom and sides, pressing the foil firmly against the contours of the pan. Allow for a generous overhang on the edges; these “handles” will aid in lifting the frozen ice cream later.
- Spread and Freeze Ice Cream: Evenly spread your softened ice cream into the foil-lined pan. Use an offset spatula or the back of a spoon to smooth the top surface. To prevent ice crystals from forming, press a piece of plastic wrap directly onto the surface of the ice cream. Transfer the pan to the freezer and freeze until the ice cream is very solid and firm, ideally for at least 6 hours, or even overnight. This extreme firmness is crucial for the dessert’s structural integrity.
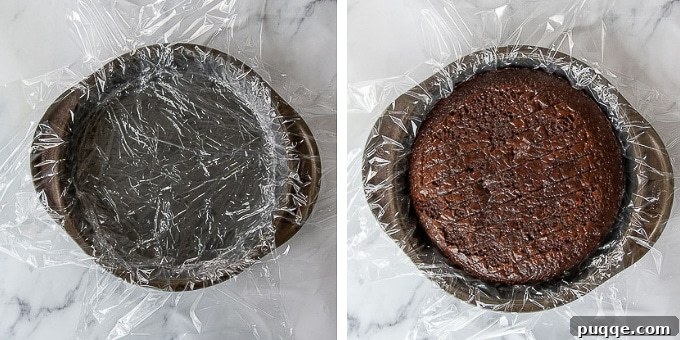
- Prepare Assembly Pan: While the ice cream is freezing, or just before assembly, prepare a second clean 9-inch cake pan. Line this pan with long pieces of plastic wrap, again criss-crossing them and ensuring the sides overhang generously. These overhangs will be used to cover the assembled cake before its final freeze.
- Place First Cake Layer: Remove one of your completely cooled cake layers from its wrapping and carefully place it at the bottom of the plastic-lined cake pan, ensuring it sits flat.
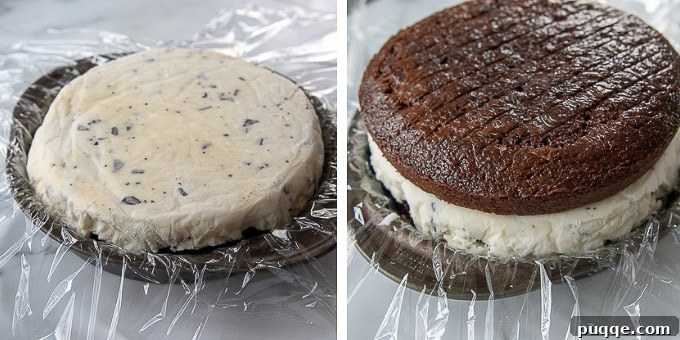
- Add Frozen Ice Cream: Now, retrieve the rock-solid ice cream layer from the freezer. Remove the plastic wrap from its surface. Using the foil overhangs as leverage, gently lift the entire ice cream disc out of its pan. Invert the ice cream directly onto the first cake layer in your assembly pan. Carefully peel away the aluminum foil from the ice cream.
- Place Second Cake Layer: Unwrap your second cooled cake layer and carefully place it on top of the ice cream layer, aligning it neatly. Use the overhanging plastic wrap from the pan to snugly cover the entire assembled cake structure. Immediately return the assembled cake to the freezer. It should remain deeply frozen while you proceed with preparing the meringue.
Phase 2: Crafting the Flawless Meringue
The meringue is the crowning glory of Baked Alaska, providing both insulation and a stunning visual appeal. Precise technique is essential for achieving those stiff, glossy peaks that will protect your frozen core.
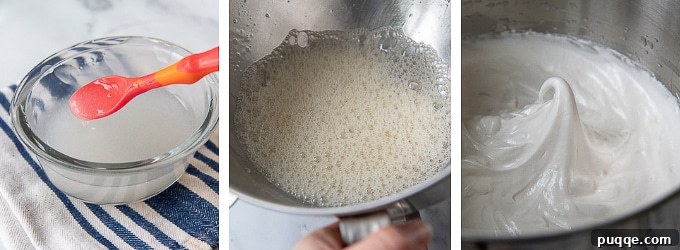
- Prepare Cornstarch Slurry: In a small, heatproof bowl, combine the ½ cup of water and 2 teaspoons of cornstarch, stirring vigorously until the cornstarch is completely dissolved and no lumps remain. Microwave this mixture for 45-60 seconds, stirring once halfway through, until it thickens into a clear, gel-like consistency. This creates a stable base for the meringue. Set it aside to cool slightly.
- Whip Egg Whites to Frothy Stage: In a large, impeccably clean mixing bowl (metal or glass bowls are best, as plastic can sometimes retain grease), combine the room-temperature egg whites with the ½ teaspoon of cream of tartar. Using an electric mixer (stand mixer or hand-held) on medium-high speed, beat the egg whites until they become frothy and soft, opaque bubbles form.
- Gradually Add Sugar for Soft Peaks: Continue beating, and gradually add the granulated sugar, about 2 tablespoons at a time, allowing it to incorporate fully before adding more. This slow addition helps the sugar dissolve properly and creates a more stable meringue. Continue beating until soft peaks form, meaning the meringue holds its shape but the tips curl over slightly when the beaters are lifted. This typically takes 1-2 minutes after all the sugar has been added.
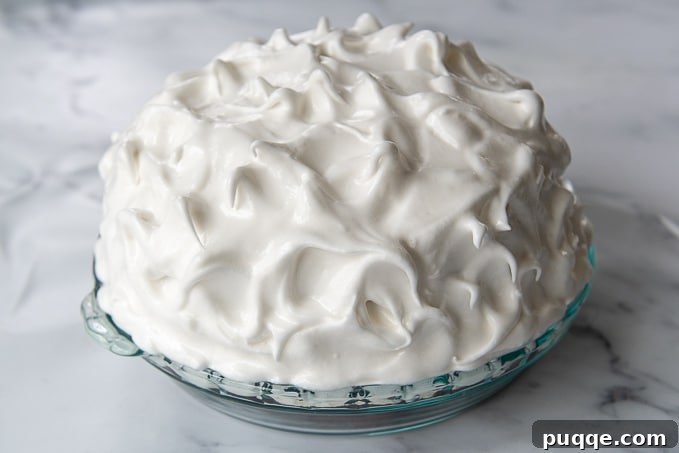
- Finish Meringue for Stiff, Glossy Peaks: Once soft peaks are achieved, add the cooled cornstarch mixture to the egg whites. Increase the mixer speed to high and continue beating until the meringue forms very stiff, glossy peaks that stand upright and hold their shape firmly when the beaters are lifted. The meringue should be smooth and shiny.
Phase 3: The Grand Finale – Toasting or Flambéing Your Baked Alaska
Now for the most exciting part – giving your Baked Alaska its signature golden finish and dramatic flair!
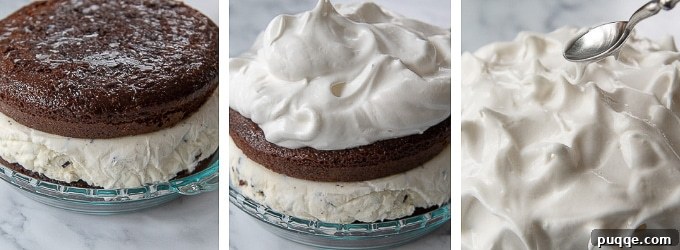
- Cover the Cake with Meringue: Retrieve the deeply frozen cake and ice cream structure from the freezer. Carefully lift it from its pan, removing the plastic wrap. Transfer the cake to an oven-safe pie dish or a sturdy serving platter. Generously spoon the prepared meringue over the entire cake, ensuring every surface – especially the sides – is completely covered and sealed all the way down to the pie dish. This meticulous coverage creates the essential insulating layer. Use the back of a spoon or a small offset spatula to create decorative, whimsical peaks all over the meringue for an elegant presentation. Return the cake to the freezer until you are ready for the final step.
- Choose Your Finish (Oven Toasting or Flambé):
- For Classic Oven Toasting: When ready to serve, preheat your oven to a very hot 500°F (260°C). Place the Baked Alaska in the preheated oven for a very short duration of 3-4 minutes, or until the meringue’s peaks turn a beautiful golden brown. Keep a very close eye on it, as the meringue can brown quickly and burn if left too long.
- For a Dramatic Flambé (Optional and with Caution): If you prefer the theatrical flambé, warm about ¼ cup of high-proof liquor (such as dark rum, brandy, or Grand Marnier) in a small saucepan over very low heat until it’s warm but not boiling. Carefully pour the warm liquor evenly over the meringue-covered cake. Using a long match or a kitchen lighter, carefully ignite the liquor at the base of the meringue. Serve immediately, allowing the flames to subside naturally before you begin to slice. Exercise extreme caution when flambéing: ensure a clear area, keep children and flammable materials away, and have a fire extinguisher or lid handy for safety.
- Serve Immediately: Serve your Baked Alaska immediately after it has been toasted or flambéed for the best hot-and-cold experience. If you need to delay serving, you can place it back in the freezer (uncovered) for up to an hour. For easier slicing, it’s recommended to let the dessert sit at room temperature for about 10-15 minutes, or in the refrigerator for 30-45 minutes, before cutting into portions.
Pro Tips for Baked Alaska Success
Achieving a perfect Baked Alaska is easier with these expert tips and tricks, ensuring your dessert is both delicious and visually impressive:
- The Ultimate Make-Ahead Dessert: Baked Alaska is a dream dessert for entertaining because much of the preparation can be done well in advance. The cake layers can be baked and frozen weeks ahead, and the assembled cake and ice cream layers (before the meringue is applied) can be frozen for several days or even up to a week. You can even apply the meringue hours before serving. This flexibility means you won’t be stressed on the day of your event – just don’t plan to make and serve it on the very same day, as ample freezing time is absolutely essential for the ice cream to firm up completely.
- Rock-Solid Ice Cream is Non-Negotiable: This is arguably the most critical tip for a successful Baked Alaska. Ensure your ice cream core is absolutely, unequivocally frozen solid before you attempt to layer it with the cake. A soft or runny ice cream layer will lead to a messy, collapsing dessert when you try to apply the meringue or toast it. Patience in this step will save you from a regrettable (and sticky!) outcome.
- Meringue Mastery – The Three Golden Rules: Successful meringue relies on precise technique and three key factors:
- Yolk-Free Egg Whites: Even the tiniest speck of egg yolk (which contains fat) can contaminate your egg whites and prevent them from whipping up properly. Be meticulous during separation.
- Room Temperature Whites: Egg whites at room temperature whip up faster, achieve greater volume, and create a more stable, voluminous meringue.
- Gradually Added Sugar: Do not dump all the sugar in at once. Add it slowly, about a tablespoon or two at a time, allowing it to fully dissolve and integrate into the egg whites as they whip. This ensures a glossy, stable, and less “weepy” meringue.
- Easy Egg Separation: While egg whites whip best at room temperature, they are actually easiest to separate when they are cold, straight from the refrigerator. Separate your eggs immediately after taking them out of the fridge, then place the whites in a clean bowl (covered) and let them sit on your counter for about 30 minutes to reach the ideal room temperature before you begin whipping.
- Endless Flavor Combinations: Don’t limit yourself to traditional vanilla. This dessert is a fantastic canvas for culinary creativity!
- Classic & Comforting: A rich chocolate cake with vanilla bean ice cream, or a simple vanilla sponge with classic strawberry ice cream.
- Decadent Delights: Pair a moist chocolate cake with refreshing mint chocolate chip ice cream, or a robust coffee-flavored ice cream.
- Fruity & Fresh: Try a light lemon sponge cake with a tart raspberry sorbet or a sweet peach ice cream.
- Unique & Exciting: Experiment with a banana cake combined with creamy toffee ice cream, or a delicate white cake layered with pistachio ice cream.
The possibilities truly are endless – feel free to match your favorite cake and ice cream flavors to create your signature Baked Alaska!
- Cleanliness is Key for Meringue: Always ensure your mixing bowl and whisk attachments are spotlessly clean and completely free of any grease, oil, or even residual soap film. Any fatty residue can act as a deflating agent, preventing the egg whites from whipping properly and achieving the desired volume and stiffness.
Serving and Storage Suggestions for Your Baked Alaska
The Best Way to Cut Baked Alaska:
Cutting through the frozen layers and delicate meringue requires a specific technique to ensure clean, beautiful slices that hold their shape. A little preparation makes all the difference:
- You’ll need a sharp, sturdy knife, such as a chef’s knife.
- Run very hot tap water over the entire blade of the knife for a few seconds to warm it up thoroughly.
- Quickly wipe the blade completely dry with a clean dish cloth. This is important to prevent water from freezing onto the dessert.
- Slice through the Baked Alaska in one swift, firm, downward motion. Avoid sawing back and forth, as this can tear the meringue and mash the ice cream.
- Repeat this warming and drying process for each and every slice. This technique ensures that the warm blade glides cleanly through the meringue and ice cream, preventing sticking and creating perfectly neat portions.
Storing Leftovers:
Should you have the rare delight of leftover Baked Alaska, it can be stored successfully in the freezer. To protect its delicate texture and prevent freezer burn, wrap the individual slices or the remaining cake tightly in plastic wrap, ensuring an airtight seal. Then, wrap it again in aluminum foil. Properly stored, it will maintain its quality for up to a week. For the best eating experience, allow it to thaw slightly in the refrigerator for about 30 minutes before serving, or at room temperature for 10-15 minutes, refreshing the meringue’s texture and softening the ice cream just enough.
Frequently Asked Questions About Baked Alaska
- Can I use a store-bought cake for Baked Alaska?
- Absolutely! Using a store-bought sponge cake or pound cake can significantly cut down on your preparation time without compromising the deliciousness of the final dessert. Just ensure it’s fully cooled and preferably chilled before assembly to maintain the cold temperature of the core.
- What’s the best type of ice cream to use?
- While any flavor works, denser, creamier ice creams (like premium full-fat varieties) tend to hold up better and freeze more solidly, which is crucial. Avoid varieties with large, hard chunks or swirls that might make slicing difficult. Classic vanilla, rich chocolate, or a tangy fruit sorbet for a lighter touch are all excellent choices that pair well with meringue.
- How far in advance can I make Baked Alaska?
- The assembled cake and ice cream layers (before the meringue is applied) can be frozen for several days, or even up to a week, wrapped tightly. Once the meringue is applied, it’s generally best to toast or flambé and serve within a few hours for optimal meringue texture. However, it can still be frozen for an additional day or two if needed. Always ensure it’s well-wrapped if freezing after meringue application.
- My meringue is weeping or shrinking, what went wrong?
- Meringue weeping (where beads of sugary syrup form) or shrinking often occurs if the sugar wasn’t fully dissolved, if the meringue was undercooked, or if there’s excessive humidity. Using room-temperature egg whites, gradually adding sugar and ensuring it’s completely dissolved (you shouldn’t feel grit when rubbing a tiny bit between your fingers), and avoiding overcooking will help prevent this. The cornstarch in this recipe is also added specifically to help stabilize it and minimize weeping.
- Is flambéing difficult or dangerous for a home cook?
- Flambéing is more theatrical than truly difficult, but it does require careful attention and adherence to safety guidelines. Always use a high-proof liquor, warm it slightly, and use a long match or kitchen lighter for ignition. Ensure you have a clear area around you, keep children and flammable materials (like curtains) away, and ensure good ventilation. If you’re hesitant or uncomfortable with open flames in the kitchen, the oven-toasting method provides equally delicious and beautiful results without the flame-related risks.
Share Your Culinary Creation!
Loved this recipe and can’t wait to make it again? Don’t forget to pin it to your Pinterest board for later inspiration and share it with your friends and family!
Let’s be friends on Pinterest! I’m always sharing great recipes!
Did you make this show-stopping dessert? We’d absolutely love to hear from you! Please leave a star rating and comment below the recipe section. Your feedback is invaluable, helping our community discover new favorites and inspiring other home bakers. I always look forward to reading your reviews and connecting with you! – Melissa
Easy Baked Alaska Recipe
This easy Baked Alaska recipe combines fluffy cake, creamy ice cream, and a perfectly toasted meringue. Choose to bake it in the oven for a golden finish or flambé for a dramatic presentation!
Author: Melissa Erdelac
Yield: 16 servings
Prep Time: 1 day (includes 6+ hours freezing time for ice cream)
Active Prep Time: Approximately 30 minutes (not including cake baking or freezing time)
Cook Time: 3-4 minutes (for oven toasting)
Total Time: 1 day and 30 minutes (inclusive of freezing and active preparation)
Pin Recipe
Ingredients:
- 1 recipe for a two-layer cake (9-inch rounds), baked and cooled (e.g., chocolate or vanilla sponge)
- 1.5 quarts (approx. 1.4 liters) ice cream (any flavor), softened for 30 minutes
- 6 large egg whites, room temperature
- ½ cup water
- 2 teaspoons cornstarch
- ½ teaspoon cream of tartar
- ¾ cup granulated sugar
- Optional for flambé: ¼ cup high-proof liquor (rum, brandy, Grand Marnier)
Instructions:
- Prepare Cake Layers: Bake your preferred two-layer cake recipe in two 9-inch cake pans. Allow cakes to cool completely on a wire rack. Once cooled, wrap layers tightly in plastic wrap and either freeze them or set aside until ready to assemble.
- Prepare Ice Cream Layer: Line one 9-inch cake pan with two long, criss-crossed sheets of aluminum foil, pressing them firmly against the bottom and sides with generous overhang. Evenly spread the softened ice cream into this foil-lined pan. Cover the ice cream surface directly with plastic wrap and freeze until very firm, at least 6 hours or overnight.
- Assemble Cake Base: Line another 9-inch cake pan with long sheets of plastic wrap, ensuring plenty of overhang. Remove the first cooled cake layer from its wrapping and place it in the plastic-lined pan.
- Add Ice Cream: Carefully remove the frozen ice cream disc from its foil lining. Invert the ice cream onto the first cake layer, then gently peel away the foil.
- Top with Second Cake Layer: Place the second cooled cake layer on top of the ice cream. Use the overhanging plastic wrap to fully cover the assembled cake. Return the cake to the freezer immediately while you prepare the meringue.
- Prepare Cornstarch Slurry: In a small heatproof bowl, combine water and cornstarch. Microwave for 45-60 seconds, stirring once, until thickened into a gel. Set aside to cool.
- Whip Egg Whites: In a large, very clean mixing bowl, beat the room-temperature egg whites with the cream of tartar on medium-high speed until frothy.
- Gradually Add Sugar: Slowly add the granulated sugar, about 2 tablespoons at a time, continuing to beat until soft peaks form (this typically takes 1-2 minutes after sugar is added).
- Finish Meringue: Incorporate the cooled cornstarch mixture into the egg whites. Continue beating on high speed until the meringue forms stiff, glossy peaks that hold their shape firmly.
- Apply Meringue: Remove the assembled cake from the freezer and transfer it to an oven-safe pie dish or serving platter, removing the plastic wrap. Generously spoon the meringue over the entire cake, sealing it all the way down to the dish to ensure no gaps. Use the back of a spoon to create decorative, weeping peaks. Return the cake to the freezer until ready to serve.
- Toast or Flambé:
- Oven Method: Preheat oven to 500°F (260°C). Bake for 3-4 minutes, or until the meringue peaks are golden brown. Watch carefully as it browns quickly.
- Flambé Method (Caution Advised): Gently warm ¼ cup of high-proof liquor (like rum or brandy) in a small saucepan. Pour the warm liquor over the meringue. Using a long match or kitchen lighter, carefully ignite the liquor. Serve immediately, allowing flames to extinguish naturally.
- Serve: Serve your Baked Alaska immediately. For easier slicing, let it sit at room temperature for 10-15 minutes or in the refrigerator for 30-45 minutes before cutting with a hot, dry knife (as described in our “Serving Suggestions” section).
Notes:
For best results, allow the Baked Alaska to set out for at least 30 minutes before serving. To achieve clean slices, heat a sharp knife under very hot running water, wipe it dry, and then slice. Repeat this process for each cut.
Nutrition Information (per serving):
Calories: 238kcal, Carbohydrates: 33g, Protein: 4g, Fat: 9g, Saturated Fat: 6g, Cholesterol: 39mg, Sodium: 90mg, Potassium: 194mg, Sugar: 31g, Vitamin A: 375IU, Vitamin C: 0.5mg, Calcium: 114mg, Iron: 0.1mg