

Prepare to fall in love with this incredible Easy Southern Tomato Pie recipe! It captures all the comforting, cheesy goodness of a traditional Southern tomato pie without the usual fuss. Forget complicated pastry crusts – this recipe simplifies the process by using a fluffy Bisquick crust that’s mixed and patted into place in minutes. Layered with a rich, sharp cheddar cheese and mayonnaise filling, and abundant fresh tomato slices, this pie is a true celebration of summer flavors. As an added bonus, we’ve included simple adaptations to ensure everyone can enjoy this classic, including a fantastic gluten-free tomato pie option.

Easy Southern Tomato Pie: A Cheesy, Flavorful, and Never-Soggy Delight
The Southern Tomato Pie is a beloved culinary tradition, especially during peak tomato season. Its rich, savory profile and tender crust make it a comforting meal or an impressive side dish. However, many home cooks are deterred by the time-consuming process of making a traditional rolled-out pastry crust and the common challenge of a soggy bottom. This recipe, featuring a brilliant Bisquick crust, elegantly bypasses these hurdles, delivering an authentic Southern taste with minimal effort. It’s the perfect solution for anyone craving homemade tomato pie without the hassle, promising a delightful texture and rich flavor every single time.
Revolutionizing Southern Tomato Pie: The Bisquick Advantage
Traditionally, a homemade tomato pie shell demands a carefully crafted, rolled-out pastry crust or specialized gluten-free pie dough. While these versions undeniably taste wonderful, they come with a significant investment of time and several intricate steps just for the crust preparation. Moreover, a frequently encountered problem is the crust becoming disappointingly soggy from the inherent moisture of fresh tomatoes, a culinary heartbreak many aspire to avoid.
Our mission was to capture that nostalgic, old-fashioned tomato pie flavor but strip away the complexities and labor. The ingenious solution? A versatile, doughy Bisquick crust replaces the multi-step pie shell. With this method, you simply combine Bisquick mix, milk, cheese, and a blend of herbs, then effortlessly press it into your pie dish. This creates a remarkably fluffy, biscuit-like base that perfectly marries the rustic charm of Southern cooking with a hint of Italian-inspired tomato pie. Crucially, this sturdier, doughier crust masterfully holds its own against the tomatoes’ moisture, ensuring a consistently delicious and structurally sound pie.
This turned out beautiful and so TASTY. My husband loved it too. I made it exactly as printed, pulling the crust up the sides and leaving a thinner crust layer on the bottom. That’s what I have always disliked about other recipes……soggy crust. This did not have one, browned nicely on the bottom due to higher cooking temperature, I presume. The seasoning in the crust perfectly complimented the tomato flavor. I will definitely make again and again and change up by experimenting with seasonings and cheese. Tip: make SURE you get tomatoes as dry as you can 🙂
—AKeeper

The Secret to a Perfect, Never-Soggy Tomato Pie
One of the most common complaints about homemade tomato pie is a watery or soggy crust. This is entirely preventable with a simple yet crucial step: proper tomato preparation. The key is to draw out as much excess moisture as possible from your tomato slices before they ever meet the pie crust. This technique isn’t just for pies; it’s a game-changer for dishes like southern-style fried green tomatoes, ensuring a crisp, delightful result.
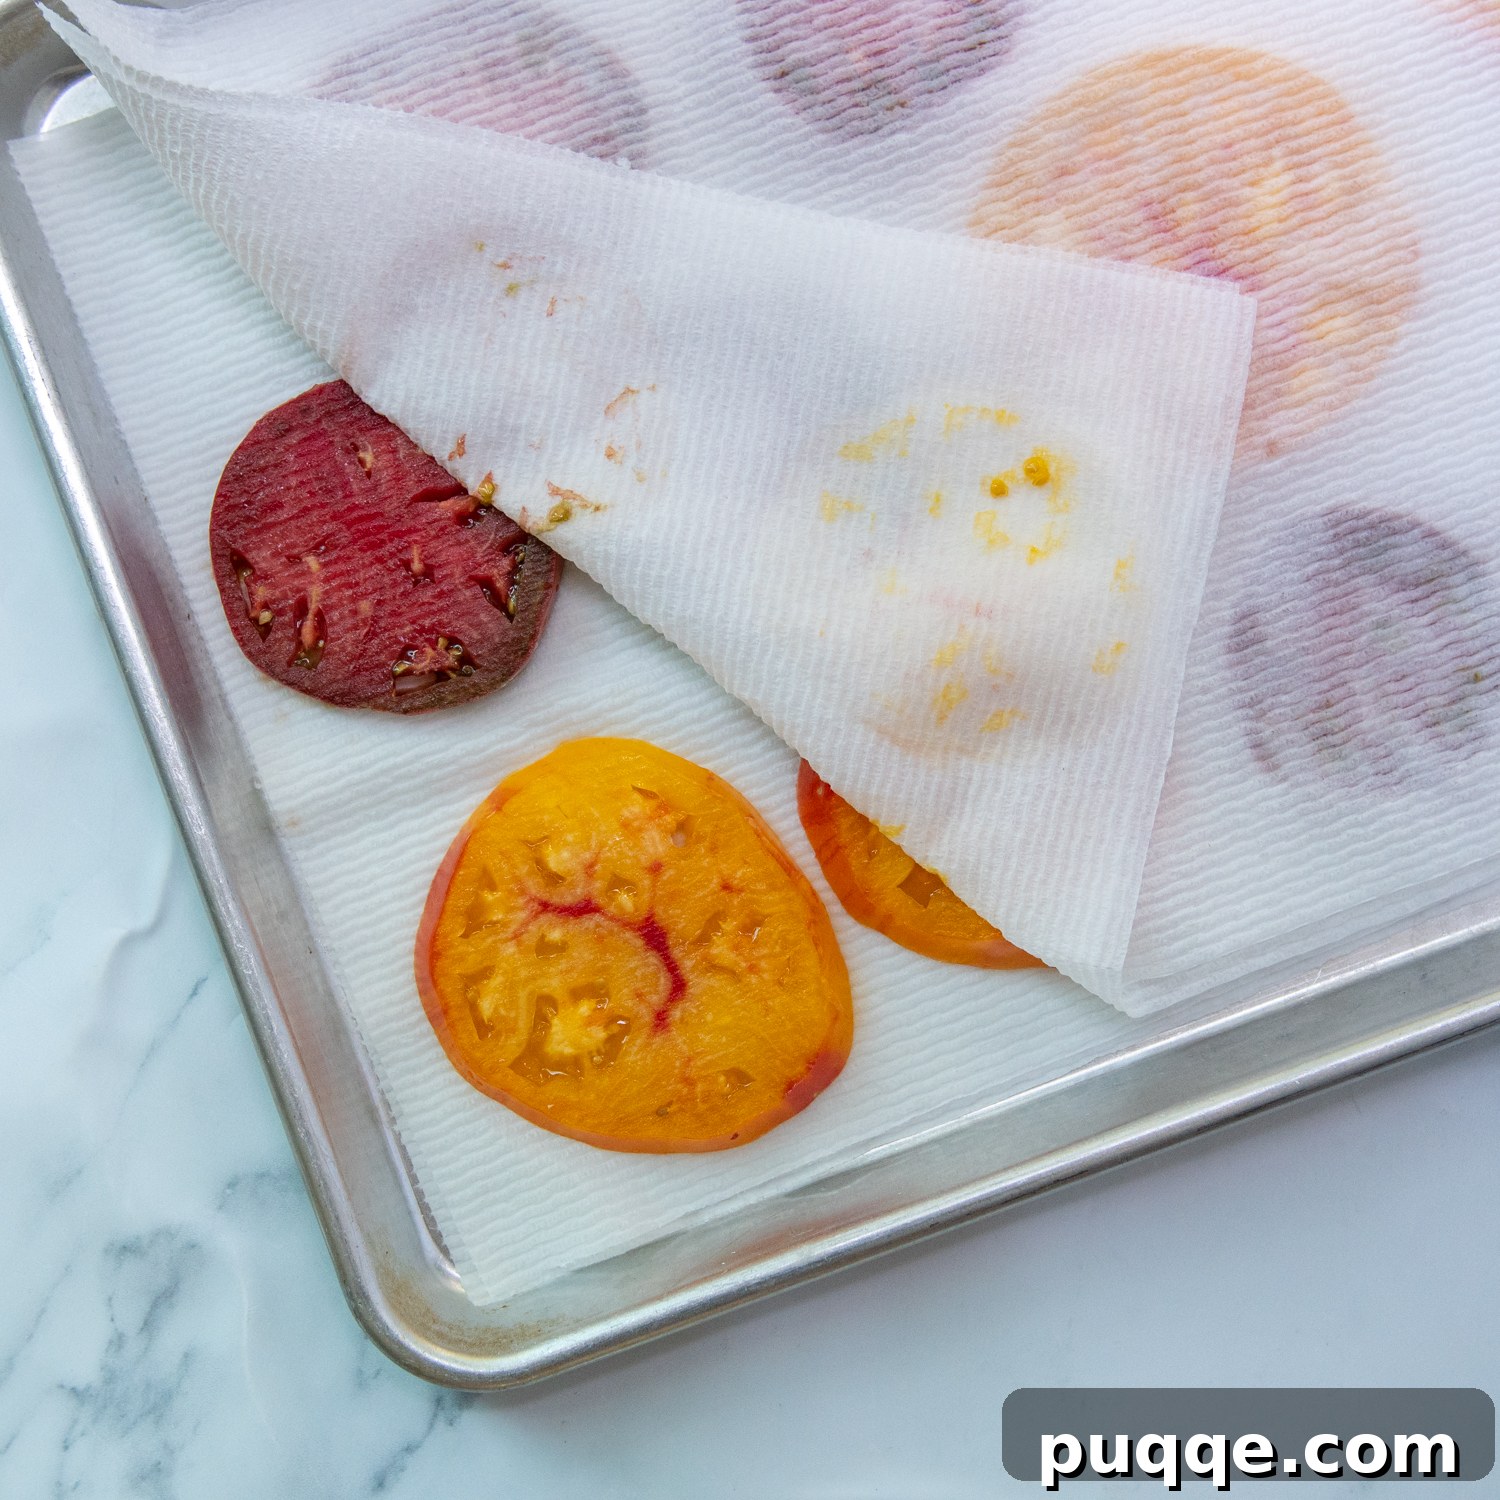
For the best results, begin drying your tomatoes even before you start preparing the crust or filling. Lay two layers of paper towels on a clean baking sheet. Arrange your freshly sliced tomatoes in a single layer on top of the paper towels. Then, gently press two more layers of paper towel over the tomatoes. Apply a light, even pressure to encourage moisture absorption. Allow the tomatoes to “drain” in this manner for at least 30 minutes. This gives ample time for the paper towels to soak up significant amounts of liquid, which would otherwise be released into your pie during baking, leading to that undesirable soggy texture. This simple trick guarantees a firm, flavorful, and beautifully structured homemade tomato pie.
Choosing the Right Tomatoes for Your Pie
While almost any ripe, fresh tomato will work, some varieties are naturally lower in moisture, making them ideal for tomato pie. Roma tomatoes, also known as plum tomatoes, are often preferred for their firm flesh and fewer seeds, meaning less liquid to drain. Beefsteak tomatoes are also a good choice, especially larger ones, as they provide substantial slices. Heirloom tomatoes add beautiful color and complex flavor, but might require a bit more diligent draining. Regardless of your choice, the drying step is paramount. There’s no need to peel your tomatoes; simply core and slice them into ¼-inch rounds for the perfect thickness and texture in your pie.
Perfect Pairings: What to Serve with Your Cheesy Tomato Pie
A hearty tomato cheese pie, especially one with a substantial doughy crust and rich cheddar filling, can be quite filling on its own. Therefore, it pairs beautifully with lighter side dishes, much like you would serve with a classic quiche. Consider these delightful accompaniments to complete your meal:
- Green Salads: A crisp, fresh salad offers a wonderful contrast to the pie’s richness. Try a vibrant Strawberry Feta Salad, a crunchy Apple Pecan Salad, or simply a refreshing garden salad with a light vinaigrette.
- Fresh Fruit Salad: The sweetness and acidity of a colorful fruit salad can brighten the palate and complement the savory pie.
- Lightly Cooked Veggies: Embrace seasonal produce with simple preparations. Options include a refreshing green bean salad, perfectly grilled zucchini, tender roasted broccoli, or caramelized Brussels sprouts.
- Soup: A light, clear broth-based soup or a chilled gazpacho makes an excellent appetizer, paving the way for the robust flavors of the tomato pie.
The Ultimate Easy Tomato Pie Recipe
This recipe brings together simple ingredients for a show-stopping dish. Follow these instructions for a perfect cheesy tomato pie every time.

Easy Tomato Pie with Bisquick

Melissa Erdelac
6 servings
30 mins
30 mins
This easy tomato pie recipe truly tastes like comforting, cheesy Southern tomato pie but without any of the hard work! Just mix and pat in a fluffy Bisquick crust, top with a sharp cheddar cheese and mayonnaise filling, and layer on perfectly dried fresh tomato slices. Plus, we’ve included simple adaptations for a delicious gluten-free option!
Pin Recipe
Rate Recipe
Ingredients
For the Crust:
- 2 large tomatoes, cored and cut into ¼” slices
- 2 cups Bisquick baking mix*, regular or gluten-free
- ½ cup grated extra sharp cheddar cheese (for crust)
- ¾ cup milk
- 2 tablespoons butter, melted and cooled
- ½ teaspoon garlic powder
- ½ teaspoon dried basil
- ½ teaspoon dried oregano
For the Filling:
- 1 ½ cups grated extra sharp cheddar cheese (remaining)
- ½ cup mayonnaise (full-fat recommended for best flavor)
- 2 tablespoons minced chives (or finely chopped green onions for a milder taste)
- ½ tablespoon apple cider vinegar (adds a subtle tang)
- ½ teaspoon salt
- ¼ teaspoon black pepper, freshly ground
Instructions
- Prepare the Tomatoes: Place a double layer of paper towels on a baking sheet. Arrange fresh tomato slices on top in a single layer (they can slightly overlap). Gently press two more layers of paper towel over the tomatoes. Let them stand for at least 30 minutes, or longer if your tomatoes are particularly juicy, to absorb excess moisture. This crucial step prevents a soggy crust.
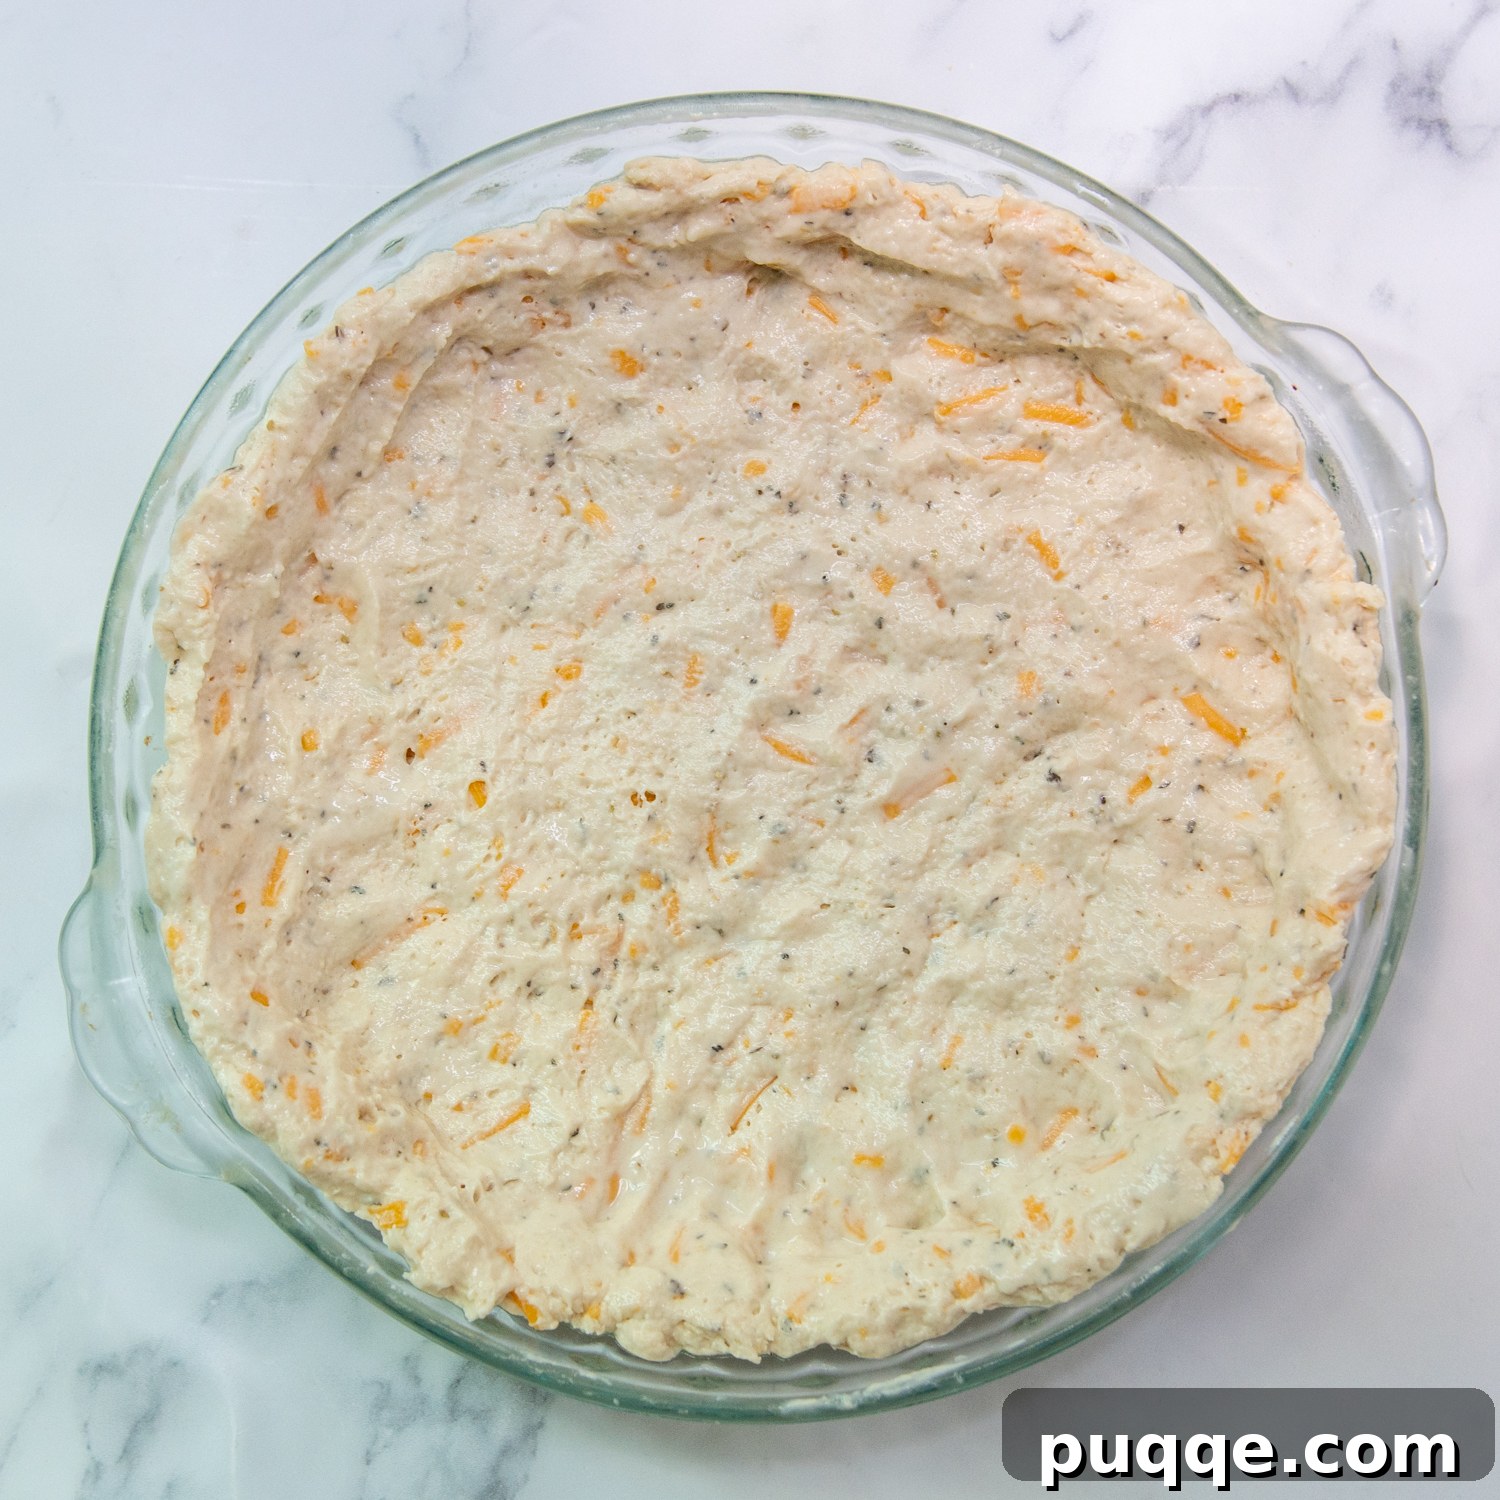
- Preheat Oven & Make the Crust: Preheat your oven to 400°F (200°C). In a medium bowl, combine the Bisquick baking mix, ½ cup shredded cheddar cheese, milk, melted and cooled butter, garlic powder, dried basil, and dried oregano. Mix until a soft dough forms. Press this dough evenly into a greased 9-inch pie plate, making sure to extend it up the sides to form a crust. Place the prepared crust in the refrigerator while you prepare the filling.
- Prepare the Cheesy Filling: In another bowl, mix together the remaining 1 ½ cups grated sharp cheddar cheese, mayonnaise, minced chives (or green onions), apple cider vinegar, salt, and pepper until well combined and creamy.
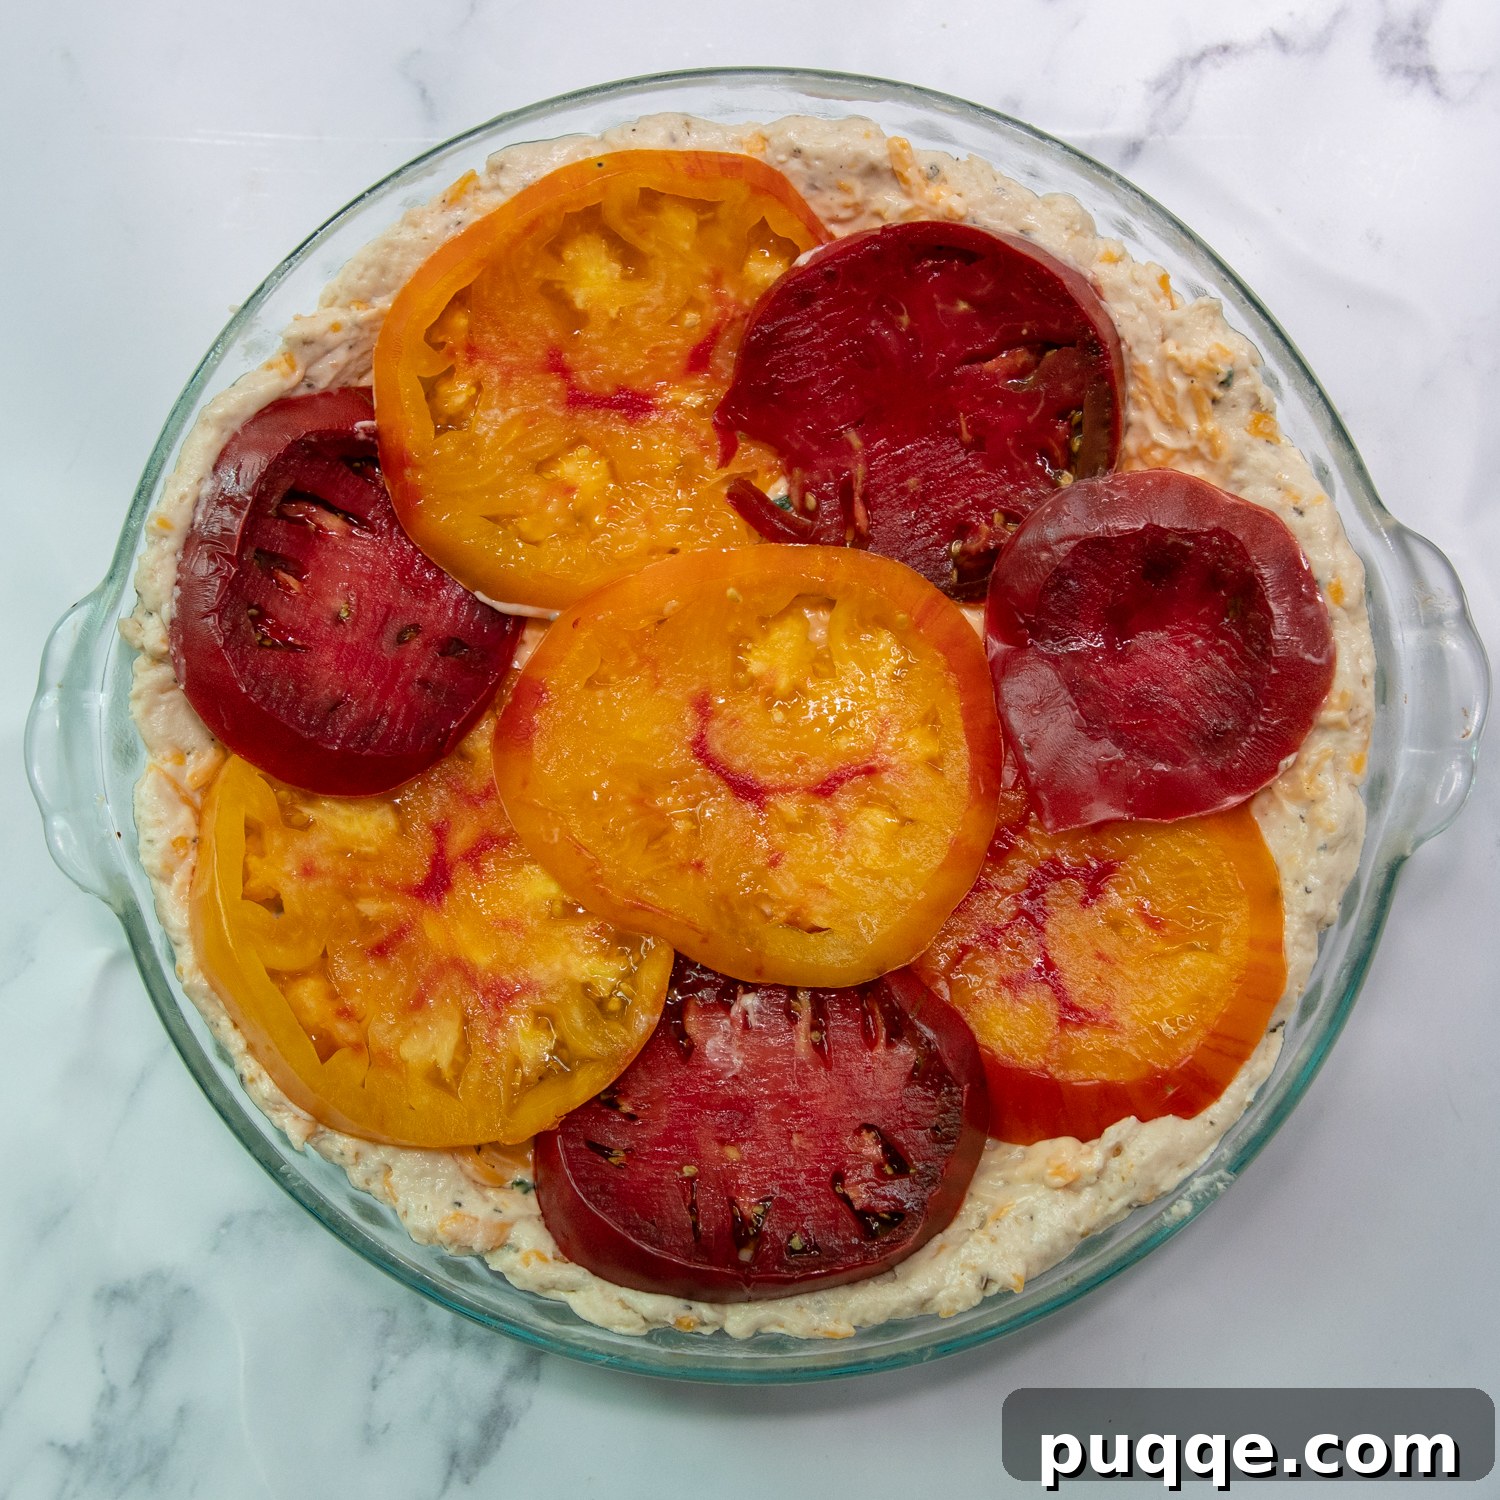
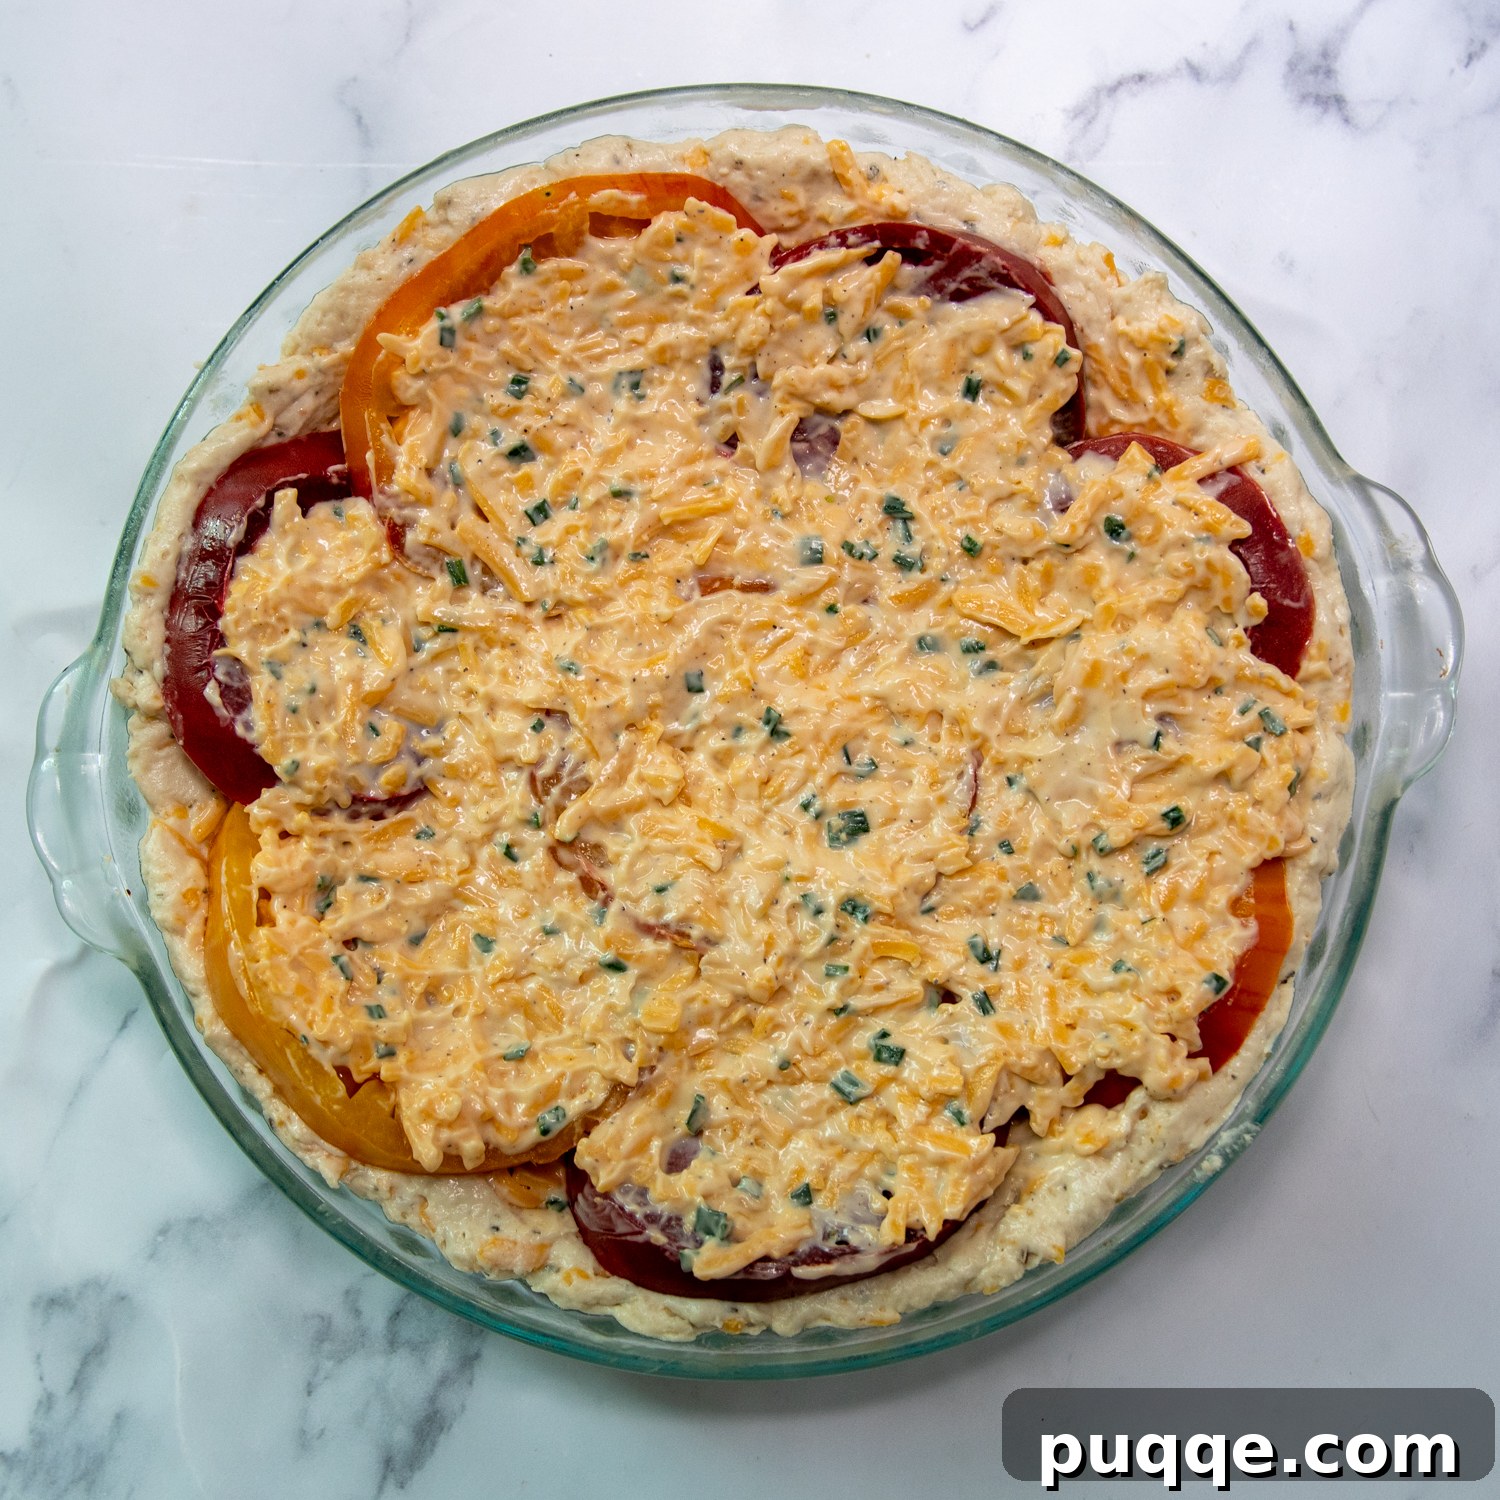
- Assemble the Pie: After the tomatoes have adequately drained, remove the chilled crust from the refrigerator. Spread half of the cheese and mayonnaise filling evenly over the bottom of the crust. Carefully arrange the dried tomato slices on top of the filling, layering them slightly if necessary to fit. Finally, spread the remaining cheese and mayonnaise filling over the tomatoes, ensuring they are mostly covered.
- Bake to Golden Perfection: Bake the tomato pie in the preheated oven for 35-40 minutes, or until the crust is golden brown and the top is bubbly and lightly browned. For an extra golden-brown finish, you may broil the pie for 1-2 minutes at the very end, watching it carefully to prevent burning. Remove from oven and let stand for 15 minutes before slicing and serving. This resting period allows the pie to set, ensuring cleaner, more cohesive slices. Enjoy your perfectly baked Bisquick tomato pie!
Notes & Tips
Making Without Bisquick
If Bisquick isn’t available or you prefer to make your own mix, you can easily substitute with all-purpose flour or a suitable gluten-free flour blend.
To the dry ingredients for the crust, add 2 cups of all-purpose or gluten-free flour, 2 teaspoons of baking powder, and ½ teaspoon of salt along with the other seasonings. When mixing with the milk, increase the amount of melted butter to 4 tablespoons to achieve the correct dough consistency.
Gluten-Free Adaptations
This recipe is incredibly easy to adapt for a gluten-free diet! Simply swap out the regular Bisquick for a reliable gluten-free baking mix.
I’ve had excellent results using Pamela’s Gluten-Free Baking Mix. However, I generally do not recommend Bisquick’s own gluten-free baking mix for this recipe, as it can result in a drier and grittier crust texture (you would likely need to add extra milk to help bind the dough). King Arthur Baking Company also produces a gluten-free baking mix that would most likely perform well, though I haven’t personally tested it with this specific recipe.
Storing and Reheating Your Tomato Pie
Leftovers: To maintain freshness, wrap any leftover pie tightly in aluminum foil or transfer individual slices to an airtight container. Store in the refrigerator for up to 2-3 days.
Reheating: The key to reheating tomato pie is to do so gently to prevent the crust from becoming overcooked and tough. While the pie can be enjoyed cold or at room temperature, here’s how to warm it perfectly:
- Microwave: Place a single slice on a microwave-safe plate. Heat at 40% power for 1-2 minutes, then finish heating at full power for 30 seconds to 1 minute, or until warmed through. Be careful not to overheat!
- Oven: For a crisper crust, place slices on a small, foil-lined baking sheet. Reheat in a 350°F (175°C) oven for 10-15 minutes, or until thoroughly heated. If the crust begins to brown too much, loosely tent the edges with foil.
Nutrition Information
Calories: 429kcal,
Carbohydrates: 32g,
Protein: 14g,
Fat: 27g,
Saturated Fat: 13g,
Cholesterol: 56mg,
Sodium: 1128mg,
Potassium: 287mg,
Fiber: 2g,
Sugar: 9g,
Vitamin A: 1086IU,
Vitamin C: 9mg,
Calcium: 389mg,
Iron: 2mg
Let’s Make This Together! (Visual Guide)
For those who love to see the process unfold, these step-by-step photos complement the full recipe card above. They provide a visual aid to ensure your easy tomato pie comes out perfectly.
1. Prep the Tomatoes for Success
Begin by placing a double layer of paper towels on a baking sheet. Lay your fresh tomato slices (cored and ¼-inch thick) on top. Gently press two more layers of paper towel over the tomatoes. Let them stand for at least 30 minutes. This essential step is your best defense against a soggy crust, ensuring a firm and flavorful pie.
2. Create the Effortless Bisquick Crust
While your tomatoes are diligently drying, it’s time to whip up the easy Bisquick crust. In a bowl, combine Bisquick baking mix, shredded cheddar cheese, your chosen herbs (garlic powder, basil, oregano), milk, and melted butter. Mix until a soft, cohesive dough forms. Press this dough firmly and evenly into your pie plate, ensuring it covers the bottom and extends up the sides to create a sturdy crust. Pop it into the fridge to chill while you prepare the filling.
3. The Cheesy Magic and Layering Process
Now for the heart of the pie! In a separate bowl, mix together the remaining shredded cheddar cheese, mayonnaise, minced chives, apple cider vinegar, salt, and pepper until it’s wonderfully creamy. Spread half of this rich, savory filling evenly over the chilled Bisquick crust. Next, carefully layer your well-drained tomato slices on top of the filling. They can slightly overlap to ensure every bite has that fresh tomato flavor. Finally, spread the remaining cheese and mayonnaise filling over the tomatoes, creating a delicious top layer.
4. Time to Bake and Enjoy!
Place your assembled tomato pie into the preheated 400°F (200°C) oven. Bake for approximately 35-40 minutes, or until the crust has achieved a beautiful golden brown and the cheesy top is bubbly and slightly browned. If you desire an extra-crisp, golden finish on top, you can carefully broil the pie for 1-2 minutes at the very end (watch it closely to prevent burning!). Once out of the oven, resist the urge to slice immediately. Let the pie stand for 10-15 minutes. This resting period allows the filling to set properly, ensuring your slices hold together perfectly for serving. Dig in and savor every bite of your homemade cheesy tomato pie!
Crafting a Delicious Gluten-Free Tomato Pie
For those managing gluten sensitivities, this recipe is wonderfully adaptable to create a delightful gluten-free tomato pie! The primary adjustment is a simple swap: replace the regular Bisquick mix with a high-quality gluten-free baking mix.
Through testing, I’ve had fantastic success with Pamela’s Gluten-Free Baking Mix, which yielded a crust with excellent texture and flavor. However, I typically do not recommend Bisquick’s own brand of gluten-free baking mix for this recipe, as the crust tended to be drier and more gritty in my experience (if you must use it, be prepared to add extra milk to achieve the right dough consistency). King Arthur Baking Company also produces a widely praised gluten-free baking mix that would likely work very well, although I haven’t personally tested it in this specific recipe.
If you find yourself without a gluten-free baking mix readily available, don’t despair! You can still achieve a wonderful gluten-free crust by using individual gluten-free flours. To replicate the leavening and texture of a baking mix, combine 2 cups of your preferred gluten-free all-purpose flour blend, 2 teaspoons of baking powder, and ½ teaspoon of salt with the other dry seasonings. When incorporating the melted butter and milk, you will need to increase the amount of melted butter to 4 tablespoons to ensure the dough binds properly and creates a tender, flavorful crust.
Delicious Add-In Ideas to Elevate Your Tomato Pie
While this savory tomato pie is incredibly flavorful on its own, it also serves as a fantastic canvas for additional ingredients. Don’t hesitate to personalize your creation! Consider enhancing that cheesy mayo mixture with any of these yummy add-ins. For even more inspiration, check out the comments section below, where fellow cooks share their favorite twists. Some common and highly recommended additions I’ve included when making this recipe are:
- Sautéed Onions: Caramellized or lightly sautéed onions add a layer of sweet and savory depth.
- Diced Ham: A fantastic way to introduce a smoky, salty element.
- Crispy Bacon: Crumbled crispy bacon bits are always a welcome addition for texture and flavor.
- Fresh Herbs: Beyond basil and oregano, consider finely minced fresh thyme, rosemary, or parsley for a burst of fresh aroma.
- Cooked and Crumbled Sausage: Italian sausage or breakfast sausage can transform this into an even heartier meal.
- Spinach or Kale: Sautéed greens can be added for extra nutrients and a lovely color contrast.
- Other Cheeses: Experiment with different cheese blends! Gruyere, Parmesan, or a touch of smoked gouda can introduce new dimensions of flavor.

Essential Tips and Tricks for Tomato Pie Perfection
Achieving the perfect homemade tomato pie is easier than you think, especially with these insider tips:
- Prioritize Tomato Drainage: Always remember to slice and thoroughly drain your tomatoes on paper towels first, before you even begin preparing the crust or filling. This is the single most important step to prevent a soggy bottom.
- Tomato Variety Matters (But Isn’t Restrictive): While any ripe, fresh tomato will work, varieties like Roma tomatoes are particularly good choices due to their lower moisture content and firm flesh. Don’t fret if you only have other types; just be extra diligent with the draining process.
- No Peeling Required: Save yourself time and effort! There is absolutely no need to peel the tomatoes. Simply core them and slice them into ¼-inch rounds for the best texture and visual appeal.
- Layer Tomatoes Evenly: For optimal flavor distribution and structural integrity, arrange the tomato slices in a single layer as much as possible. It’s perfectly fine if they overlap slightly to fit them all into the pie plate.
- Achieve Golden Cheese: For a beautifully lightly browned, golden cheese topping, consider broiling the pie for 1-2 minutes at the very end of the baking time. Watch it extremely carefully to ensure the crust doesn’t burn! Alternatively, if your crust is already perfectly golden, you can cover the edges with a pie shield or aluminum foil before broiling the top.
- Fresh vs. Dried Herbs: While dried herbs are convenient and effective, feel free to substitute with fresh minced herbs. Add them directly to the crust mixture or sprinkle them generously as a vibrant garnish just before serving for an extra pop of fresh flavor.
- Allow to Rest: Resist the urge to cut into the pie immediately after taking it out of the oven. Letting it stand for 10-15 minutes allows the filling to set, resulting in cleaner, more stable slices.

Frequently Asked Questions About Easy Tomato Pie
Here are some common questions about making this delightful Southern favorite:
Can I use different types of cheese?
Absolutely! While sharp cheddar provides a classic Southern flavor, feel free to experiment. Gruyere, mozzarella (ensure it’s well-drained), Parmesan, or even a blend of Italian cheeses can offer a unique twist to your tomato pie.
What if I don’t have Bisquick?
No Bisquick? No problem! You can easily make a homemade equivalent for the crust. Combine 2 cups all-purpose flour, 2 teaspoons baking powder, and ½ teaspoon salt. Then, proceed with the recipe, adding the milk, melted butter (increased to 4 tablespoons), and herbs to this dry mixture.
Can I prepare tomato pie ahead of time?
You can prepare some components in advance. The tomato slices can be drained a few hours ahead and stored in the refrigerator. The Bisquick crust can be mixed and pressed into the pie plate, then chilled for up to a day before baking. However, assembling and baking the entire pie fresh is recommended for the best texture, as the tomatoes will continue to release moisture over time.
How do I know when the tomato pie is cooked through?
The pie is ready when the crust is golden brown and the cheesy filling is bubbly and lightly browned on top. The edges of the crust should appear crisp. If you see excess moisture around the edges, it might need a few more minutes to evaporate.
Save This Recipe to Your Pinterest Board!
Let’s be friends on Pinterest! I’m always sharing great recipes!
Did you make this recipe? We love hearing from you! Leave a star rating and comment below the recipe card. Your feedback helps others discover and enjoy our recipes, and I always make sure to respond! -Melissa
Did you make this recipe?
Please leave a star rating and review below. It helps others when searching for recipes and I LOVE feedback!