
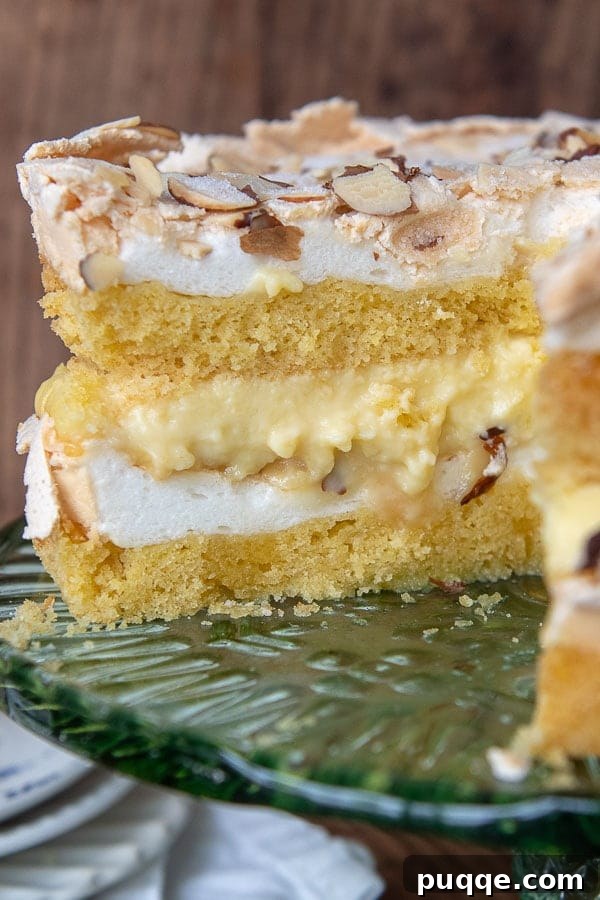
Embark on a culinary journey with the enchanting Blitz Torte, often hailed as the “World’s Best Cake.” This classic, old-fashioned dessert is a symphony of contrasting textures and harmonious flavors, promising an unforgettable experience with every bite. Imagine a golden-brown, crackling meringue that yields to a light, airy cake, all perfectly layered around a luscious, creamy vanilla custard filling. It’s a dessert that truly lives up to its grand reputation, captivating palates with its unique charm and elegant simplicity. Prepare to discover why this German-inspired delight has charmed generations and continues to be a cherished favorite.
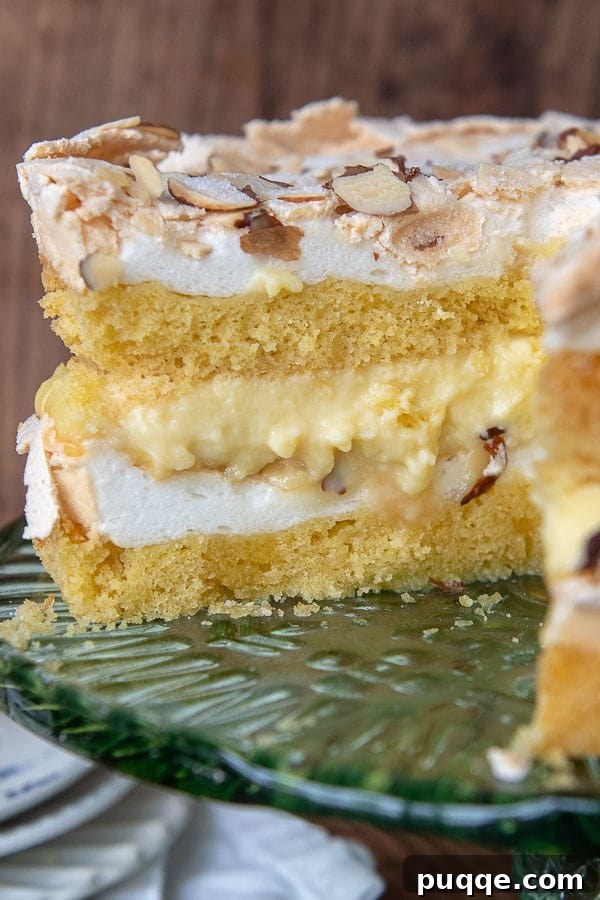
Blitz Torte: A Timeless Classic Deserving of Its “Best Cake” Title
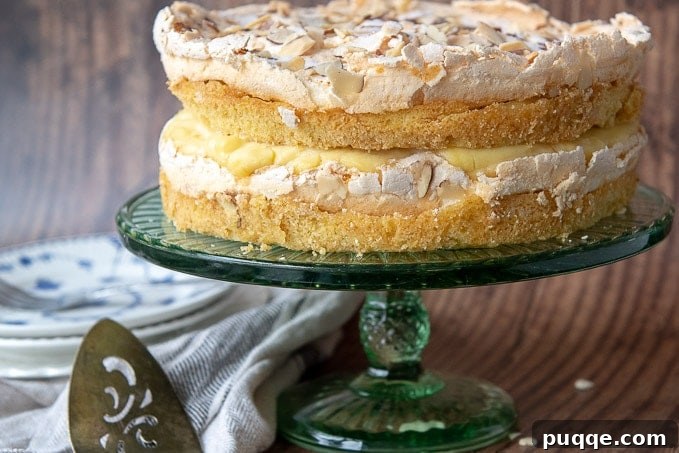
While its name, “Blitz,” translates to “lightning” in German, hinting at a quick preparation, this unique dessert is actually an American innovation with clear European roots. Unlike conventional layer cakes, the Blitz Torte stands apart by uniting a tender, dense cake base with a cloud-like, airy meringue topping, both baked together in the same pan. The magic truly unfolds with the inclusion of a rich, pudding-like vanilla custard, generously spread between these distinct layers. This ingenious construction results in a dessert that offers an unparalleled textural experience—crisp, chewy, tender, and creamy all in one glorious mouthful.
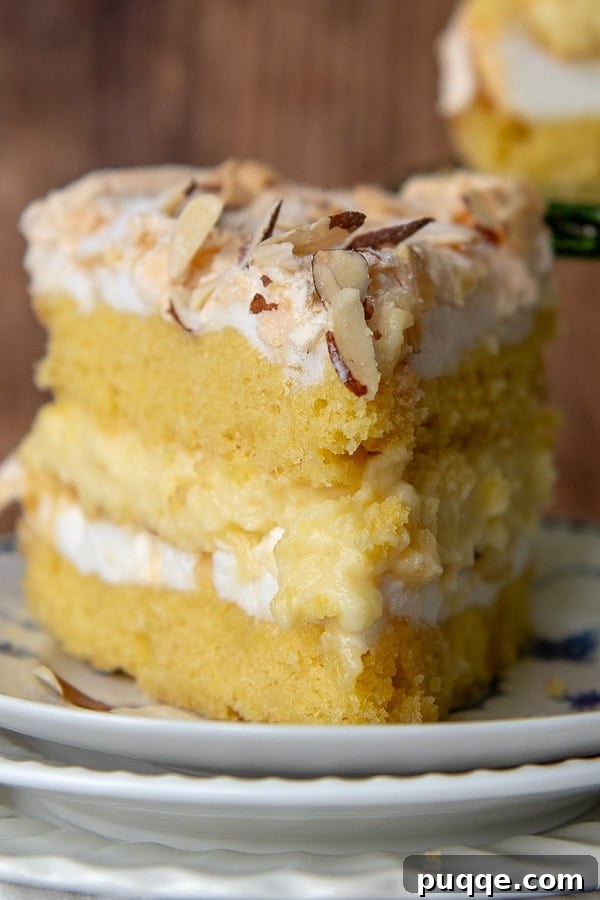
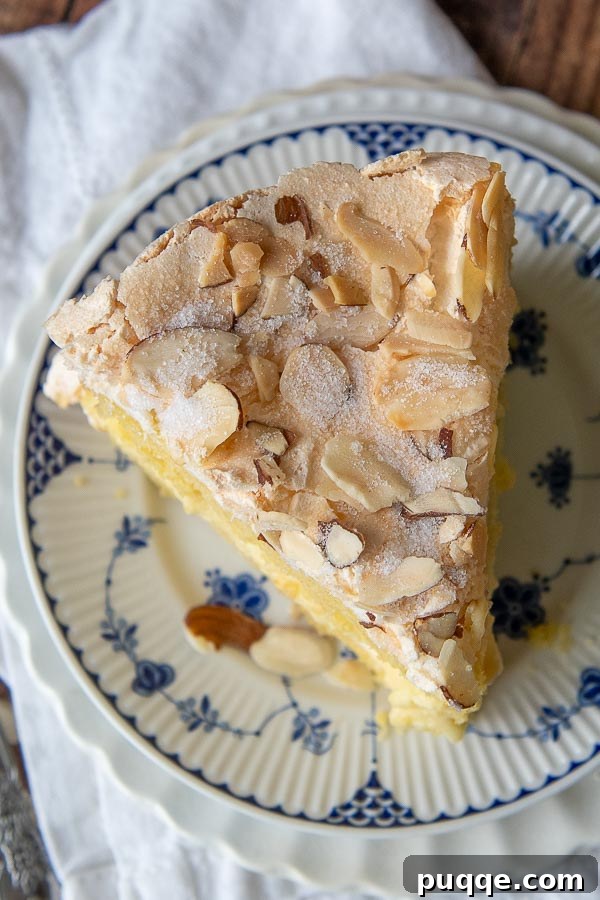
The allure of the Blitz Torte lies in its simplicity and the masterful balance of its components. Much like other beloved vintage recipes, such as a homemade almond apple cake, it’s the combination of humble ingredients, expertly prepared, that elevates it to extraordinary heights. Each forkful transports you through a delightful sequence: the initial crunch of caramelized sugar and toasted almonds on the meringue, followed by the delicate crispness of the meringue itself, then the soft chewiness of the vanilla cake, culminating in the cool, smooth luxury of the creamy filling. This harmonious interplay of textures and flavors ensures that every single aspect of this cake is a pure delight, leaving no room for disappointment.
Adding to its versatility and widespread appeal, the Blitz Torte can be wonderfully adapted to suit various dietary needs. Whether you prefer traditional all-purpose flour or opt for a gluten-free alternative, this recipe delivers exceptional results. Many bakers, including myself, have successfully prepared this torte both ways, proving its adaptability without compromising on its signature taste or texture. This makes it an ideal choice for entertaining a diverse group of guests, ensuring everyone can enjoy a slice of this magnificent creation.
Despite its “lightning” name, a truly exceptional Blitz Torte requires a little forethought, particularly concerning the custard filling. For the best results, the custard needs ample time to cool to room temperature before being thoroughly chilled in the refrigerator. This crucial step ensures the custard achieves the perfect consistency, firm enough to hold the cake layers beautifully together without seeping out. To streamline your baking process, consider preparing the custard a day in advance, allowing it to chill completely overnight. This not only simplifies assembly on baking day but also deepens the vanilla flavor of the custard. Should you find yourself short on time, a rich, buttery vanilla whipped cream makes an excellent alternative filling, and a sprinkle of fresh berries can add a delightful burst of freshness and color.
Crafting Your Masterpiece: Essential Ingredients for Blitz Torte
Creating an extraordinary Blitz Torte begins with understanding the role of each ingredient. While the full recipe with precise measurements is detailed in the recipe card below, let’s explore the key components that bring this magical cake to life, along with some helpful tips for maximizing flavor and texture.
For the Heavenly Custard Filling
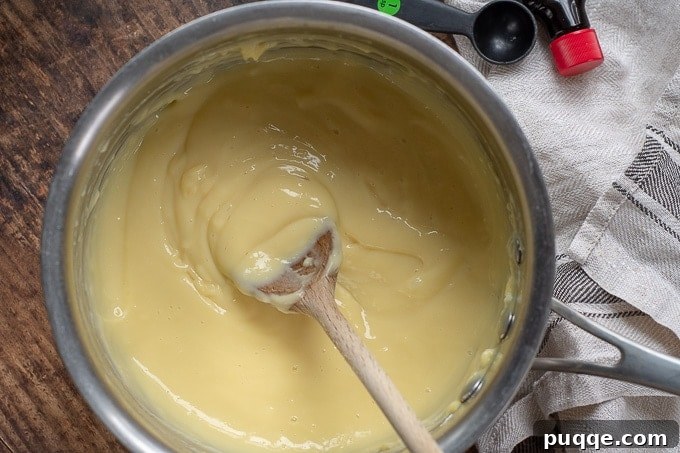
The heart of this torte is its incredibly smooth and flavorful vanilla custard, made right on your stovetop, much like a classic homemade pudding. You’ll combine whole milk, egg yolks, sugar, cornstarch, and a touch of salt. The whole milk provides a rich, creamy base, while egg yolks add essential richness and help with thickening. Cornstarch is the star thickener here, ensuring a stable, velvety custard that won’t weep. Cook and stir this mixture gently over medium heat until it thickens to a luxurious, spoon-coating consistency and boils for just one minute. Once removed from the heat, a generous amount of vanilla is stirred in. For an unparalleled vanilla experience, consider using vanilla bean paste instead of extract; its concentrated flavor and visible specks will truly elevate your custard. After flavoring, it’s crucial to cool the custard completely. Press plastic wrap directly onto the surface to prevent a skin from forming, then allow it to cool to room temperature before chilling it thoroughly in the refrigerator. This step is vital for a perfectly set filling.
For the Tender Cake Layers
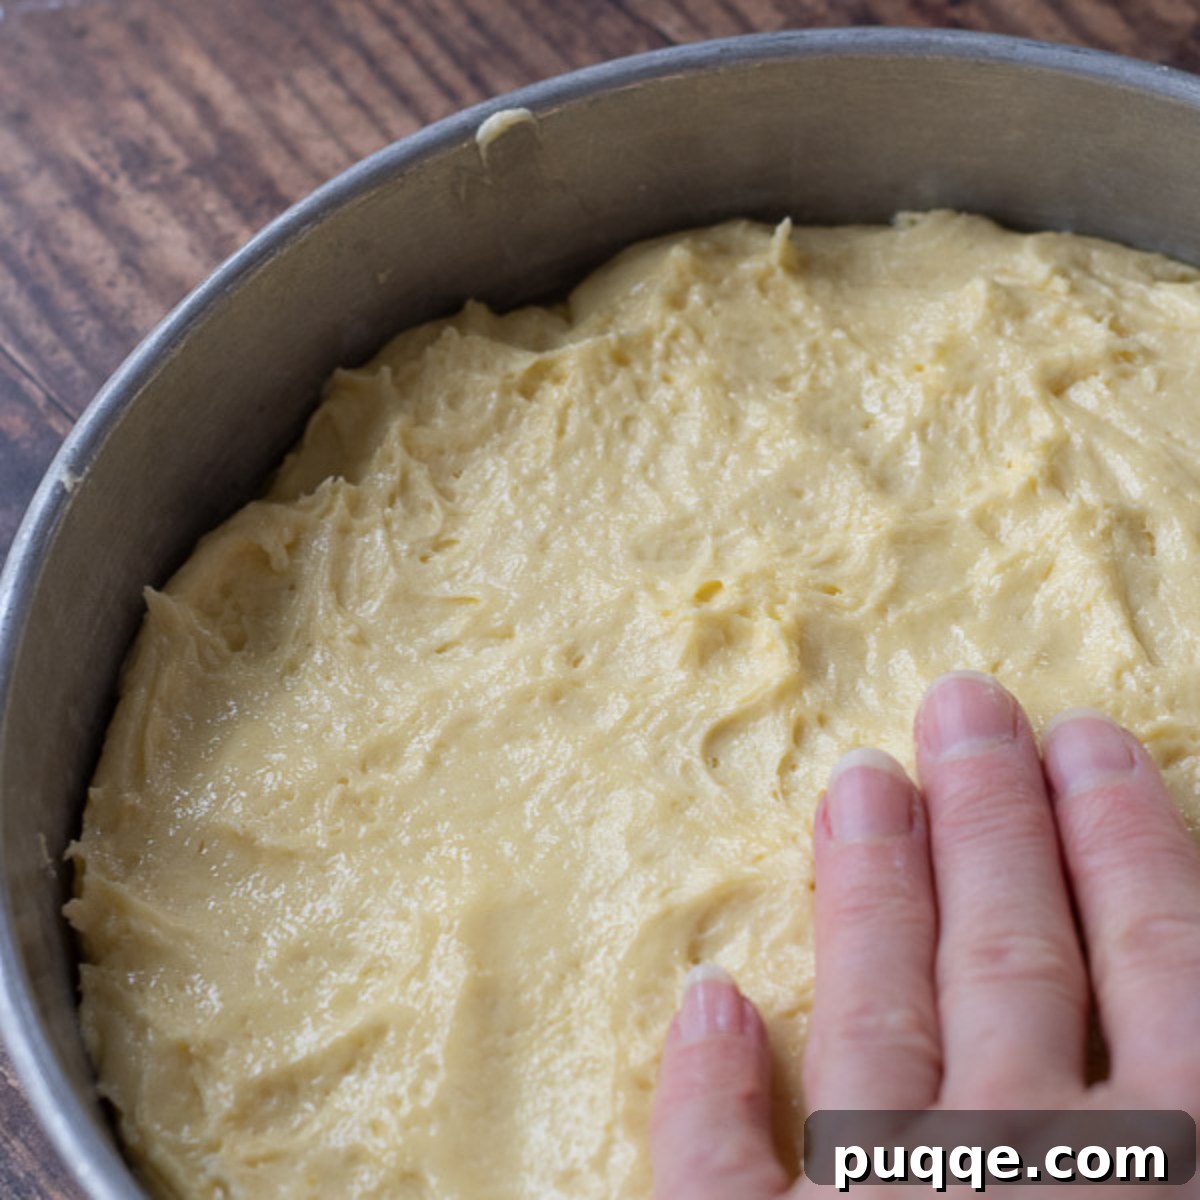
The cake batter, though simple, is where the “lightning” reference truly makes sense for ease of mixing. Unlike many elaborate cake recipes, this batter comes together quickly by beating together shortening, powdered sugar, egg yolks, and milk until smooth. Shortening is often favored in older recipes for its ability to create an incredibly tender, soft crumb, different from butter’s flavor and texture profile. After combining these wet ingredients, the dry components—flour, baking powder, and a pinch of salt—are added and mixed for just a minute until fully incorporated. The batter will naturally be quite thick, especially if you opt for a gluten-free all-purpose flour blend like Cup4Cup, which often contains cornstarch that contributes to its thickness. This results in a wonderfully moist and tender crumb after baking. Once your batter is ready, it needs to be evenly spread into your prepared cake pans. Due to its thickness, you might find it easiest to use an offset spatula or even greased fingertips to gently press and spread the batter across the bottom of the pans, ensuring an even layer. Set these aside while you prepare the meringue.
Whipping Up the Signature Meringue
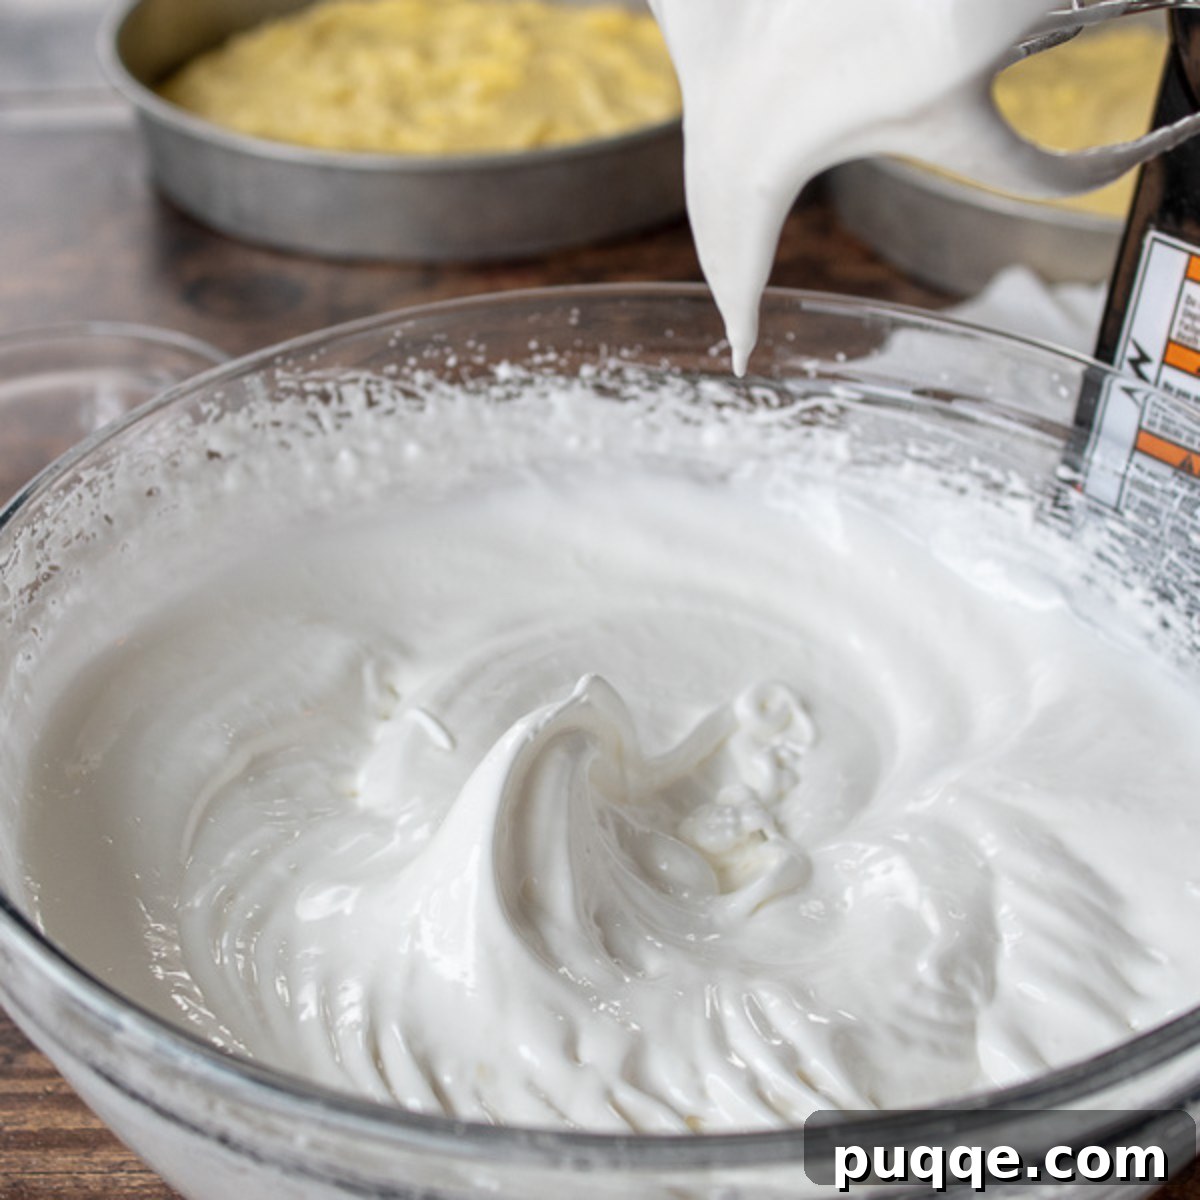
The meringue is the crowning glory of the Blitz Torte, providing that iconic crisp and airy topping. Begin by beating room-temperature egg whites in a meticulously clean, dry bowl until they become foamy. The cleanliness of your bowl is paramount here, as even a tiny speck of grease can prevent the whites from whipping properly. Once foamy, gradually introduce a mixture of powdered sugar and granulated sugar, adding just a couple of tablespoons at a time. This slow addition allows the sugars to fully dissolve, creating a stable and glossy meringue. Continue beating until the meringue forms stiff, shining peaks that hold their shape beautifully. This perfect meringue is key to the torte’s famous crunchy top.
Baking and Assembling Your Torte
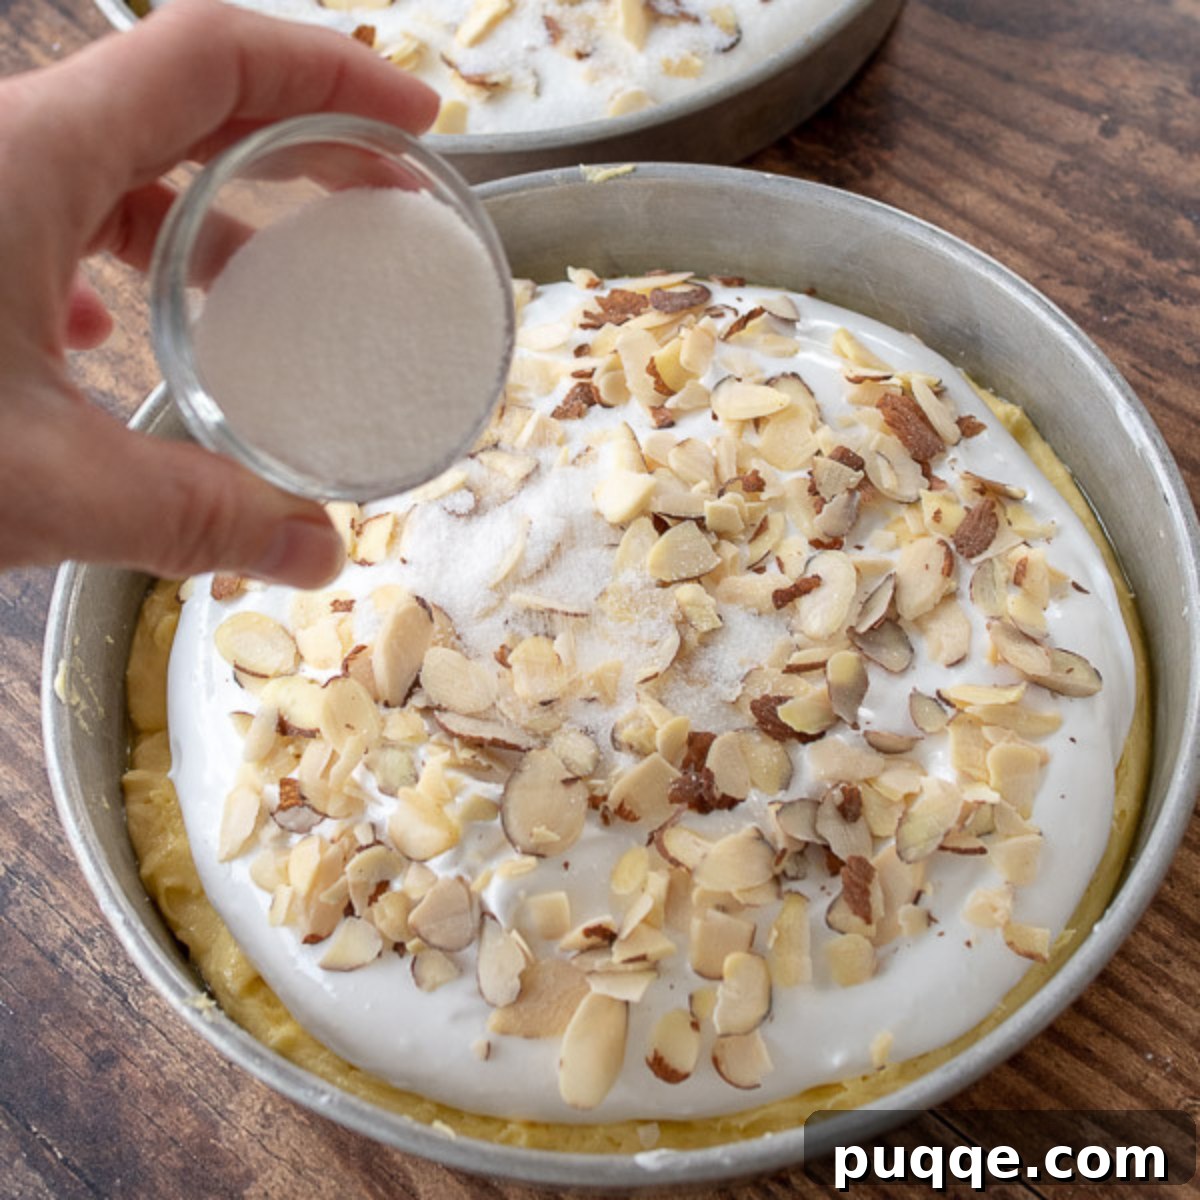
With your cake batter and meringue ready, it’s time for the final touches before baking. Divide the perfectly whipped meringue evenly between the two cake layers in their prepared pans, spreading it gently over the batter. Then, generously sprinkle sliced almonds over the meringue, followed by a light dusting of granulated sugar. This combination is what creates that magical, irresistible crunchy, crackling topping that makes Blitz Torte so distinctive and memorable.
Bake the layers until the meringue is set and golden, and a toothpick inserted into the cake layer (not just the meringue) comes out clean. It’s common for the meringue to appear done before the cake base, so always check the cake’s doneness. Once baked, allow the cake layers to cool completely within their pans before attempting to remove them. This is crucial for structural integrity.
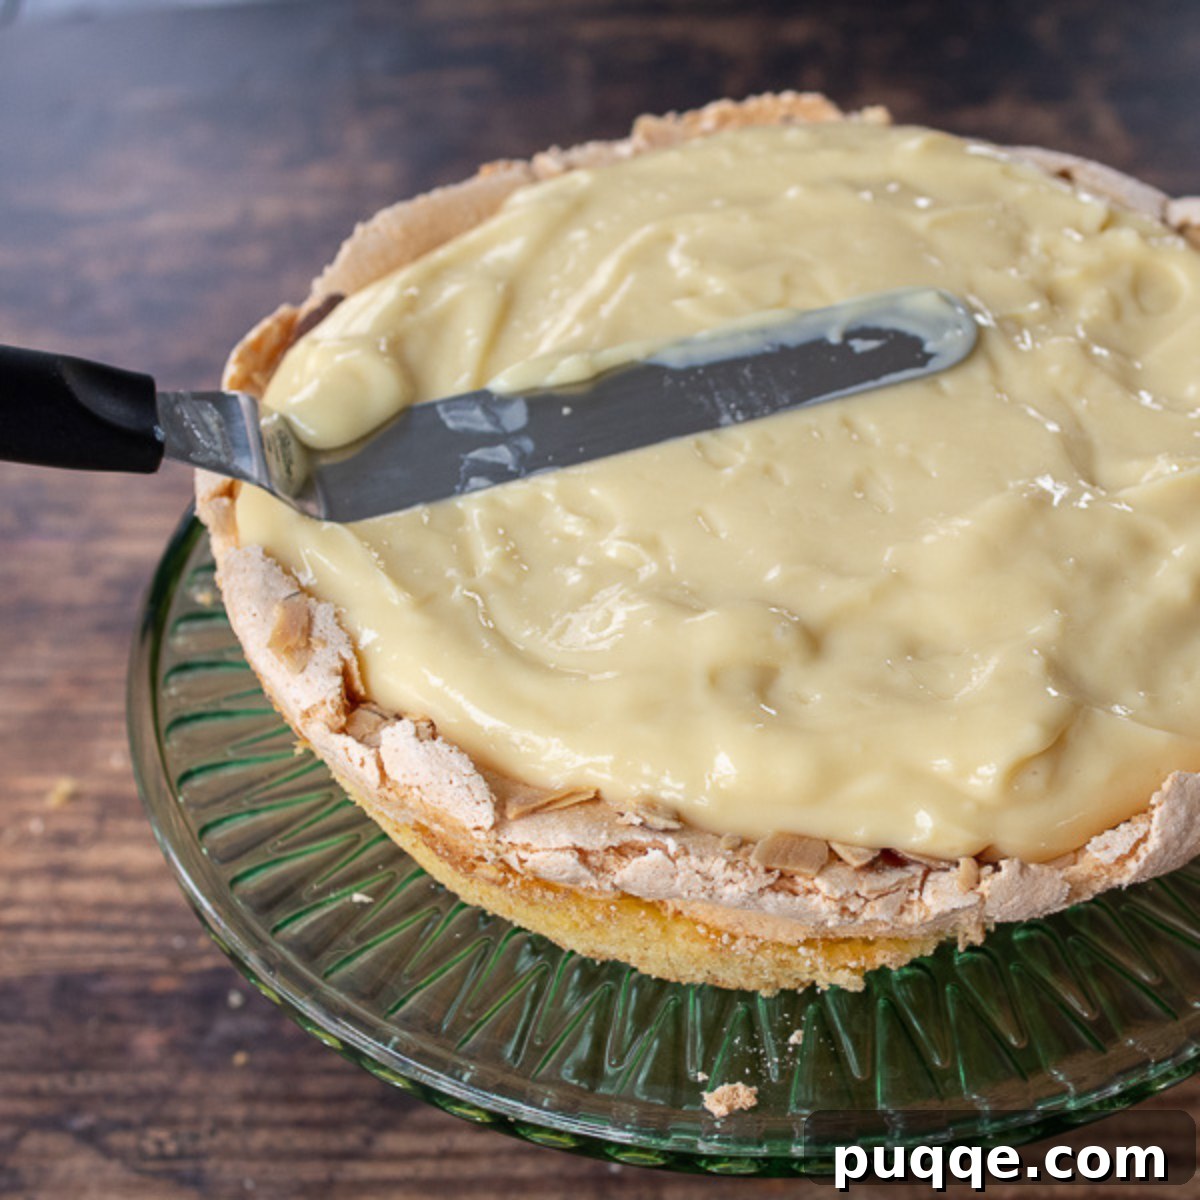
For assembly, run a thin knife around the edges of each pan to loosen the cake. Because the meringue side faces up, a gentle touch is required. Use a small offset spatula and your hand to carefully lift each layer out of its pan. If you used parchment paper, peel it off from the bottom of the cake. Place one cake layer, meringue-side up, on your chosen serving platter. Spread the chilled vanilla custard generously over this layer. Finally, carefully place the second cake layer on top, also meringue-side up. For neat slices and to prevent the layers from sliding, I highly recommend refrigerating the assembled torte for at least an hour before serving. When it’s time to cut, a serrated knife used with a gentle sawing motion will yield the cleanest, most beautiful slices.
Creative Variations & Serving Suggestions for Your Blitz Torte
While the classic Blitz Torte recipe holds a special place in the hearts of many, its fundamental structure lends itself beautifully to delicious variations. Many enthusiasts enjoy customizing this vintage dessert based on family traditions or seasonal preferences. These adaptations are so tempting, you might want to try them all!
- Add Fresh Fruit: Transform your Blitz Torte into a vibrant berry delight by incorporating a layer of fresh fruit. Raspberries, blackberries, or sliced strawberries placed directly on top of the creamy custard filling add a burst of color, a tangy counterpoint to the sweetness, and a wonderful freshness. This is especially lovely during summer months when berries are at their peak.
- Nutty Alternatives: While sliced almonds are traditional and create that iconic crunch, feel free to experiment with other nuts. Chopped walnuts or pecans can offer a different flavor profile and texture. However, the presence of some form of nuts is highly recommended, as they contribute significantly to the torte’s overall appeal and signature crunch. For an even richer flavor, lightly toast your chosen nuts before sprinkling them over the meringue.
- Whipped Cream Filling Bliss: For a lighter, airier alternative to the classic custard, a simple whipped cream filling works wonders. To prepare, beat together 2 cups of heavy cream with ¼ cup of powdered sugar until light, fluffy, and stiff peaks form. This less-dense filling allows the cake and meringue to truly shine. You can also layer fresh berries with the whipped cream for an added layer of flavor and elegance. Consider infusing the whipped cream with a touch of almond extract for an extra nod to the torte’s nutty origins.
- Chocolate Drizzle: For chocolate lovers, a delicate drizzle of melted dark or milk chocolate over the finished torte before serving can add an extra layer of decadence and visual appeal.
- Citrus Zest: A hint of lemon or orange zest in either the cake batter or the custard can brighten the flavors, adding a refreshing note that beautifully complements the vanilla and almond.
Serving Your Blitz Torte
The Blitz Torte is a showstopper on its own, but it pairs wonderfully with a few simple accompaniments. Serve it alongside a freshly brewed cup of coffee or a delicate tea, making it perfect for an afternoon treat or a delightful end to a meal. A small scoop of vanilla bean ice cream or a dollop of extra whipped cream can elevate the experience, offering additional creaminess. For a touch of freshness, a small side of mixed berries or a sprig of mint makes a beautiful and flavorful garnish.
Save This Irresistible Blitz Torte Recipe to Your Pinterest Board!
Let’s be friends on Pinterest! I’m always sharing fantastic recipes you won’t want to miss.
Frequently Asked Questions About Blitz Torte
- Why is it called “Blitz” Torte?
The name “Blitz,” meaning “lightning” in German, is often associated with the relatively quick preparation of the cake batter itself, compared to more complex European tortes. While the overall process involves cooling time, the individual cake components come together with surprising speed.
- Can I make Blitz Torte ahead of time?
Absolutely! The custard filling can be made 1-2 days in advance and stored in an airtight container in the refrigerator. The baked cake layers (without the custard) can also be stored at room temperature for up to a day, or wrapped tightly and frozen for longer. Assemble the torte no more than a day before serving for optimal freshness, especially the meringue’s crispness.
- How do I prevent a soggy meringue?
The key to a crisp meringue lies in proper baking and cooling. Ensure the meringue is fully set and lightly golden. Also, cooling the cake layers completely before assembling with the chilled custard is crucial, as residual heat and moisture can make the meringue soggy. Storing the assembled torte in the refrigerator can soften the meringue over time, so consuming it within 1-2 days is ideal.
- What if my custard is too thin or too thick?
If your custard is too thin, it likely didn’t cook long enough or didn’t reach a full boil. You can gently reheat it, whisking constantly, until it thickens. If it’s too thick, you can whisk in a tablespoon or two of warm milk until it reaches the desired consistency. Always ensure accurate measurements, especially for cornstarch.
- What kind of pans should I use?
Two 8-inch round cake pans are ideal for this recipe, creating two perfect layers for the torte. Ensure they are properly greased and lined with parchment paper for easy removal.
Did you make this recipe? I genuinely love hearing about your baking adventures! Please take a moment to leave a star rating and comment below the recipe card. Your feedback is incredibly valuable to our community, helping others discover and enjoy this recipe. I promise to always respond! -Melissa
4.31 stars (36 ratings)
World’s Best Blitz Torte with Custard Filling

Melissa Erdelac
This old-fashioned Blitz Torte recipe is an explosion of textures and tastes with a crunchy, crackling meringue top, chewy, light cake, and a creamy, vanilla custard filling layered in between. Anyone who has tried this cake has exclaimed, “This is the World’s Best Cake!” This German-inspired torte truly lives up to its name! Try it and see for yourself.
Pin
Rate
Remove Ads
Ingredients
Cream Filling:
- 1 ½ cups 2% or whole milk
- 2 egg yolks
- ⅓ cup granulated sugar
- 2 tablespoons cornstarch
- ⅛ teaspoon salt
- 2 teaspoon vanilla extract
Cake:
- ½ cup shortening
- ¾ cup powdered sugar
- 4 large eggs, separated and room temperature
- 3 tablespoons milk
- 1 cup all purpose flour or gluten free all purpose flour, (I recommend Cup4Cup gluten free flour)
- 1 teaspoon baking powder
- ¼ teaspoon salt
- ½ cup powdered sugar (for meringue)
- ½ cup granulated sugar (for meringue)
- ½ cup sliced almonds
- 2 tablespoons granulated sugar (for sprinkling)
Equipment
-
8 inch cake pans
-
Stand Mixer
-
Offset Spatula
-
Saucepan
-
Whisk
Instructions
Custard Filling
- Whisk the milk, 2 egg yolks, sugar, cornstarch, and salt together in a medium saucepan. Cook and stir over medium heat, stirring constantly, until the mixture thickens significantly and comes to a gentle boil. Continue to boil and stir for 1 minute to ensure proper thickening.
- Remove the saucepan from the heat and stir in the vanilla extract (or vanilla bean paste). Immediately press a piece of plastic wrap directly onto the surface of the custard to prevent a skin from forming as it cools. Set aside to cool to room temperature, then transfer to the refrigerator to chill thoroughly for at least 2-3 hours, or preferably overnight. The custard can be made 1-2 days in advance and stored in an airtight container in the refrigerator.
Cake and Meringue
- Preheat your oven to 325ºF (160ºC). Spray two 8-inch cake pans generously with cooking spray. Line the bottom of each pan with a circle of cut-to-size wax or parchment paper, then spray the paper as well. Set the prepared pans aside.
- In a large mixing bowl, using a stand mixer with a paddle attachment or a hand mixer, beat together the shortening, ¾ cup powdered sugar, egg yolks, and milk until thoroughly combined and smooth, scraping down the sides of the bowl as needed.
- Add the flour, baking powder, and ¼ teaspoon salt to the wet ingredients. Beat on medium speed for 1 minute, again scraping down the bowl to ensure everything is well-incorporated. The batter will be quite thick.
- Divide the thick cake batter evenly between the two prepared cake pans. Use an offset spatula or your greased fingertips to gently press and spread the batter evenly across the bottom of each pan. Set the pans aside.
- In a separate, very clean, dry bowl (preferably a metal or glass bowl for stability), beat the 4 room-temperature egg whites until they become foamy. Gradually add ½ cup powdered sugar and ½ cup granulated sugar, a couple of tablespoons at a time, continuously beating. Continue to beat the meringue until it becomes stiff, glossy, and holds beautiful peaks.
- Carefully spread half of the prepared meringue evenly over the cake batter in each pan. On top of the meringue, sprinkle each pan with half of the sliced almonds and 1 tablespoon of granulated sugar (total 2 tablespoons for both cakes).
- Bake for 35-40 minutes, or until the meringue is set, lightly golden, and a toothpick inserted into the cake portion (not just the meringue) comes out clean. The meringue will likely look done before the cake base. Cool the cake layers completely in their pans on a wire rack. This is crucial for easy removal.
Assembly
- Once the cake layers are completely cool, use a thin knife to carefully loosen the edges of each cake from its pan. Since the meringue side will be the top, handle with care.
- Using a small offset spatula and your hand, gently lift one cake layer out of its pan. If you used parchment paper, carefully peel it off the bottom. Place this first layer, meringue-side up, on your chosen serving platter.
- Evenly spread the thoroughly chilled custard filling over the first cake layer.
- Carefully remove the second cake layer from its pan, peeling off any parchment paper. Gently place this layer on top of the custard, meringue-side up.
- Refrigerate the assembled torte for at least 1 hour before serving. This allows the custard to fully set and the cake to firm up, making for cleaner slices. Use a serrated knife with a gentle sawing motion to cut slices, and refrigerate any leftovers in an airtight container for up to 3 days.
Notes
Recipe adapted from a vintage Betty Crocker cookbook, a testament to its enduring classic status.
Nutrition Facts (per serving)
Calories: 463kcal, Carbohydrates: 61g, Protein: 8g, Fat: 21g, Saturated Fat: 5g, Cholesterol: 135mg, Sodium: 169mg, Potassium: 224mg, Fiber: 1g, Sugar: 45g, Vitamin A: 230IU, Calcium: 120mg, Iron: 1.5mg
Did you make this recipe? Please leave a star rating and review below. It helps others when searching for recipes and I LOVE feedback!